Sponsored

SierraBronco

Wildtrak
Well-Known Member
Joined
Mar 27, 2024
Threads
41
Messages
5,284
Reaction score
14,278
Location
USA
Vehicle(s)
2022 Wildtrak, 2024 Wildtrak, 2024 Wildtrak
Your Bronco Model
Wildtrak
@SierraBronco I think I just found your install vid for your NVM belly skids. Thank you for that! The NVM instructions are not great. I'm doing the 74weld stage 1, e-swaybar disco, and NVM skids all in the same install, so that will be very helpful. Thanks!
Awesome! That’s why we shared it! Started off recording just to help us remember what goes where but figured might as well share the little helpful bits we discovered too! Glad it helped
Sponsored


userdude

Badlands
Well-Known Member
First Name
Jared
Joined
Feb 20, 2023
Threads
45
Messages
6,923
Reaction score
13,409
Location
Denton, TX
Vehicle(s)
2023 2dr Badsquatch
Your Bronco Model
Badlands
Clubs
 
@SierraBronco I think I just found your install vid for your NVM belly skids. Thank you for that! The NVM instructions are not great. I'm doing the 74weld stage 1, e-swaybar disco, and NVM skids all in the same install, so that will be very helpful. Thanks!
It's probably not fair to compare any instructions to the NASA-grade ones you get from 74Weld... lol 🤐

(But yeah, a lot of these fab shops don't do instructions at all or well.)
 

Roofus

Outer Banks
Well-Known Member
Joined
Nov 26, 2021
Threads
80
Messages
1,116
Reaction score
1,621
Location
Swamp
Vehicle(s)
M3/Bronco
Your Bronco Model
Outer Banks
Clubs
 
It's probably not fair to compare any instructions to the NASA-grade ones you get from 74Weld... lol 🤐

(But yeah, a lot of these fab shops don't do instructions at all or well.)
Yep 74weld instructions are just fine. But when I was going through the NVM instructions, I thought "They really shouldn't let the engineers write up the instructions for us normies." 🤣
 

Roofus

Outer Banks
Well-Known Member
Joined
Nov 26, 2021
Threads
80
Messages
1,116
Reaction score
1,621
Location
Swamp
Vehicle(s)
M3/Bronco
Your Bronco Model
Outer Banks
Clubs
 
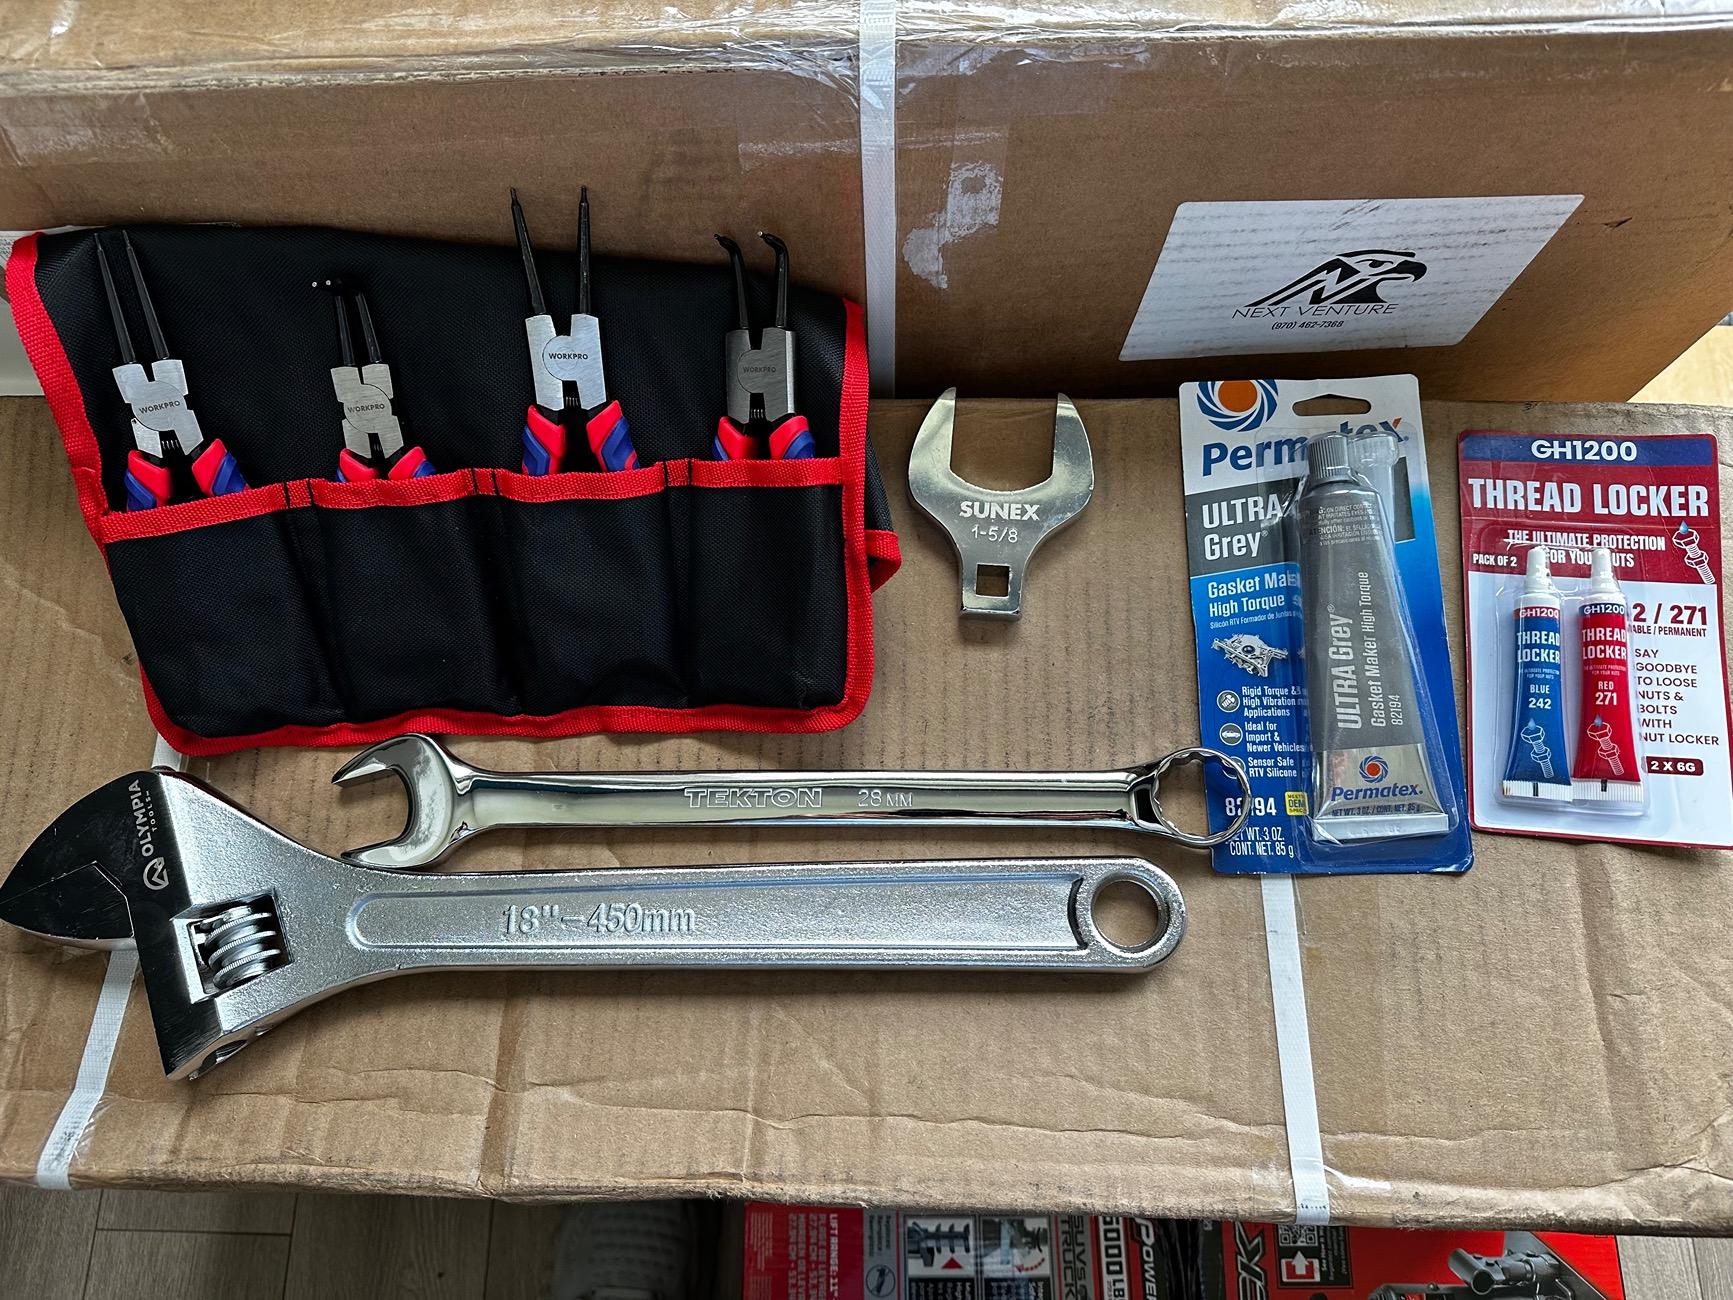
You guys think I’m good to go? Missing anything?
Standard tools covered… wrenches sockets etc
18” adjustable wrench
28mm crescent
1-5/8 crowfoot for putting on the Icons
Lock ring pliers
Thread locker/rtv

Ford Bronco 74weld stage 1 steering upgrade DIY install IMG_6349
 

Sponsored

SierraBronco

Wildtrak
Well-Known Member
Joined
Mar 27, 2024
Threads
41
Messages
5,284
Reaction score
14,278
Location
USA
Vehicle(s)
2022 Wildtrak, 2024 Wildtrak, 2024 Wildtrak
Your Bronco Model
Wildtrak
You guys think I’m good to go? Missing anything?
Standard tools covered… wrenches sockets etc
18” adjustable wrench
28mm crescent
1-5/8 crowfoot for putting on the Icons
Lock ring pliers
Thread locker/rtv

IMG_6349.jpeg
Seeing those snap ring pliers make me want to replace the 40 year old one I have that’s been abused mostly doing anything but snaprings 😂

I spy NVM boxes

That’s all I have to contribute. I haven’t done the stage one. I’d be interested to know how tight the passenger side tierod is though. I removed the driver side with normal channel locks but the passenger side was a whole different animal
 

Roofus

Outer Banks
Well-Known Member
Joined
Nov 26, 2021
Threads
80
Messages
1,116
Reaction score
1,621
Location
Swamp
Vehicle(s)
M3/Bronco
Your Bronco Model
Outer Banks
Clubs
 
Seeing those snap ring pliers make me want to replace the 40 year old one I have that’s been abused mostly doing anything but snaprings 😂

I spy NVM boxes

That’s all I have to contribute. I haven’t done the stage one. I’d be interested to know how tight the passenger side tierod is though. I removed the driver side with normal channel locks but the passenger side was a whole different animal
Good eye, Popeye!
I've had giant boxes sitting around for weeks to get everything ready. I am very lucky to have a wife who is into overlanding! ha!

E-swaybar disconnect went on Saturday in the parking garage. That one was an easy 40min job. 6 bolts, swap, 6 bolts, done. Now just need to do wiring to the aux switch.

We work out of state so I just have a condo parking garage to do my small projects. We're driving home this weekend and I'll have my garage to do the rest. So once I'm in the garage I'll do the Stage 1 and the NVM belly skids. And the NVM rear diff and shock skids are at the powder coaters, so I'll do those whenever I get them back.

I'll buy a 4 foot Roam awning for the back of the roof rack on labor day sale and I think I'm done for the year. Next year I'll do king shocks and storage system in the rear and I think we'll be set for our trip to Moab next year. But first up is Vermont in October and Georgia Traverse in either November or next Feb/March.
 

Brostango

Badlands
Well-Known Member
Joined
Apr 24, 2022
Threads
18
Messages
168
Reaction score
384
Location
Bay Area, CA
Vehicle(s)
2005 F150 Crew, 2016 ATS Coupe
Your Bronco Model
Badlands
Clubs
 
You guys think I’m good to go? Missing anything?
Standard tools covered… wrenches sockets etc
18” adjustable wrench
28mm crescent
1-5/8 crowfoot for putting on the Icons
Lock ring pliers
Thread locker/rtv

IMG_6349.jpeg
Gasket scrapper or razor blades and compressed air to blow the crud out.
 

Roofus

Outer Banks
Well-Known Member
Joined
Nov 26, 2021
Threads
80
Messages
1,116
Reaction score
1,621
Location
Swamp
Vehicle(s)
M3/Bronco
Your Bronco Model
Outer Banks
Clubs
 

userdude

Badlands
Well-Known Member
First Name
Jared
Joined
Feb 20, 2023
Threads
45
Messages
6,923
Reaction score
13,409
Location
Denton, TX
Vehicle(s)
2023 2dr Badsquatch
Your Bronco Model
Badlands
Clubs
 
Safety glasses and perhaps some mechanix gloves, I smashed my hand pretty good getting it out and stuff will fall on your face as you're working. Also, I don't know if you're planning to use jack stands, but I found some pretty good tire ramps online if you're interested. Delivered in two days.
 

Sponsored

WalkerTR

Outer Banks
Member
First Name
Tony
Joined
Jan 19, 2022
Threads
1
Messages
12
Reaction score
7
Location
Florence, Alabama
Vehicle(s)
2018 F150, 1978 Bronco
Your Bronco Model
Outer Banks
Good eye, Popeye!
I've had giant boxes sitting around for weeks to get everything ready. I am very lucky to have a wife who is into overlanding! ha!

E-swaybar disconnect went on Saturday in the parking garage. That one was an easy 40min job. 6 bolts, swap, 6 bolts, done. Now just need to do wiring to the aux switch.

We work out of state so I just have a condo parking garage to do my small projects. We're driving home this weekend and I'll have my garage to do the rest. So once I'm in the garage I'll do the Stage 1 and the NVM belly skids. And the NVM rear diff and shock skids are at the powder coaters, so I'll do those whenever I get them back.

I'll buy a 4 foot Roam awning for the back of the roof rack on labor day sale and I think I'm done for the year. Next year I'll do king shocks and storage system in the rear and I think we'll be set for our trip to Moab next year. But first up is Vermont in October and Georgia Traverse in either November or next Feb/March.
Wondering if you purchased the 4 foot awning. I'm very interested in doing the same. I am debating between the 4 and 5 foot. You don't see many mounted this way, but I think will be perfect for my needs. Any lessons learned?
 

Roofus

Outer Banks
Well-Known Member
Joined
Nov 26, 2021
Threads
80
Messages
1,116
Reaction score
1,621
Location
Swamp
Vehicle(s)
M3/Bronco
Your Bronco Model
Outer Banks
Clubs
 
Wondering if you purchased the 4 foot awning. I'm very interested in doing the same. I am debating between the 4 and 5 foot. You don't see many mounted this way, but I think will be perfect for my needs. Any lessons learned?
I’m literally in the process of installing the awning, roam rugged mounts, and my Starlink on the rack this weekend. It has been a freaking jigsaw puzzle. I’ll try to snap some pics today. I was at it all day yesterday and had to change my original plan on mounting the awning brackets and didn’t realize at the time that would change the mounting position of how far out I needed to extend the bracket. So after spending all day with it I had to pull the awning brackets off so that I can drill new holes in the “L” bracket. Such a pain. I think it will all come together. It’s just been a nightmare because the brackets are steel and keep melting my drill bits.
 

WalkerTR

Outer Banks
Member
First Name
Tony
Joined
Jan 19, 2022
Threads
1
Messages
12
Reaction score
7
Location
Florence, Alabama
Vehicle(s)
2018 F150, 1978 Bronco
Your Bronco Model
Outer Banks
I’m literally in the process of installing the awning, roam rugged mounts, and my Starlink on the rack this weekend. It has been a freaking jigsaw puzzle. I’ll try to snap some pics today. I was at it all day yesterday and had to change my original plan on mounting the awning brackets and didn’t realize at the time that would change the mounting position of how far out I needed to extend the bracket. So after spending all day with it I had to pull the awning brackets off so that I can drill new holes in the “L” bracket. Such a pain. I think it will all come together. It’s just been a nightmare because the brackets are steel and keep melting my drill bits.
Thanks for the feedback. Are you okay with the four foot awning? I was considering the five knowing that it would extend about 6 inches on both sides of my roof rack. Do you plan on keeping the awning on all the time or just when you travel/need it.
 

Roofus

Outer Banks
Well-Known Member
Joined
Nov 26, 2021
Threads
80
Messages
1,116
Reaction score
1,621
Location
Swamp
Vehicle(s)
M3/Bronco
Your Bronco Model
Outer Banks
Clubs
 
Thanks for the feedback. Are you okay with the four foot awning? I was considering the five knowing that it would extend about 6 inches on both sides of my roof rack. Do you plan on keeping the awning on all the time or just when you travel/need it.
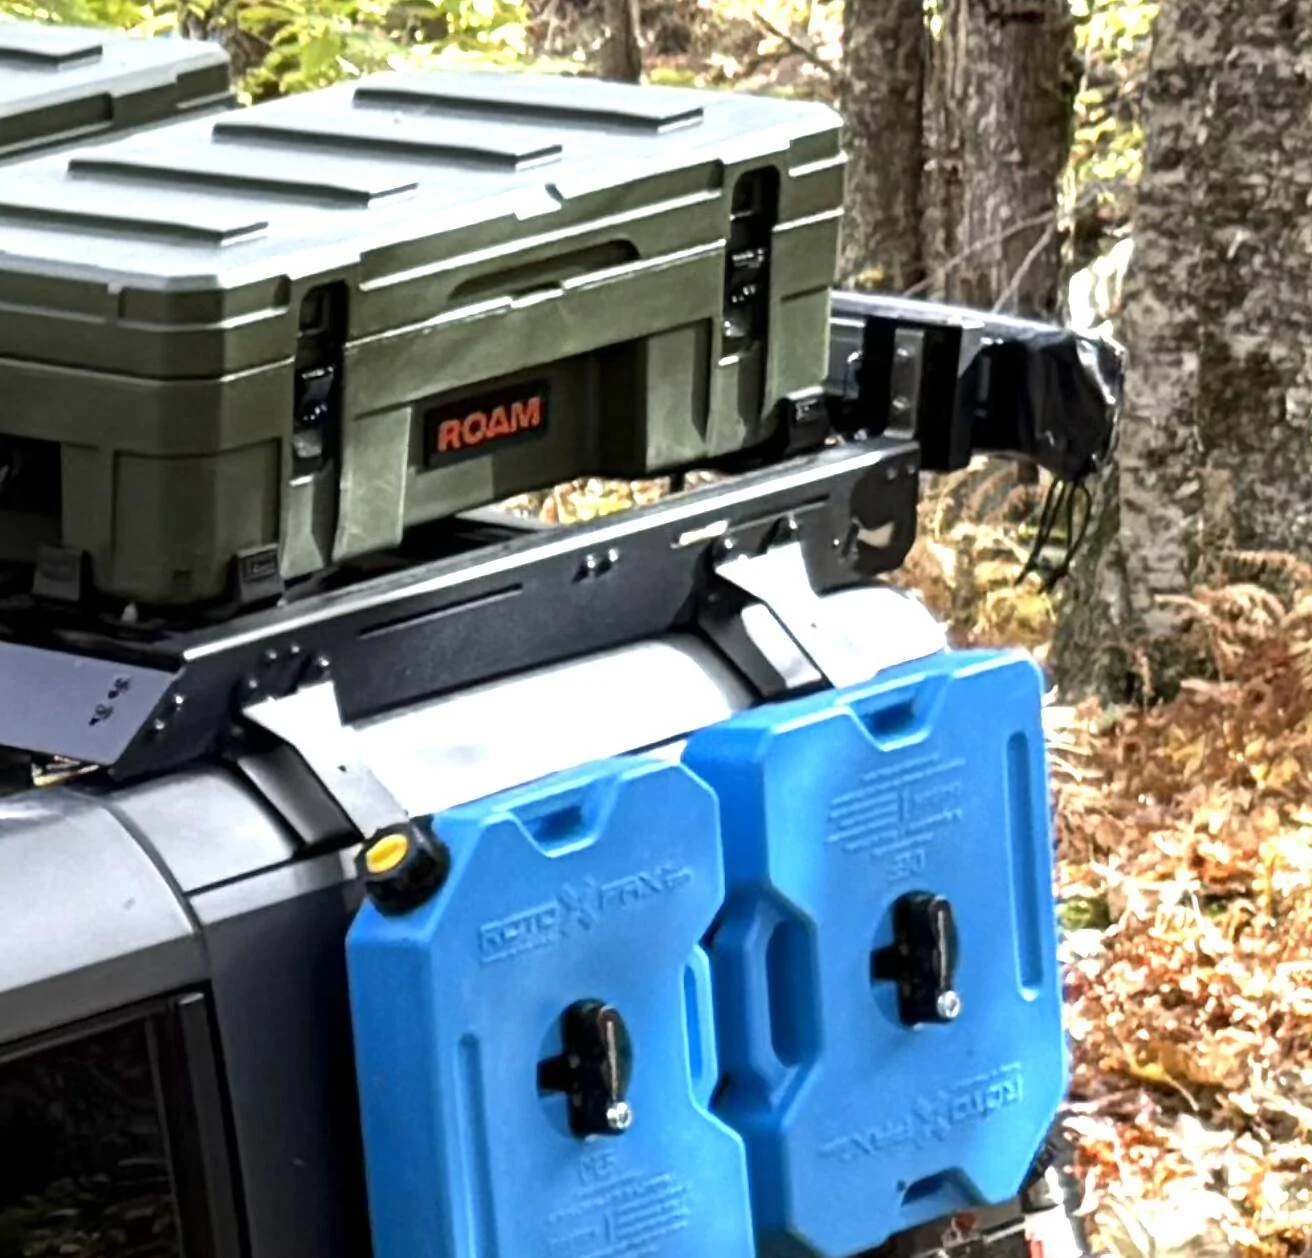
I used these: https://racksbraxusa.com/hd-racksbrax/ They allow you to remove the awning when you're not camping without having to remove the brackets.

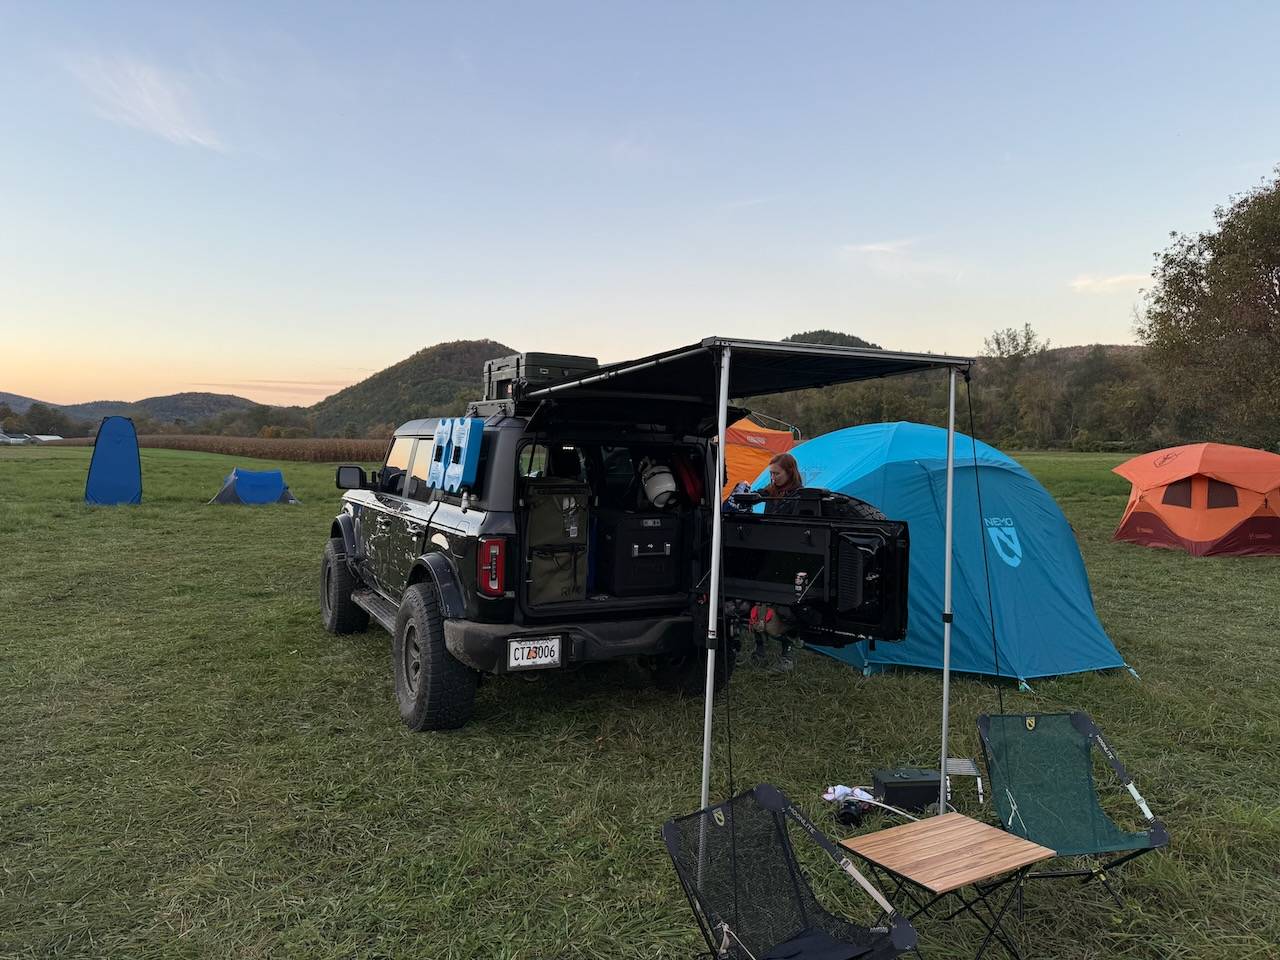
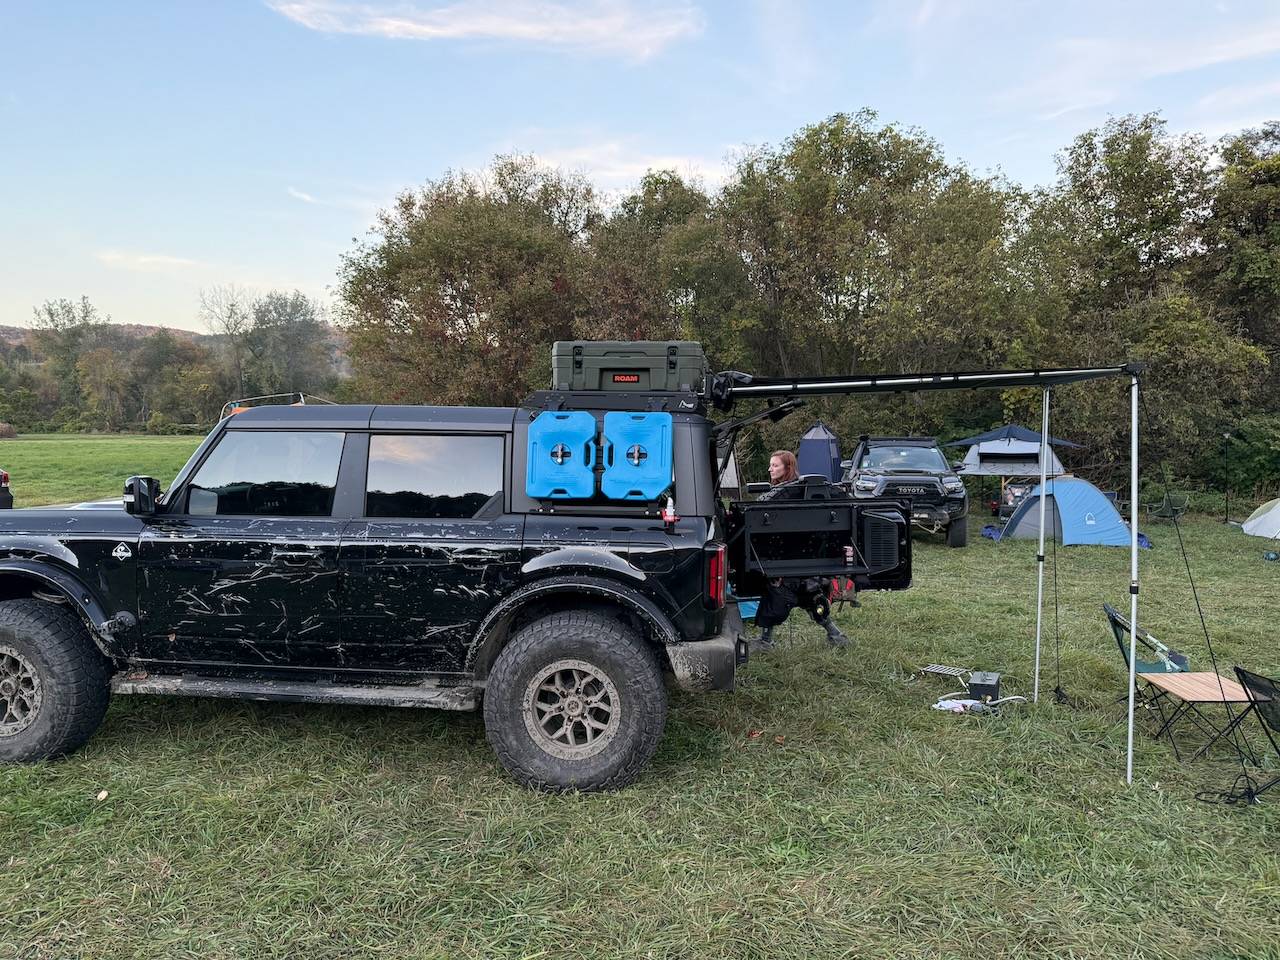
The 4ft was perfect for our needs and the fit is exactly what I hoped for. I think a 5' would be too big and hang off the sides too much. I unfortunately don't have a straight on shot from the rear and I've already taken it off. It's hard to tell, but it hangs off about 1.5" past the edge of the rack, but does not push out past the pakrax on the sides. I'd knock off a Rotopax before I'd clip the edge of the awning by a good margin.

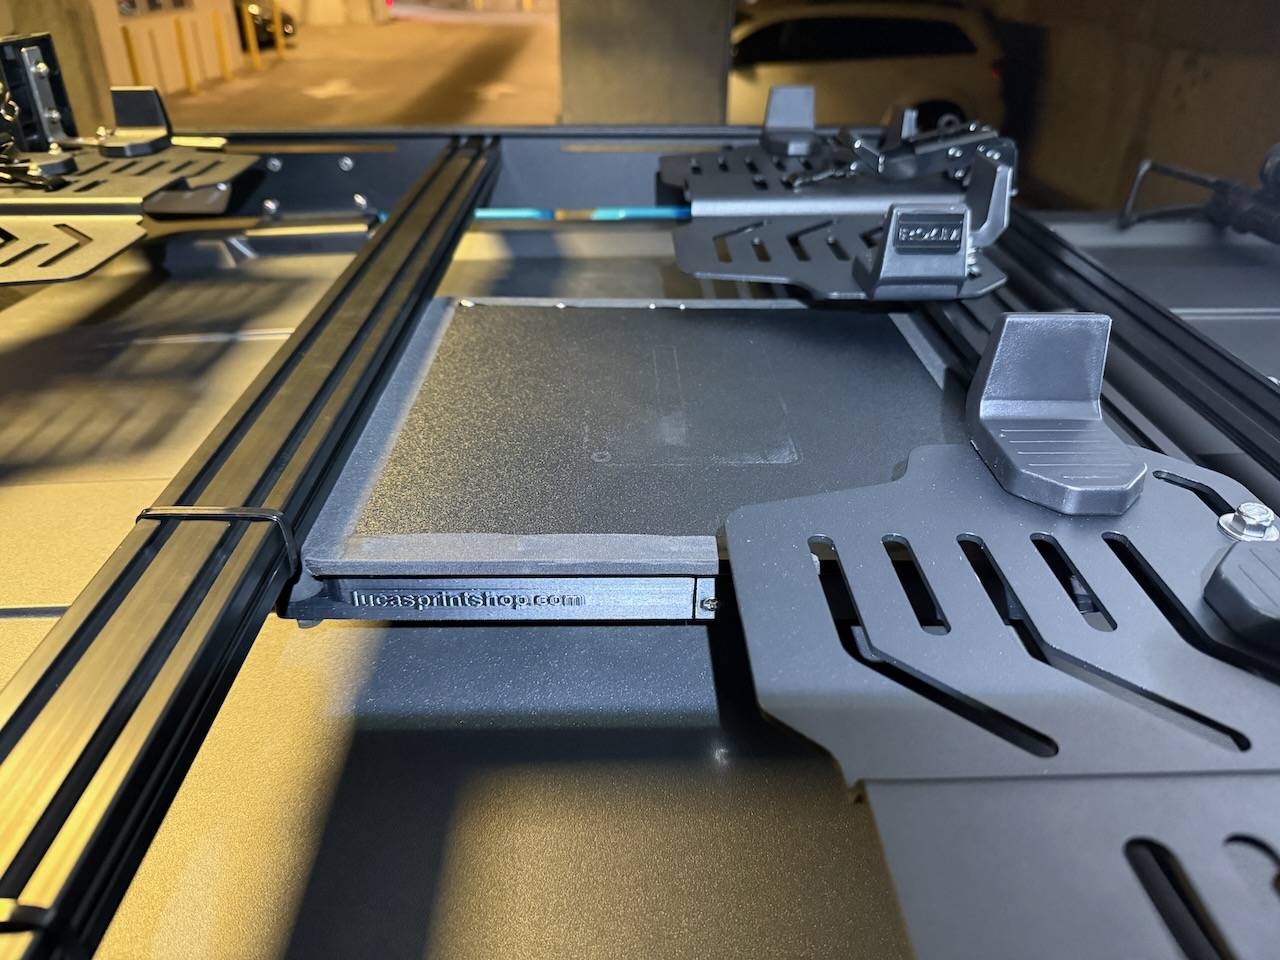
Attached some pics of the starlink mini mounted and the awning.

Ford Bronco 74weld stage 1 steering upgrade DIY install IMG_6994
Ford Bronco 74weld stage 1 steering upgrade DIY install IMG_7060
Ford Bronco 74weld stage 1 steering upgrade DIY install IMG_7059
Ford Bronco 74weld stage 1 steering upgrade DIY install Screenshot 2024-10-14 at 1.18.44 PM
 

WalkerTR

Outer Banks
Member
First Name
Tony
Joined
Jan 19, 2022
Threads
1
Messages
12
Reaction score
7
Location
Florence, Alabama
Vehicle(s)
2018 F150, 1978 Bronco
Your Bronco Model
Outer Banks
I used these: https://racksbraxusa.com/hd-racksbrax/ They allow you to remove the awning when you're not camping without having to remove the brackets.

The 4ft was perfect for our needs and the fit is exactly what I hoped for. I think a 5' would be too big and hang off the sides too much. I unfortunately don't have a straight on shot from the rear and I've already taken it off. It's hard to tell, but it hangs off about 1.5" past the edge of the rack, but does not push out past the pakrax on the sides. I'd knock off a Rotopax before I'd clip the edge of the awning by a good margin.

Attached some pics of the starlink mini mounted and the awning.

IMG_6994.jpeg
IMG_7060.jpeg
IMG_7059.jpeg
Screenshot 2024-10-14 at 1.18.44 PM.jpg
Great Information. I'm also using a half roof rack and the same roam gear. Looking at you awning pics I believe you are correct about the 5 foot poking out a little to far. Saved me a return, and thanks for adding the links for how you attached the awning. Perfect response for me.
Sponsored


Top