

- Thread starter
- #61
The mystery deepens. Thanks!Mid Package (312A) comes with Ambient footwell lighting as well. I have it on my 2-door and have more than adequate lighting for my needs.
Great job on the writeup @Theherofails
Sponsored
The mystery deepens. Thanks!Mid Package (312A) comes with Ambient footwell lighting as well. I have it on my 2-door and have more than adequate lighting for my needs.
Great job on the writeup @Theherofails
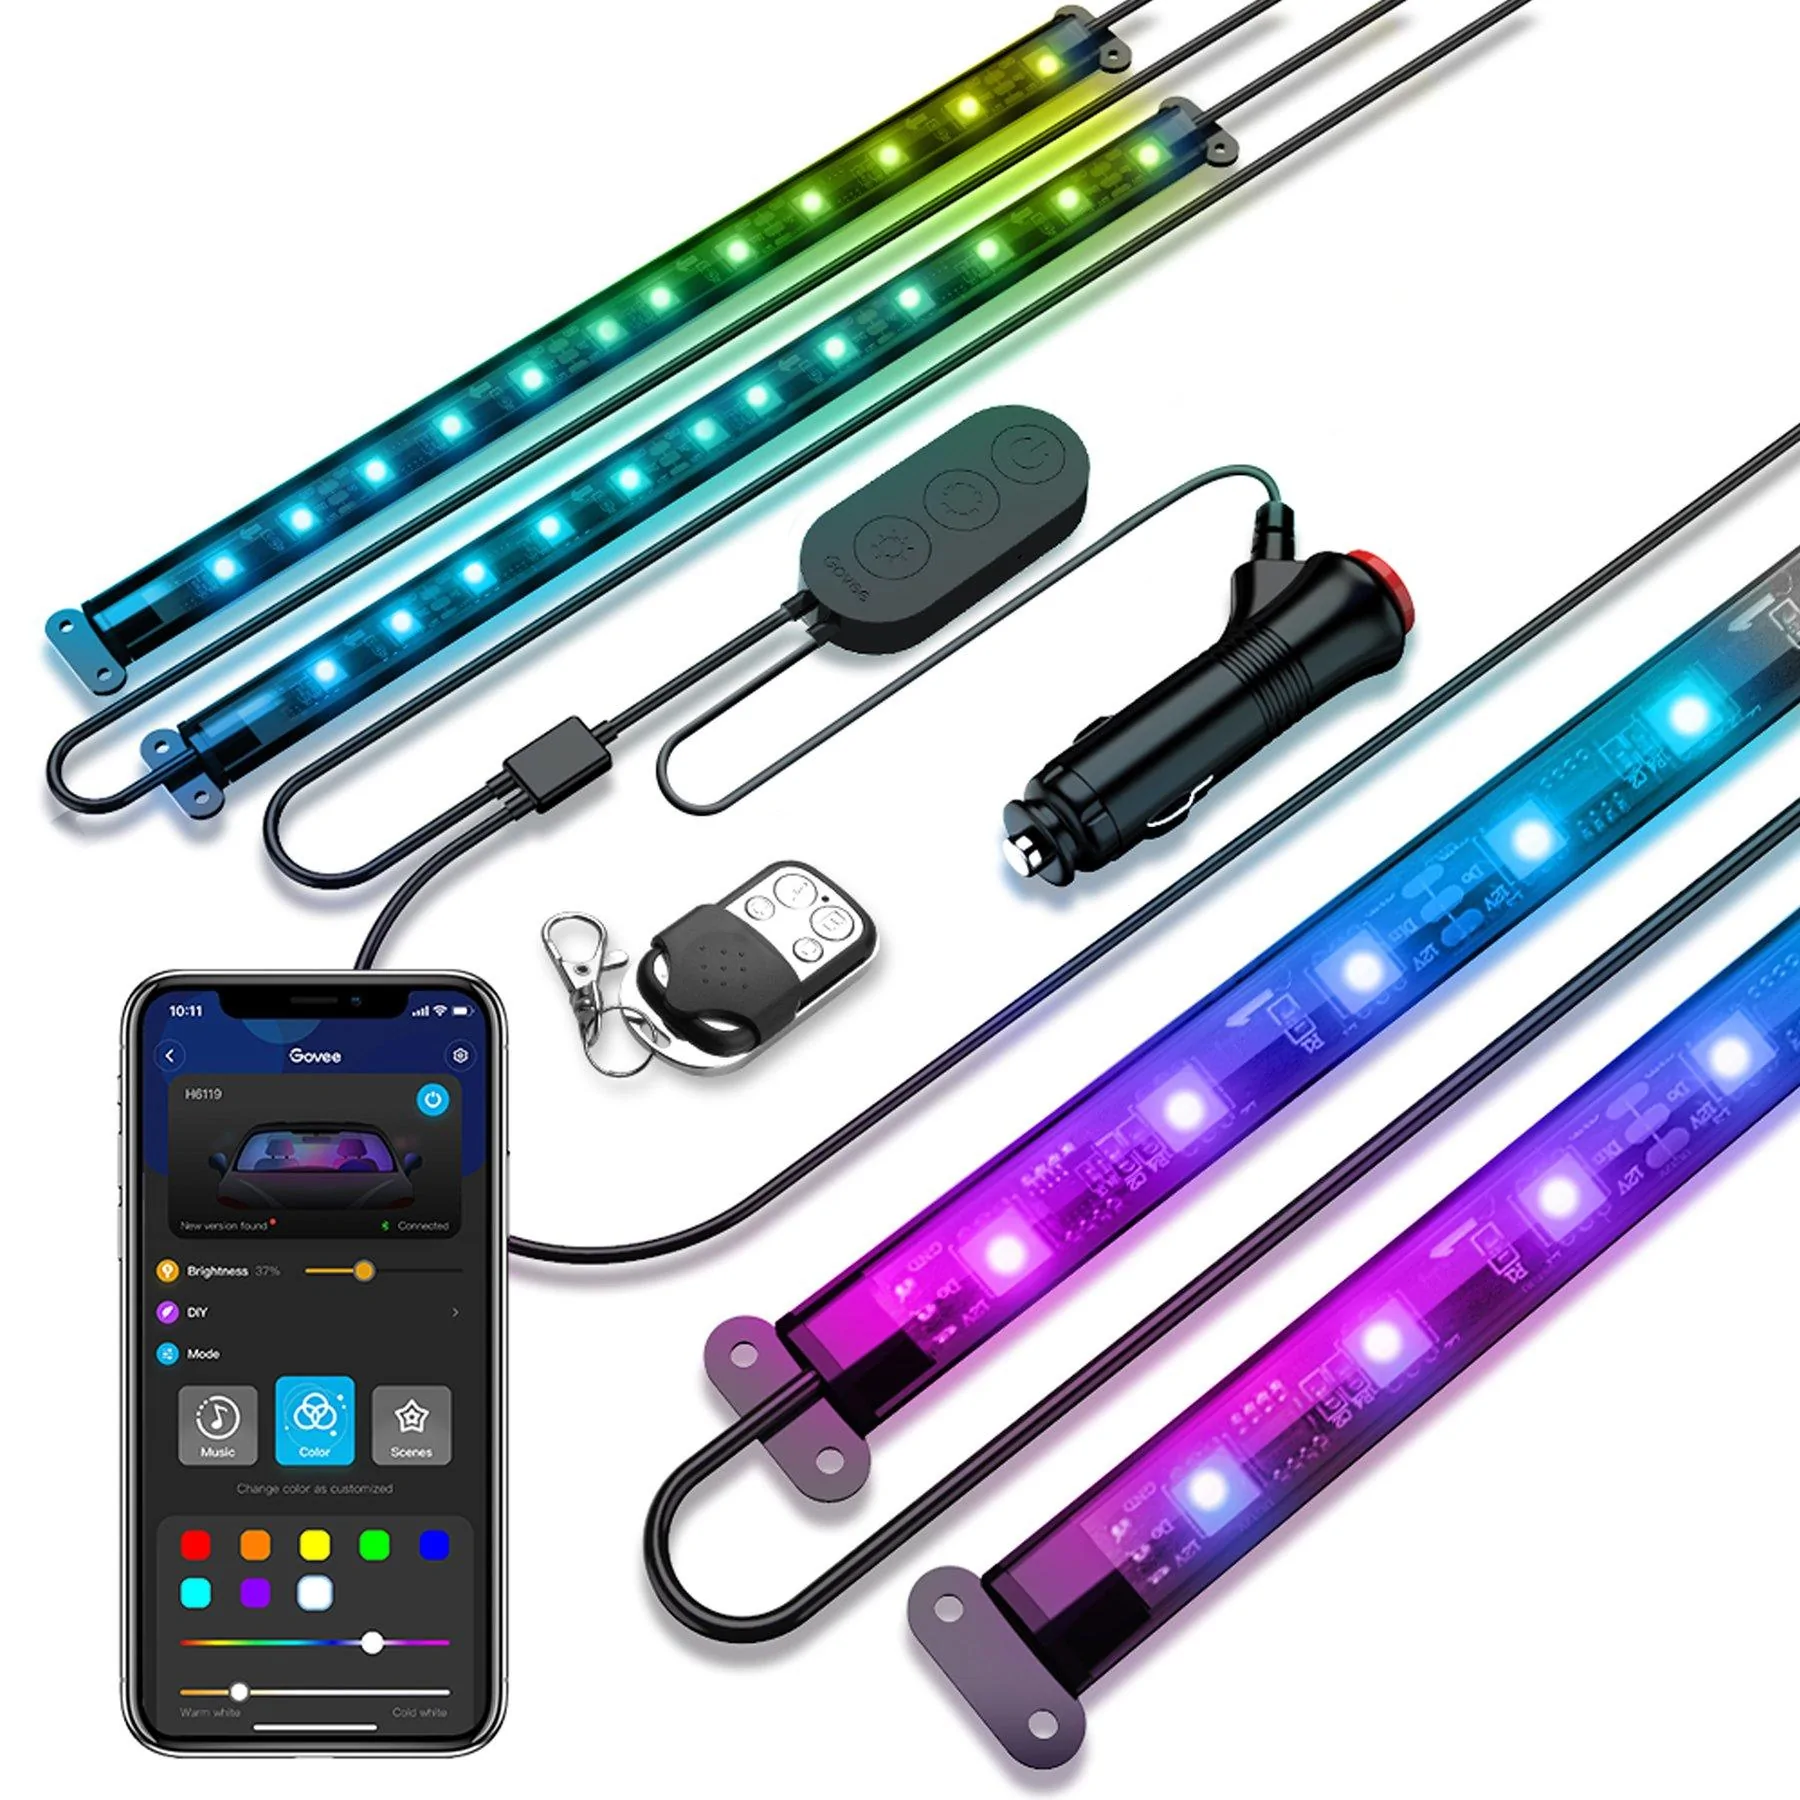
Really nice write-up. Had not thought about doing this but now that my badlands is tinted I may do this as well!This is the lighting kit used.
TOTAL INSTALL TIME: 45 minutes.
(I know the guide is messy, consider this a beta until I figure out formatting to a tolerable level)
This is a "simple" guide to installing interior ambient lighting, as the Bronco w/hard top is VERY dark inside - especially once your windows are tinted. The goal was to get it as close to factory while keeping the cost affordable. This is footwell lighting and there will be a different tutorial for proper cabin lighting to replicate the missing dome light. The linked lighting kit is fully bluetooth and you control everything from your cell phone.
This install uses upfitter switch 6 (Yellow/Orange) as a manual bypass but lights will turn on and off with the vehicle if left in the on position. I did this because there are times when I don't want a lot of interior light - doors off, for example. If you don't need the bypass, your install will vary slightly. You'll need to tie into a 12v power that turns off with the vehicle. Center console is an 'always on' power source, so not ideal.
The install vehicle is a Badlands with wash out interior. This matters more than you would think - how you attach the LED lighting is going to vary based on your vehicle interior. Leather interior with carpet will likely need different LED placement below the seats. I would likely use the same method but attach to the bottom of the seat instead of the floor. No chance of getting anything sticky to stick to the vinyl, so bottom of the seat is out.
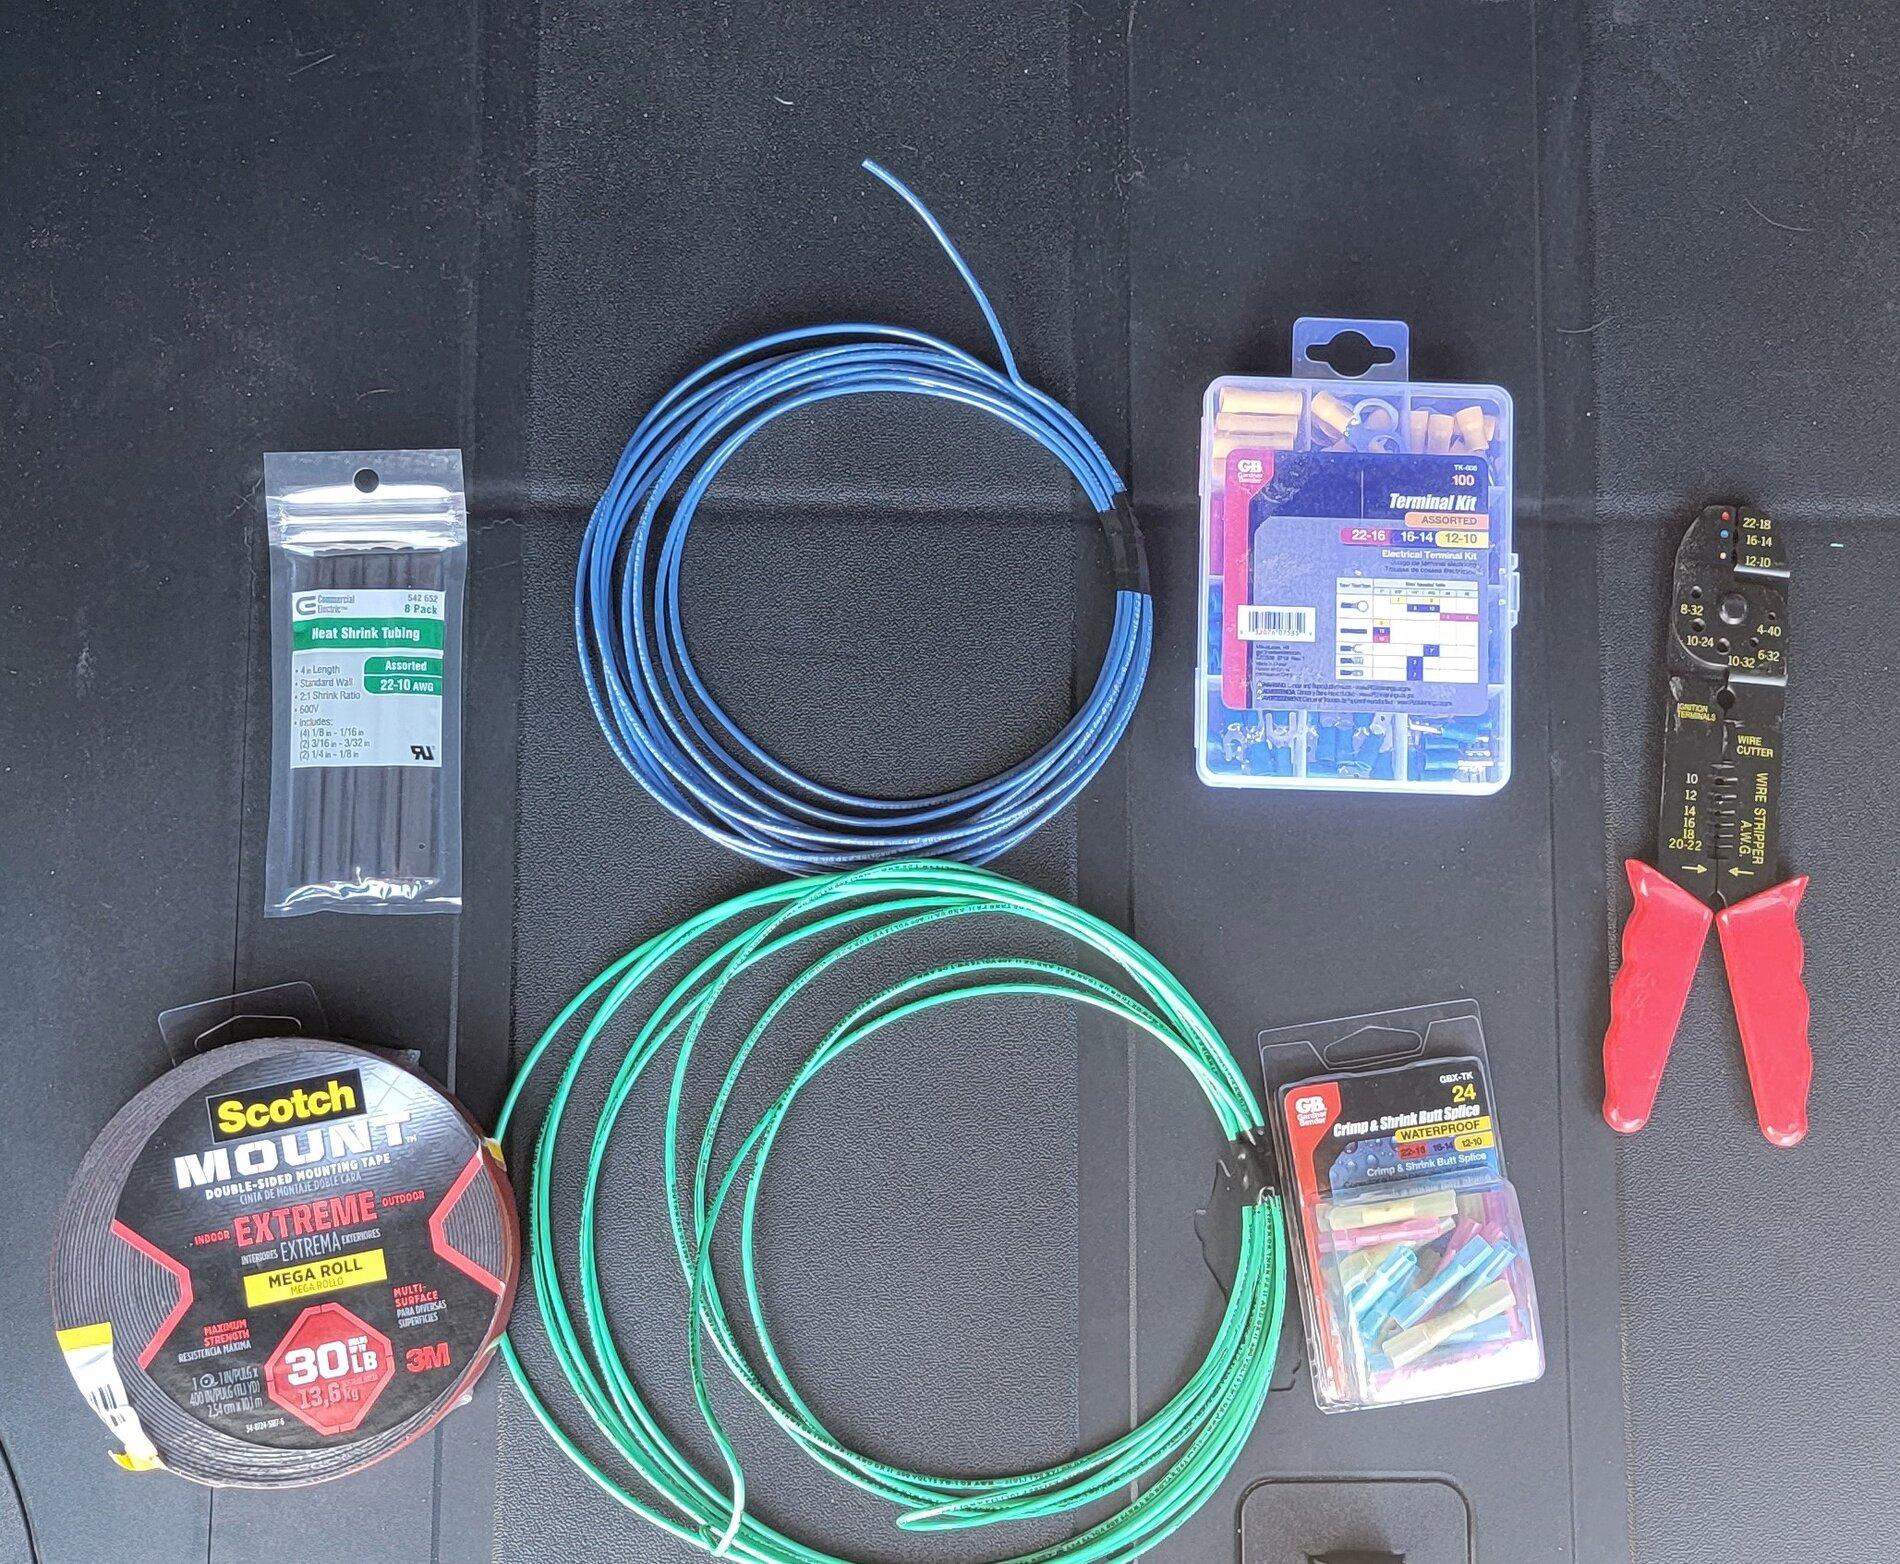
Tools and Materials Needed:
![]()
- 10 feet of stranded 16 gauge wire. Trailer wire would work fine. I used blue for lighting.
- 1ft stranded 16 gauge wire for ground.
- 3M EXTREME install double sided tape
- Crimp Solder connectors for 12-16 gauge wire & heat source to heat shrink wrap.
- 1 Ring style connector for Ground lug
- T15 bit & Screwdriver (not pictured)
- Shrink Wrapping is optional and would only be needed if soldering wires instead of using connectors
- Sharp knife or scissors
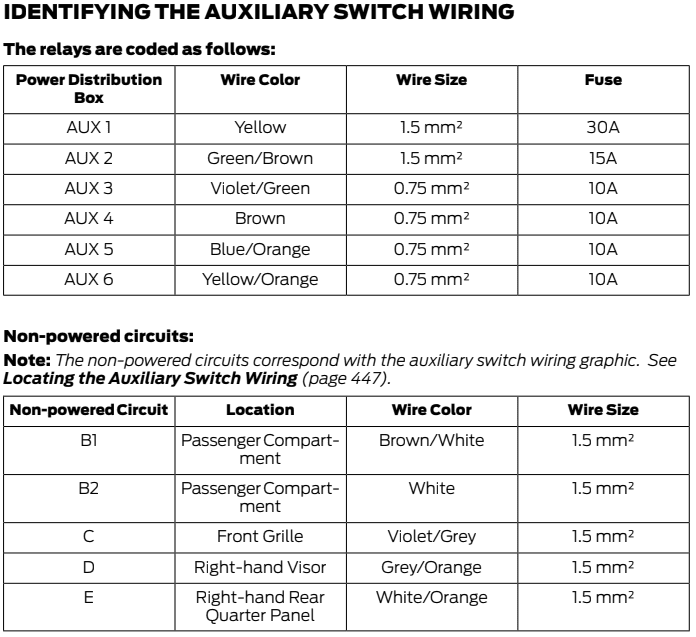
First, some reference material.
![]()
![]()
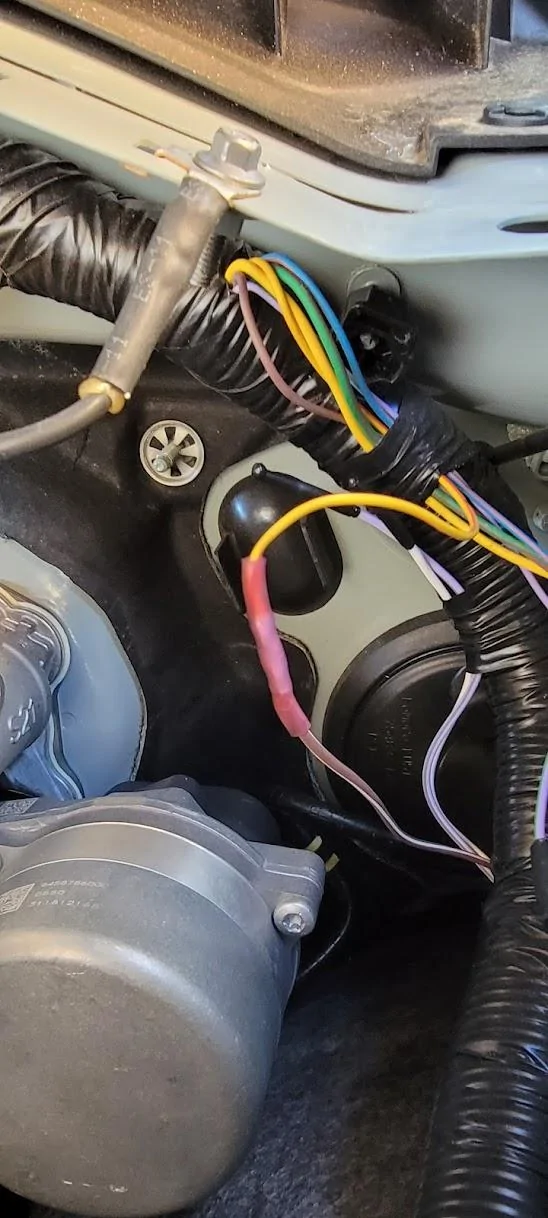
Aux6 is Yellow/Orange and we will be attaching
that to Brown/White under the hood, which in turn
is found behind the glove box. I used crimp solder butt
connectors, which are weatherproof. This gives us 12v
behind the glove box.
Follow the instructions for your connector choice (or solder).![]()
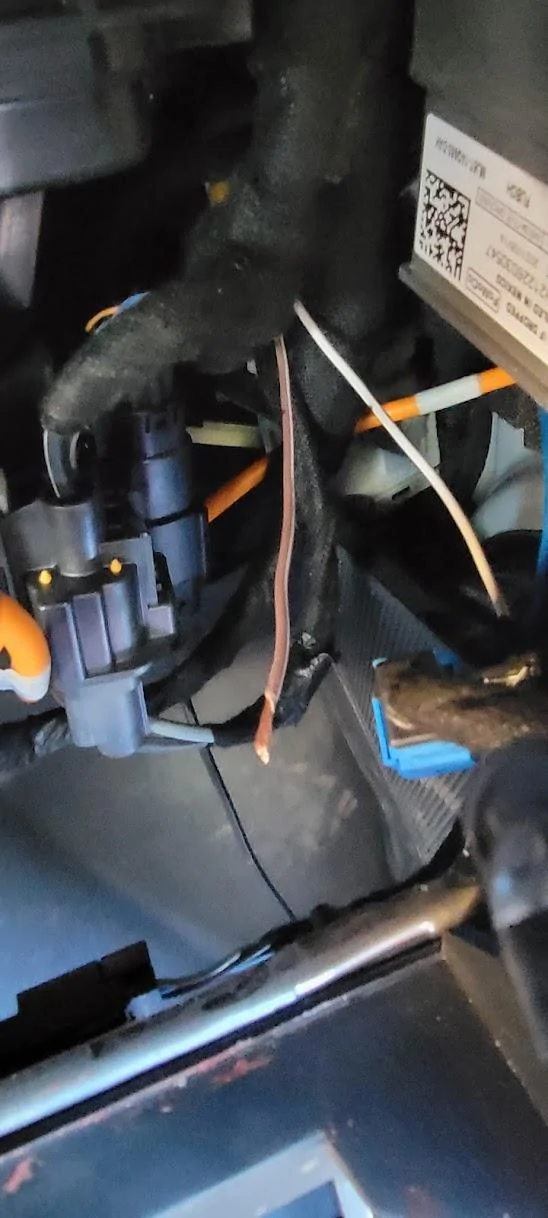
There are two wires behind the glove box that are part of the upfitter switch system.The brown/white wire now has 12v and will power the LED system.
To remove the glove box, push in on the tab located on each side of the glove box and let it drop down out of the way.![]()
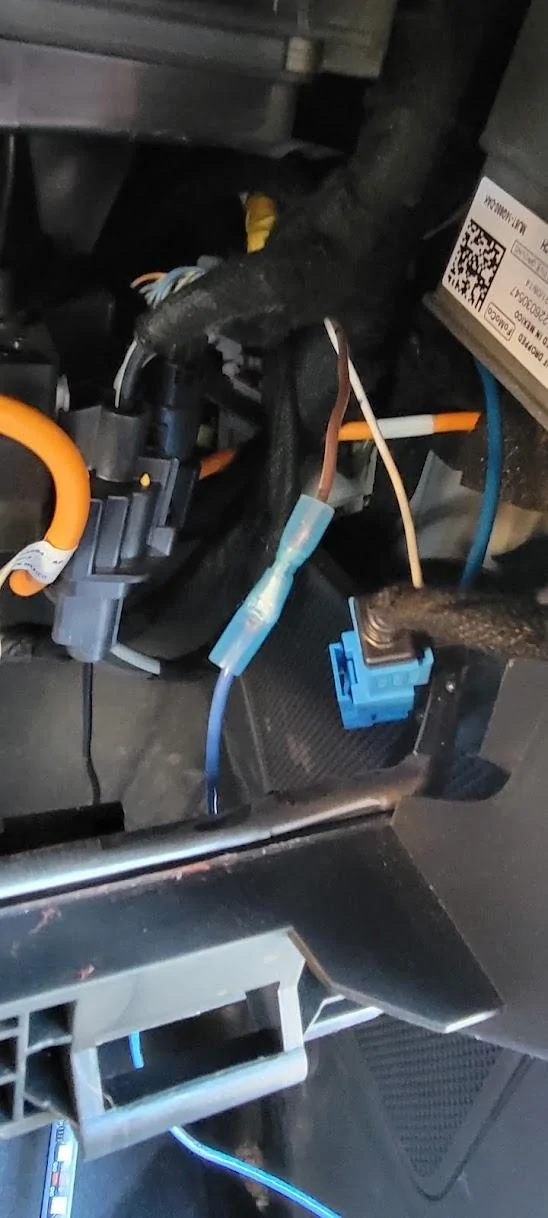
Next, attach your 10 foot section of 14-16AWG wire with your connector of choice. Here you can see the blue wire as I was connecting it to the brown/white wire from the previous step. This was taken prior to using heat to shrink the blue sleeve down onto the wires for a permanent attachment.
You'll want to snake the wire behind the trim in the
passenger footwell that houses the speaker grill.
This panel really isn't attached in any meaningful
way, so you should have zero issue sliding it under
the edge until you hit the section in the next step.
Start up top behind the glove box and slide it under
down until you hit the door sill.![]()
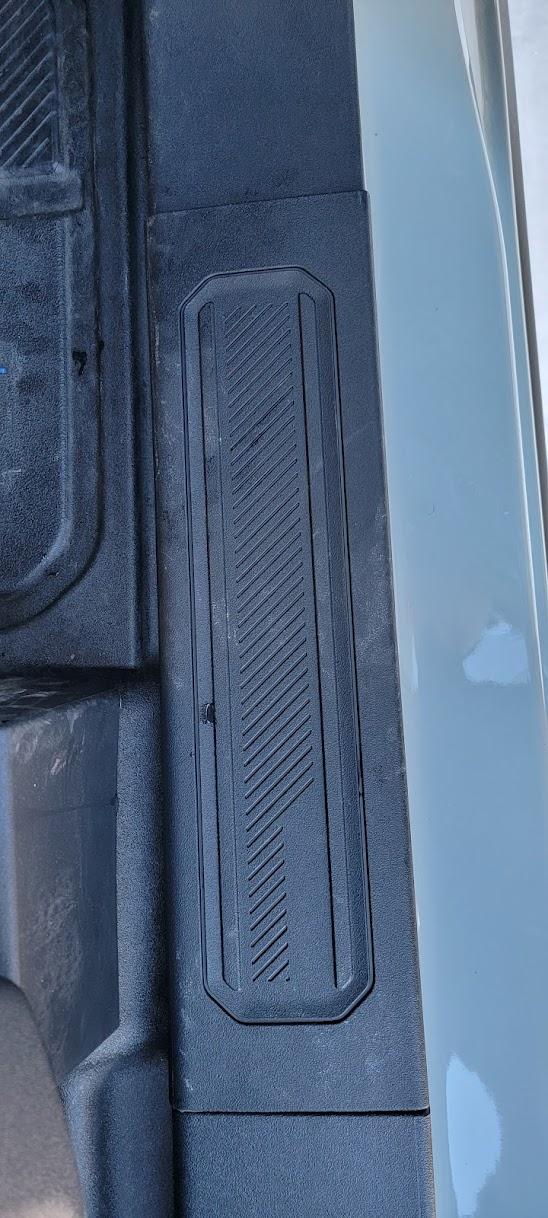
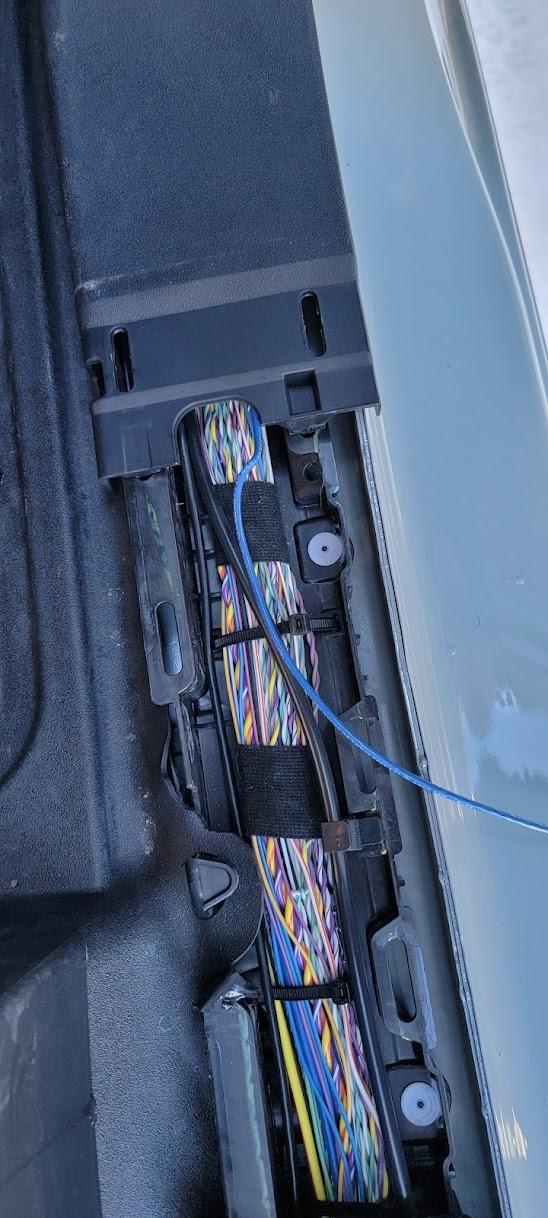
This trim piece is actually the cover for the main cable channel for your Bronco. Grab with your fingers and gently pry.The entire panel will come off, exposing the wiring beneath it.![]()
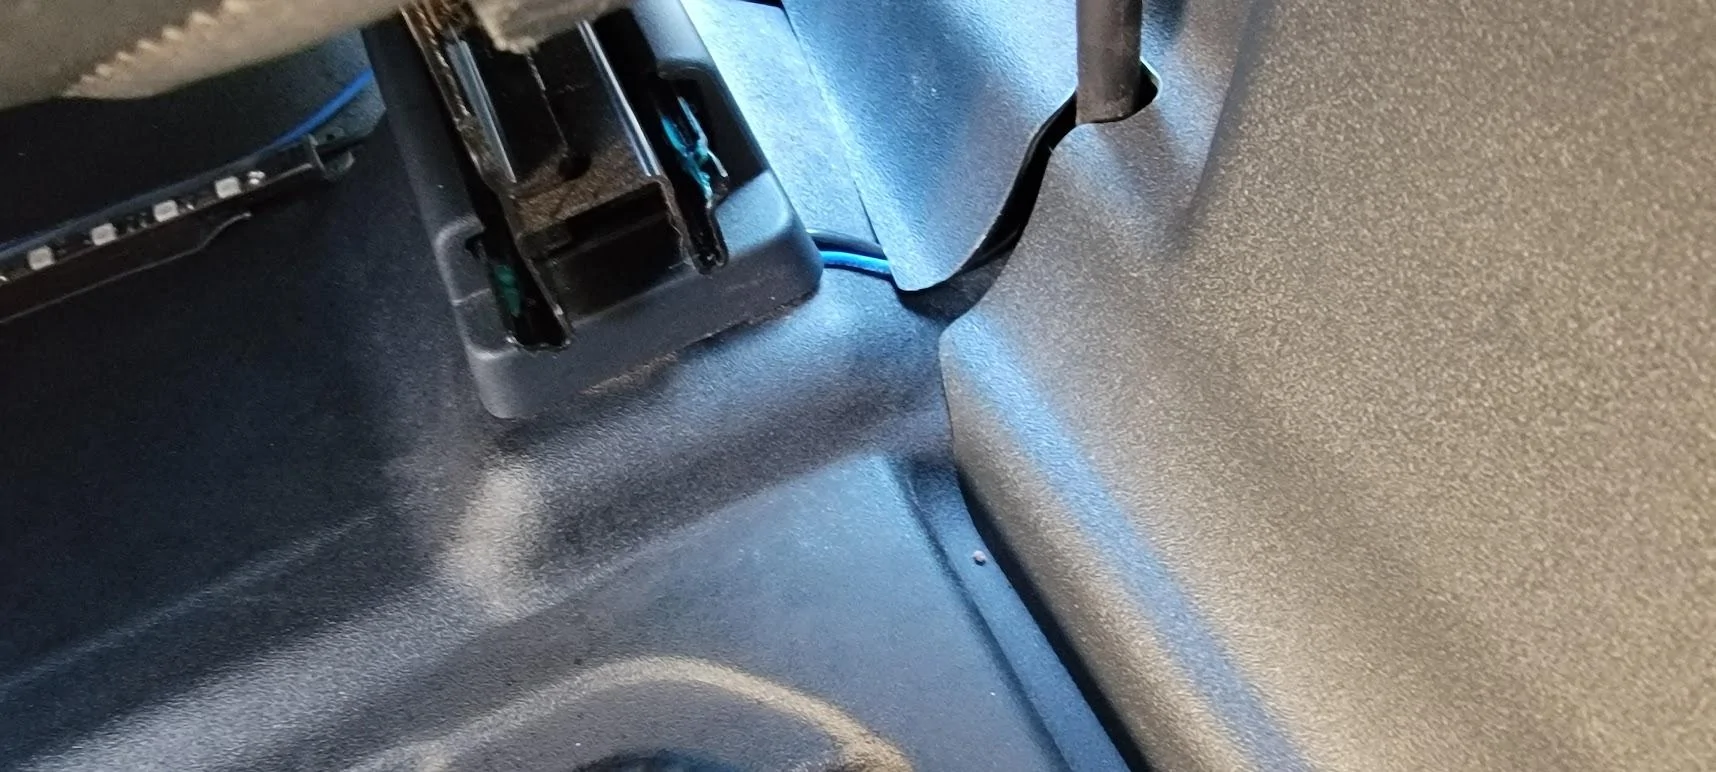
Continue to run the blue wire until you hit the rear
trim piece towards the bottom of the photo.
Slightly wiggling this piece will allow it to pop up
enough for you to continue routing the blue wire
until you hit the cut out for the seat belt, as shown in
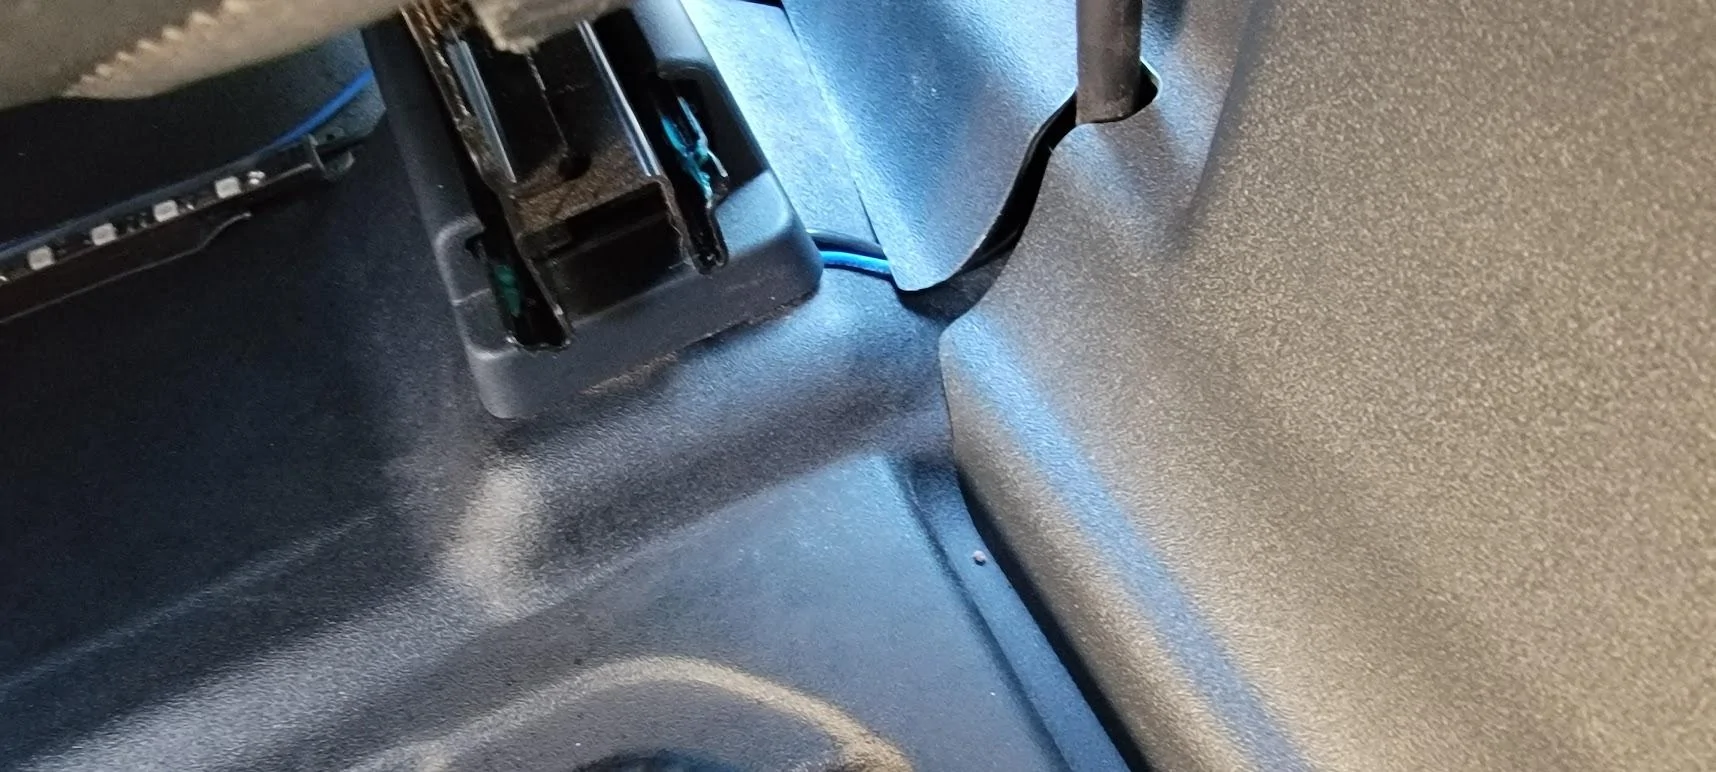
next photo. This is behind the B-Pillar, at the back of the passenger front seat.![]()
The black object coming out of the cut out and leaving the top of
the photo is your actual seatbelt. This is going to be our exit point
(and entry point for a later step) for the blue 12v power cable.
At this point, we need to start installing the lights.
So now that we have power where we need it, we need to install the actual LED wiring harness. This is where things get tricky to explain. The LED kit in question is a Y wiring harness, and the center point for this harness is the rear center console, between the front two seats. You'll route one set of 2 LED strips to the left, and the other set to the right.
![]()
In the photo, you can see the 12v plug going to the control module, which exits and splits into the Y. Set the LED kit in the back seat on the floor directly behind your center console. This is the central install point. From here, you will attach the first LED strip on the left and right side to the bottom of the rear seats.
![]()
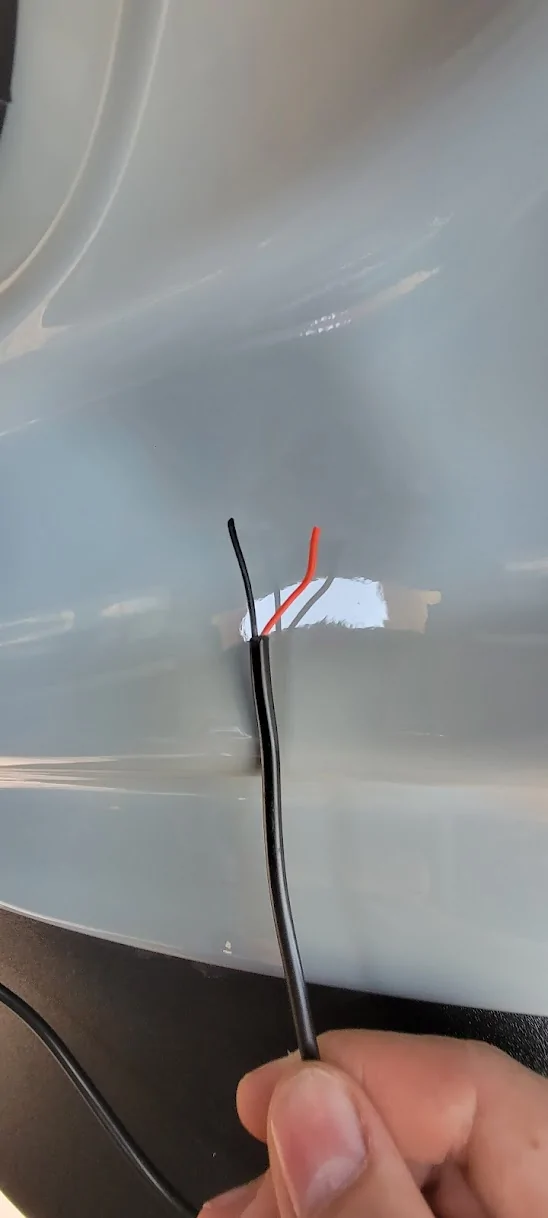
Chop off the 12v connector to reveal a black and red wire.
Black = ground
Red = 12v![]()
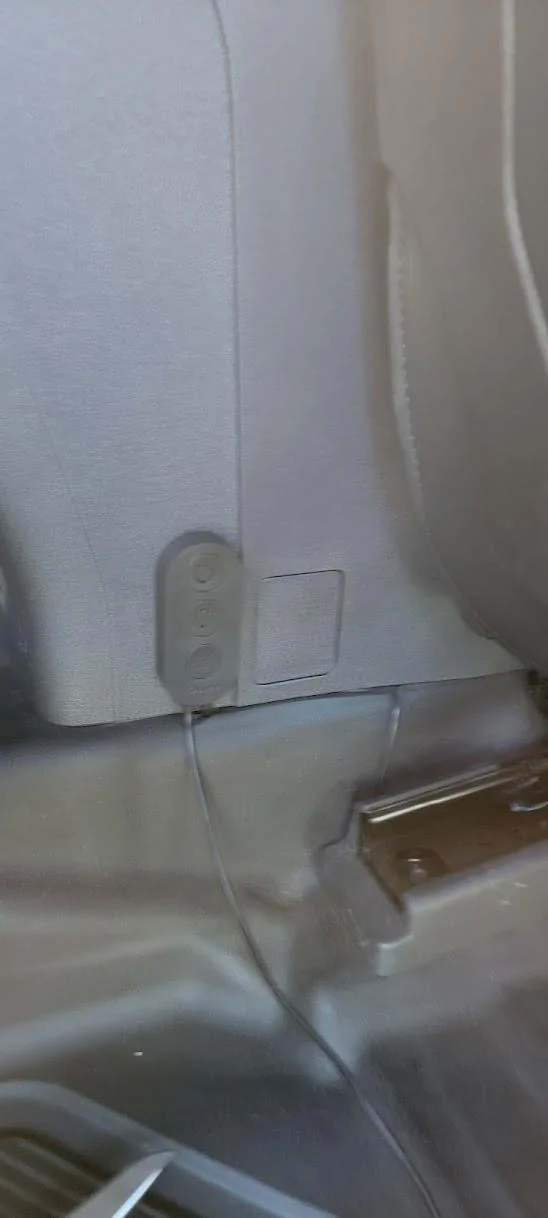
I attached the control module to the rear of the console using a section of the 3M extreme tape. The included stuff is garbage. Make sure to clean the area first. Once your control module is placed, you'll want to shove the left extra wire under the center console to keep the install tidy. The loose cable gets routed under the trim piece attached to seat rail in a following step.![]()
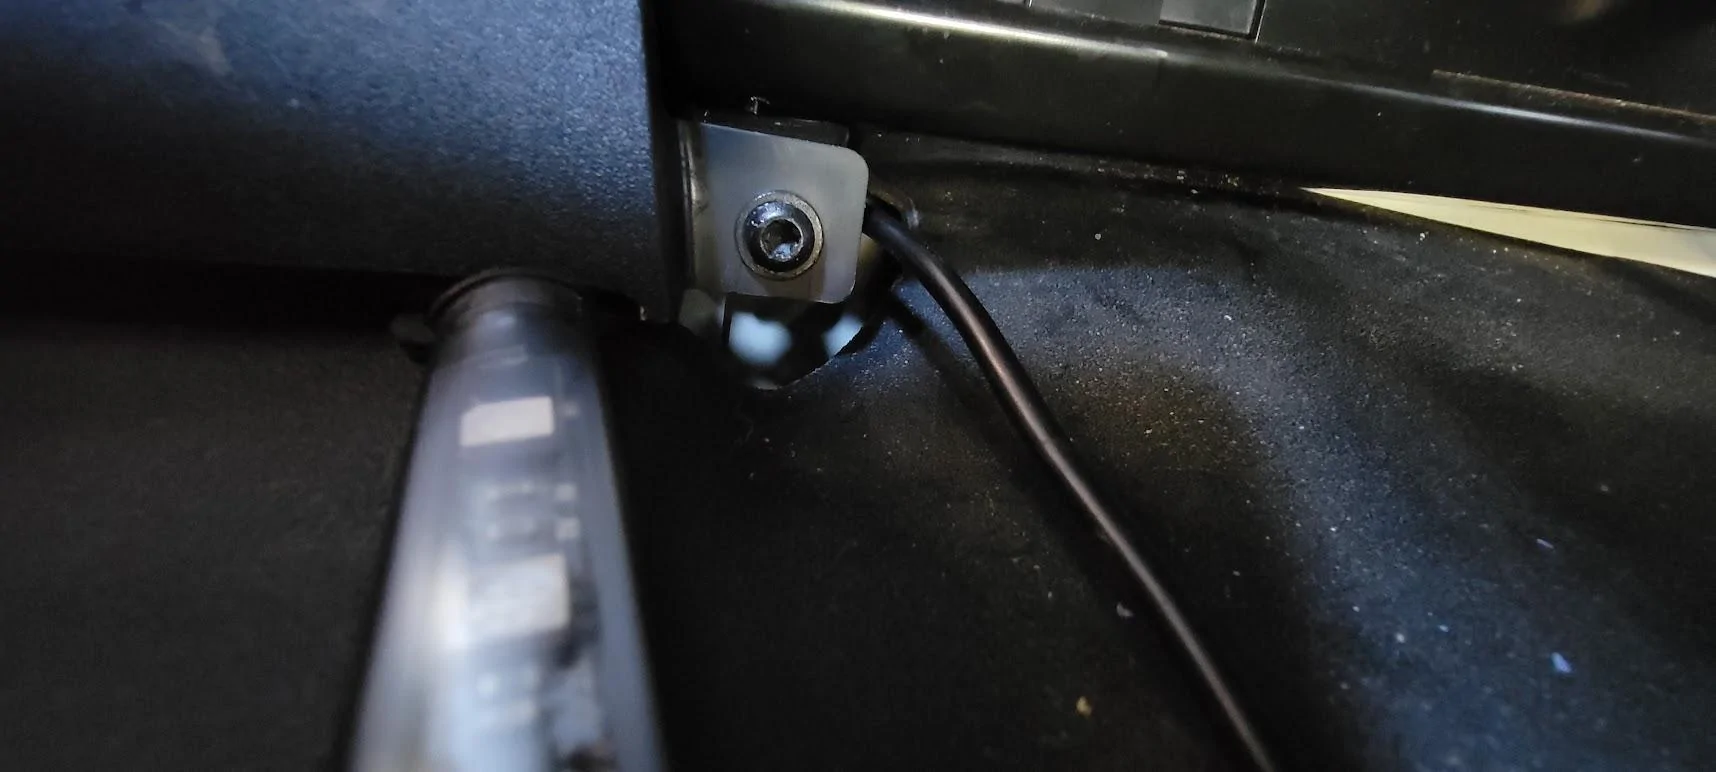
This small black screw (T15 bit) holds the trim piece on the back of the seat rail to the vehicle. I tested it with a multimeter to confirm a solid ground via the screw threads. This will be your ground point. I had to create a small ground wire, as I didn't have a ring connector that would fit the bolt shaft that would crimp onto the 16AWG wire.![]()
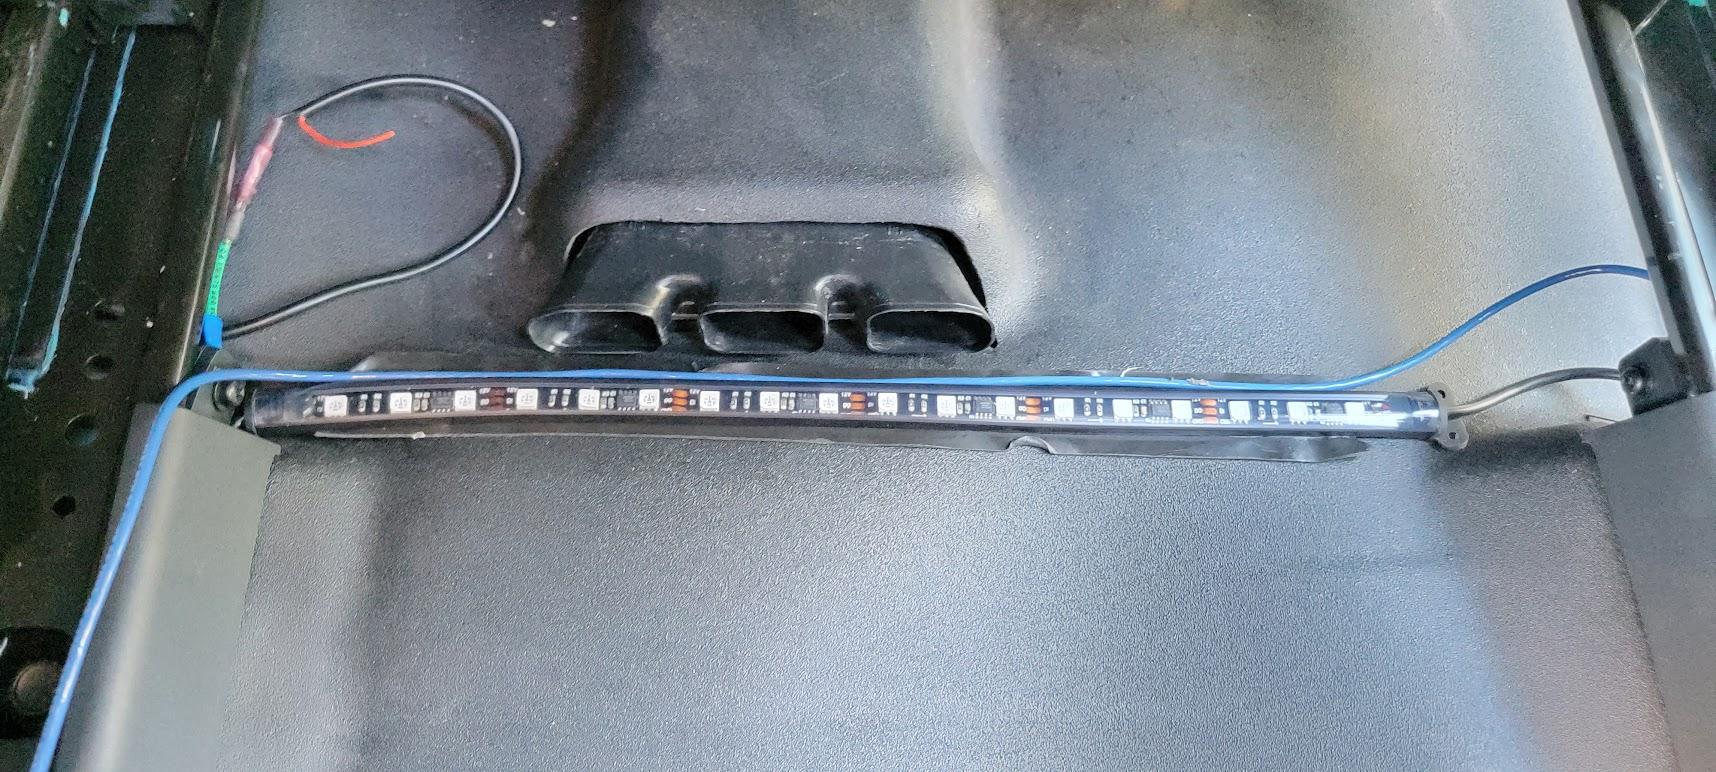
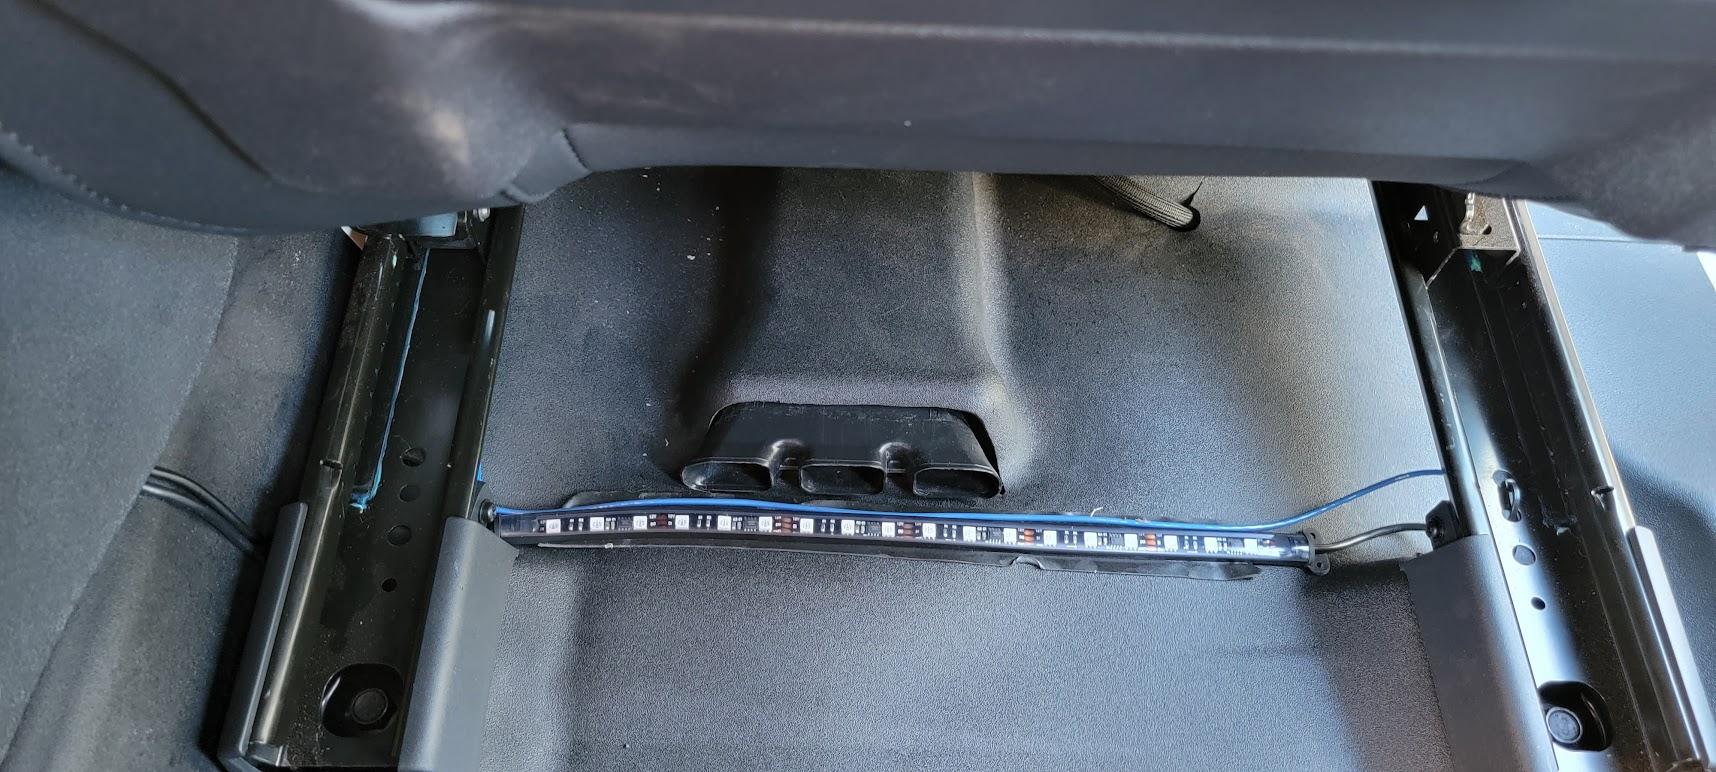
Right here is where I attach the ground to bolt above after having scuffed the surface to ensure a proper ground path. This photo also shows what the extreme tape is for. Position a strip under(from the rear) each front seat, directly in front of the AC vent. Remove the included tape and press your light strip directly on to the extreme tape. Make sure you clean the floor really well first with mild soap and water to ensure proper adhesion.
I ran the power wire directly behind the light strip, using the same strip of extreme tape to hold it in place. I then zip tied the blue wire to the seat rail on both sides as a strain relief. Trim any excess wire and connect it to the red wire
coming from the LED control module.
If you have leather or cloth, you can also use the extreme tape to attach the light strip on the bottom of the seat, but make sure you leave enough slack in the black cables attached to LED strips. The seats move forward and backward, so keep that in mind.
Attach your 12v power using a butt splice crimp connector and tuck the excess cables/wires under the center console trim or the seat rail. I also used a zip tie to keep them from flopping around.
Driver side is done exactly the same way but you only have the black LED strip cable to deal with. Don't worry, with the seats in normal use positions, these LED strips are completely hidden.
Once install is done, use a knife to CAREFULLY trim excess black tape from around the light strip for bonus points (not pictured).![]()
You're going to use the same method as above to route the black cable connecting the LED strips through the main bus channel to the front passenger and driver areas. (Same image as above for reference).
Passenger side will have the 12v power (blue in my case) and the black cable connecting front and back LED strips. Driver side will only be the black LED cable.
Reattach trim.![]()
![]()
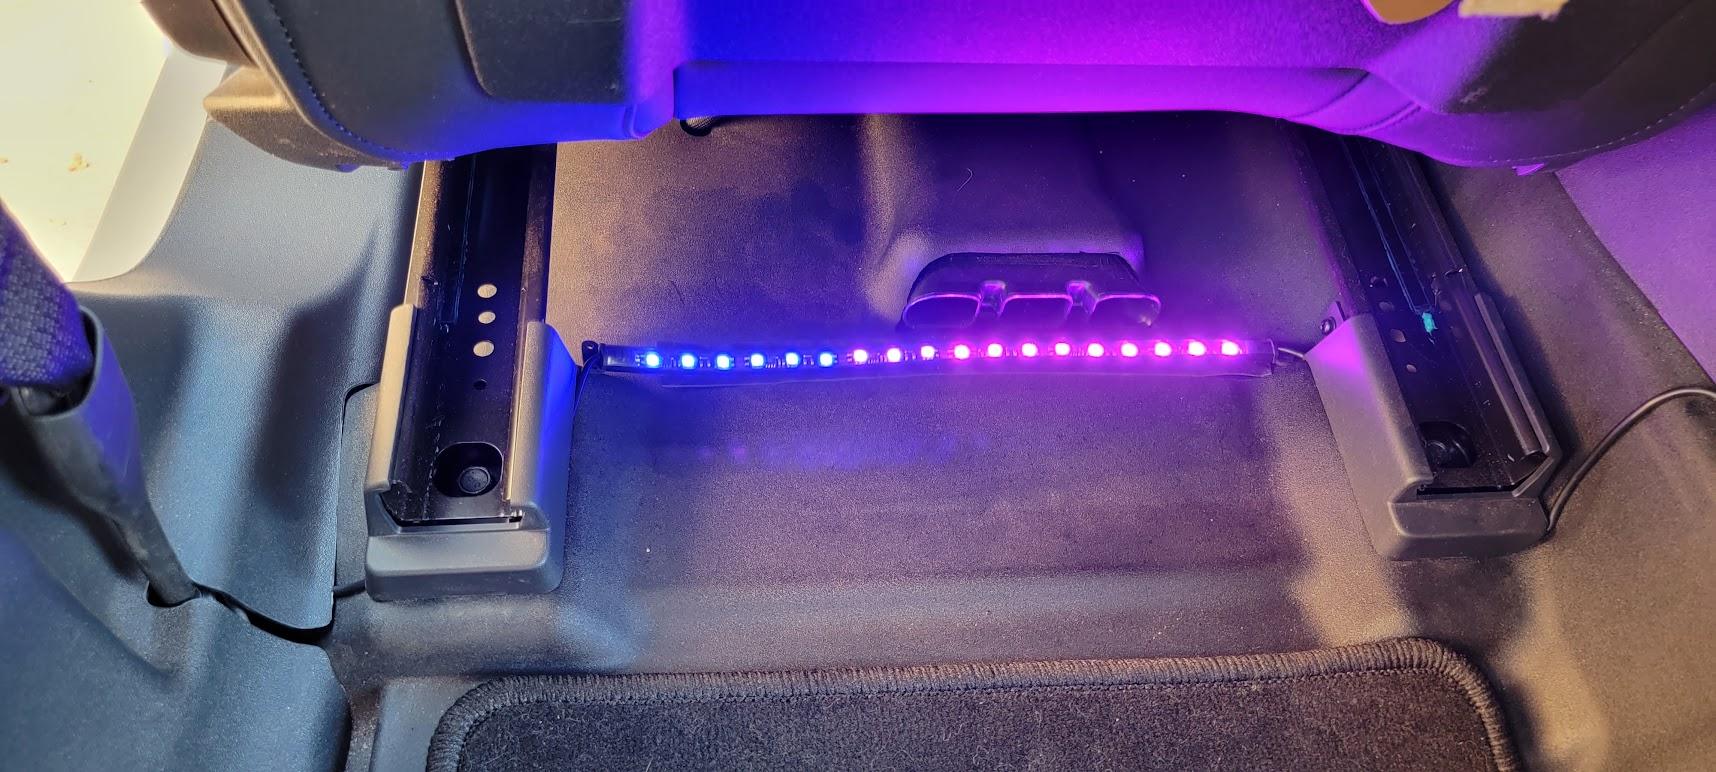
This is what your passenger and driver side should look like when finished with the rear install. These are the only two places that any type of wire or cable should be visible when finished.
The trim is so floppy here that it will never put enough pressure on the cable to damage it. If you are worried, just route it through the channel slightly to the rear that the seatbelts use.![]()
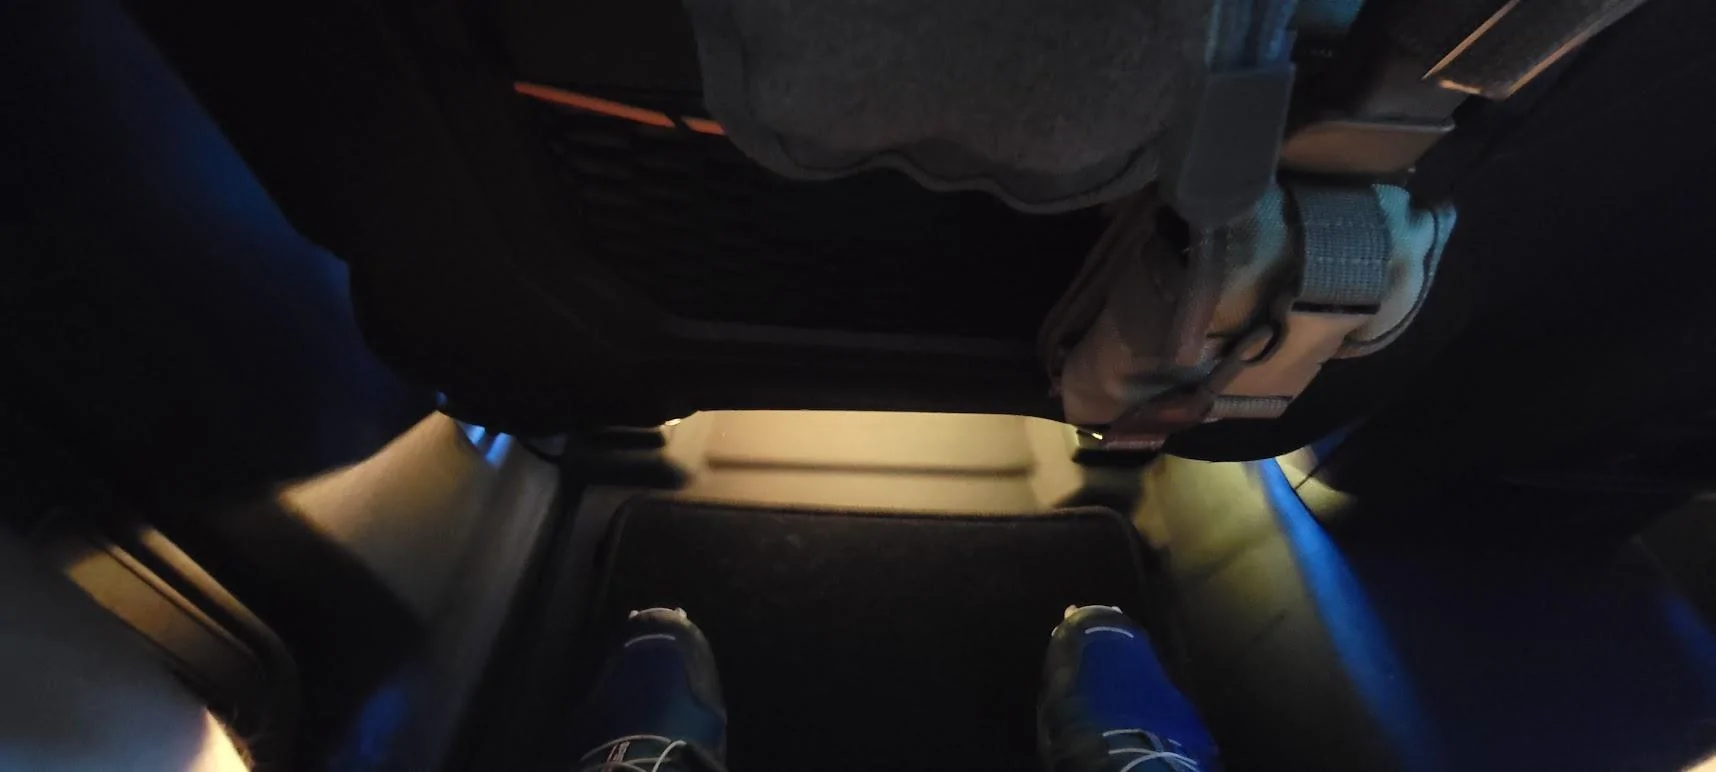
Your finished rear install should look a lot like this (trim the tape once you are certain you like the positioning of the LED strip). I noticed the wash out flooring is quite loose and wavy under the seats.![]()
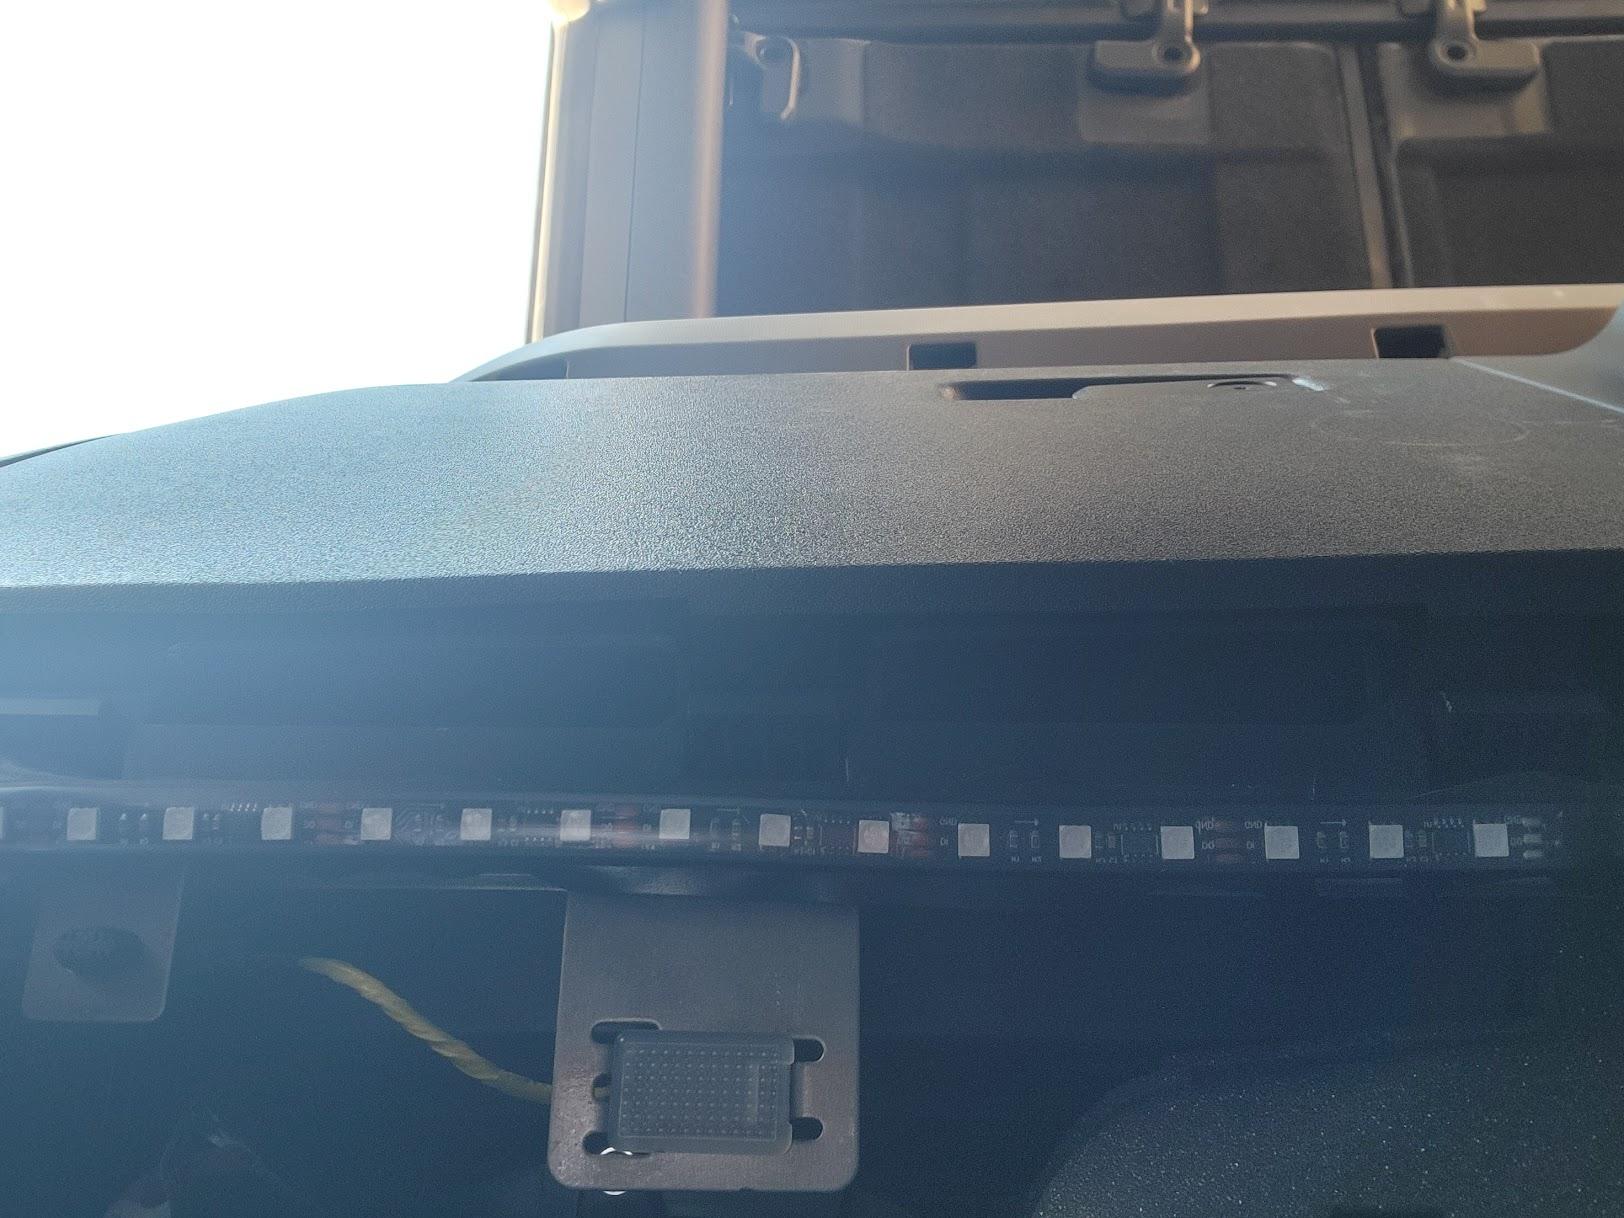
For your front driver and passenger, it's a little trickier. You're going to use the 3M extreme tape again and attach the light strip to the thin edge behind your dash that faces down. I have yet to find a better mounting method, although this one is a little difficult to use. You'll have to zig zag the LED strip a little to route it around the OBD2 sensor (and a few other little objects).
You'll route both sides behind the trim, down to the main cable channel shown above. The driver side gets routed under the foot rest, which is attached to the trim.
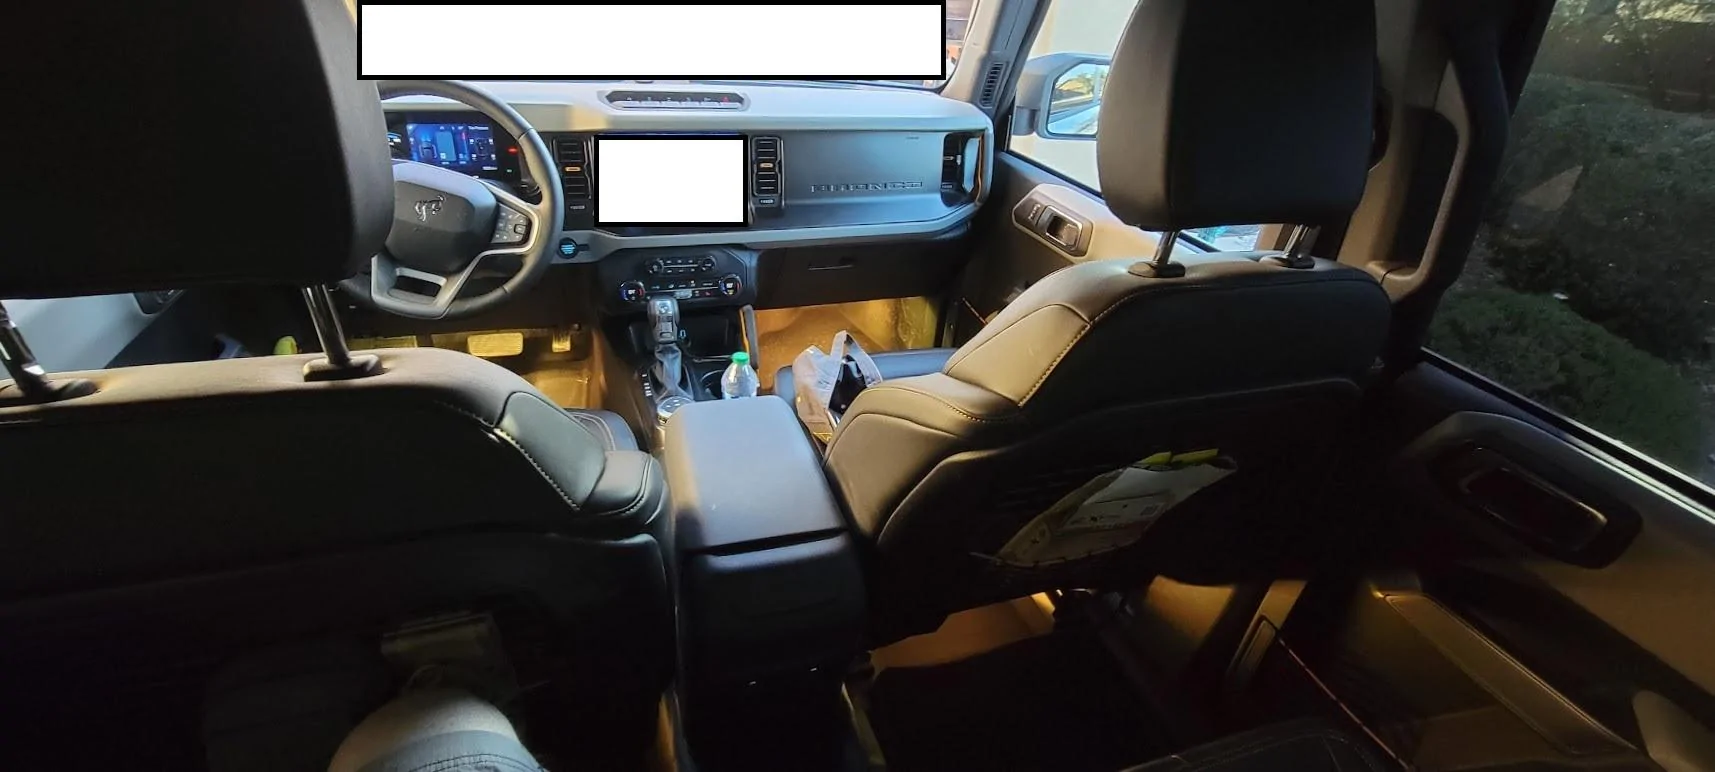
Once you are done, go back and trim up any excess tape to your liking, tuck any loose wires under the trim, and you should have a completely clean install that is weather resistant. The location of the rear seat light strips was dictated by the fact that absolutely nothing sticks to the vinyl seating, so you can't just adhere it to the bottom of the seat. The LED strips are sealed, so shouldn't be damaged when washing out your interior. You'll never need to access the control module, but it's behind the seat if needed. Everything is handled by an app on your cellphone.
![]()
![]()
Absolutely no wires or LEDS are visible from the inside or out, doors on or off - The only visible wires should be 1-2" as it exits under the seats and enters the trim pieces, but you would have to move your seats forward and REALLY be looking for it. Be warned - the black EXTREME tape is PAIN in the butt to work with. You really have to take your time and be patient to keep it from sticking you or anything in a 10 foot radius to the vehicle accidentally.
I'll add a video here shortly to demonstrate it at night. I think I'll be doing video format tutorials as it is a PAIN to try to write this all down.. Feel free to tell me where I lost the plot down in the reply section and I'll clean this tutorial up as needed. Hopefully its enough for people to get started with their planning.
Edit 1: Ok.. the LEDs can be seen with doors off for those under about 5'9". I forgot to crouch. So.. MOSTLY successful. Really depends on how you position them though.
thats low key the real reason I went with Badlands instead of Black Jack, I wanted my colorRemember MyColor?
I thought Ford was going to have all sorts of customizable lighting for the Bronco, but that push at Ford seemed to have died off before the B6G.
Regardless of how bright mine turns out to be (when I finally get my Bronco), I think I will try this mod. I like the idea of having customizable color, particularly red to help with preserving night vision. Look forward to seeing how your solution for top-down lighting turns out.I am VERY curious why there is such a divide re:cabin lighting. Some people swear it's more than sufficient.. Yet here we are, starved for light. There is a piece of the puzzle missing and I'm not sure what it is yet.
If I can get it in psychedelic colors I just might be in (child of the 60s)These are obviously full RGB plus white and are individually addressable diodes for disco parties in the back. I didn't want to completely ruin my reputation by posting that though, so I kept it Badlands Orange.. I'll probably run blue or purple most of the time. Im a child of the 80s.. I like my retro.
Rear dome on mine is the same. need to play with itIve turned it up all the way and then a tad bit more.. Ill have to look into the rear dome light - mine is nowhere NEAR that bright. Its ok for the cargo area but not the back seats. Almost completely dark.
As usual, another great solution, and well documented!This is the lighting kit used.
TOTAL INSTALL TIME: 45 minutes.
(I know the guide is messy, consider this a beta until I figure out formatting to a tolerable level)
This is a "simple" guide to installing interior ambient lighting, as the Bronco w/hard top is VERY dark inside - especially once your windows are tinted. The goal was to get it as close to factory while keeping the cost affordable. This is footwell lighting and there will be a different tutorial for proper cabin lighting to replicate the missing dome light. The linked lighting kit is fully bluetooth and you control everything from your cell phone.
This install uses upfitter switch 6 (Yellow/Orange) as a manual bypass but lights will turn on and off with the vehicle if left in the on position. I did this because there are times when I don't want a lot of interior light - doors off, for example. If you don't need the bypass, your install will vary slightly. You'll need to tie into a 12v power that turns off with the vehicle. Center console is an 'always on' power source, so not ideal.
The install vehicle is a Badlands with wash out interior. This matters more than you would think - how you attach the LED lighting is going to vary based on your vehicle interior. Leather interior with carpet will likely need different LED placement below the seats. I would likely use the same method but attach to the bottom of the seat instead of the floor. No chance of getting anything sticky to stick to the vinyl, so bottom of the seat is out.
Tools and Materials Needed:
![]()
- 10 feet of stranded 16 gauge wire. Trailer wire would work fine. I used blue for lighting.
- 1ft stranded 16 gauge wire for ground.
- 3M EXTREME install double sided tape
- Crimp Solder connectors for 12-16 gauge wire & heat source to heat shrink wrap.
- 1 Ring style connector for Ground lug
- T15 bit & Screwdriver (not pictured)
- Shrink Wrapping is optional and would only be needed if soldering wires instead of using connectors
- Sharp knife or scissors
First, some reference material.
![]()
![]()
Aux6 is Yellow/Orange and we will be attaching
that to Brown/White under the hood, which in turn
is found behind the glove box. I used crimp solder butt
connectors, which are weatherproof. This gives us 12v
behind the glove box.
Follow the instructions for your connector choice (or solder).![]()
There are two wires behind the glove box that are part of the upfitter switch system.The brown/white wire now has 12v and will power the LED system.
To remove the glove box, push in on the tab located on each side of the glove box and let it drop down out of the way.![]()
Next, attach your 10 foot section of 14-16AWG wire with your connector of choice. Here you can see the blue wire as I was connecting it to the brown/white wire from the previous step. This was taken prior to using heat to shrink the blue sleeve down onto the wires for a permanent attachment.
You'll want to snake the wire behind the trim in the
passenger footwell that houses the speaker grill.
This panel really isn't attached in any meaningful
way, so you should have zero issue sliding it under
the edge until you hit the section in the next step.
Start up top behind the glove box and slide it under
down until you hit the door sill.![]()
This trim piece is actually the cover for the main cable channel for your Bronco. Grab with your fingers and gently pry.The entire panel will come off, exposing the wiring beneath it.![]()
Continue to run the blue wire until you hit the rear
trim piece towards the bottom of the photo.
Slightly wiggling this piece will allow it to pop up
enough for you to continue routing the blue wire
until you hit the cut out for the seat belt, as shown in
next photo. This is behind the B-Pillar, at the back of the passenger front seat.![]()
The black object coming out of the cut out and leaving the top of
the photo is your actual seatbelt. This is going to be our exit point
(and entry point for a later step) for the blue 12v power cable.
At this point, we need to start installing the lights.
So now that we have power where we need it, we need to install the actual LED wiring harness. This is where things get tricky to explain. The LED kit in question is a Y wiring harness, and the center point for this harness is the rear center console, between the front two seats. You'll route one set of 2 LED strips to the left, and the other set to the right.
![]()
In the photo, you can see the 12v plug going to the control module, which exits and splits into the Y. Set the LED kit in the back seat on the floor directly behind your center console. This is the central install point. From here, you will attach the first LED strip on the left and right side to the bottom of the rear seats.
![]()
Chop off the 12v connector to reveal a black and red wire.
Black = ground
Red = 12v![]()
I attached the control module to the rear of the console using a section of the 3M extreme tape. The included stuff is garbage. Make sure to clean the area first. Once your control module is placed, you'll want to shove the left extra wire under the center console to keep the install tidy. The loose cable gets routed under the trim piece attached to seat rail in a following step.![]()
This small black screw (T15 bit) holds the trim piece on the back of the seat rail to the vehicle. I tested it with a multimeter to confirm a solid ground via the screw threads. This will be your ground point. I had to create a small ground wire, as I didn't have a ring connector that would fit the bolt shaft that would crimp onto the 16AWG wire.![]()
Right here is where I attach the ground to bolt above after having scuffed the surface to ensure a proper ground path. This photo also shows what the extreme tape is for. Position a strip under(from the rear) each front seat, directly in front of the AC vent. Remove the included tape and press your light strip directly on to the extreme tape. Make sure you clean the floor really well first with mild soap and water to ensure proper adhesion.
I ran the power wire directly behind the light strip, using the same strip of extreme tape to hold it in place. I then zip tied the blue wire to the seat rail on both sides as a strain relief. Trim any excess wire and connect it to the red wire
coming from the LED control module.
If you have leather or cloth, you can also use the extreme tape to attach the light strip on the bottom of the seat, but make sure you leave enough slack in the black cables attached to LED strips. The seats move forward and backward, so keep that in mind.
Attach your 12v power using a butt splice crimp connector and tuck the excess cables/wires under the center console trim or the seat rail. I also used a zip tie to keep them from flopping around.
Driver side is done exactly the same way but you only have the black LED strip cable to deal with. Don't worry, with the seats in normal use positions, these LED strips are completely hidden.
Once install is done, use a knife to CAREFULLY trim excess black tape from around the light strip for bonus points (not pictured).![]()
You're going to use the same method as above to route the black cable connecting the LED strips through the main bus channel to the front passenger and driver areas. (Same image as above for reference).
Passenger side will have the 12v power (blue in my case) and the black cable connecting front and back LED strips. Driver side will only be the black LED cable.
Reattach trim.![]()
![]()
This is what your passenger and driver side should look like when finished with the rear install. These are the only two places that any type of wire or cable should be visible when finished.
The trim is so floppy here that it will never put enough pressure on the cable to damage it. If you are worried, just route it through the channel slightly to the rear that the seatbelts use.![]()
Your finished rear install should look a lot like this (trim the tape once you are certain you like the positioning of the LED strip). I noticed the wash out flooring is quite loose and wavy under the seats.![]()
For your front driver and passenger, it's a little trickier. You're going to use the 3M extreme tape again and attach the light strip to the thin edge behind your dash that faces down. I have yet to find a better mounting method, although this one is a little difficult to use. You'll have to zig zag the LED strip a little to route it around the OBD2 sensor (and a few other little objects).
You'll route both sides behind the trim, down to the main cable channel shown above. The driver side gets routed under the foot rest, which is attached to the trim.
Once you are done, go back and trim up any excess tape to your liking, tuck any loose wires under the trim, and you should have a completely clean install that is weather resistant. The location of the rear seat light strips was dictated by the fact that absolutely nothing sticks to the vinyl seating, so you can't just adhere it to the bottom of the seat. The LED strips are sealed, so shouldn't be damaged when washing out your interior. You'll never need to access the control module, but it's behind the seat if needed. Everything is handled by an app on your cellphone.
![]()
![]()
Absolutely no wires or LEDS are visible from the inside or out, doors on or off - The only visible wires should be 1-2" as it exits under the seats and enters the trim pieces, but you would have to move your seats forward and REALLY be looking for it. Be warned - the black EXTREME tape is PAIN in the butt to work with. You really have to take your time and be patient to keep it from sticking you or anything in a 10 foot radius to the vehicle accidentally.
I'll add a video here shortly to demonstrate it at night. I think I'll be doing video format tutorials as it is a PAIN to try to write this all down.. Feel free to tell me where I lost the plot down in the reply section and I'll clean this tutorial up as needed. Hopefully its enough for people to get started with their planning.
Edit 1: Ok.. the LEDs can be seen with doors off for those under about 5'9". I forgot to crouch. So.. MOSTLY successful. Really depends on how you position them though.
A few people had great ideas in this thread, but its gotten really long.. I'm going to be posting my idea on what I did to address the upper lighting issue here shortly. Trying to stick to OEM looks instead of running light strips everywhere that are visible. I think it'll look pretty decent. Will share shortly.As usual, another great solution, and well documented!
So have you or anyone else reading this seen a solution for brighter lights in the light fixture in the roll bar? I'm guessing those or 5VDC LEDs. Wonder if there's anything brighter that can be plugged in there. I skipped the Aux switches (yes, kicking myself).
Thanks. Yes, I'm looking for an OEM look. Was hoping it was as easy as replacing the LED bulbs with brighter ones, and not having to flip a separate switch. Just come on when they normally would (door open, turned on manually). But maybe that's asking too much.A few people had great ideas in this thread, but its gotten really long.. I'm going to be posting my idea on what I did to address the upper lighting issue here shortly. Trying to stick to OEM looks instead of running light strips everywhere that are visible. I think it'll look pretty decent. Will share shortly.
Mine is the same...was turned to very low at pickup...found the slider and OMG who would ever want it that bright! I turned it to about 25% and it is perfect for me...I can read the writing on your shoes when I look down into the footwells but does not glare up to my eyes when looking forward at night.Something is wrong. I agree the interior is dark because of all the black but my dome light is blinding!
I spent a half hour out in the Bronco last night trying to identify the problem. The only overhead light is the rear bar with it's two small LED projector style lights, and it has a clear cover on it.. no diffuser at all. The rear tailgate area light at least has a diffuser to spread the light around.Mine is the same...was turned to very low at pickup...found the slider and OMG who would ever want it that bright! I turned it to about 25% and it is perfect for me...I can read the writing on your shoes when I look down into the footwells but does not glare up to my eyes when looking forward at night.
Interesting the differences with OP...his are DARK.
Apologies, I meant the footwell lighting...I spent a half hour out in the Bronco last night trying to identify the problem. The only overhead light is the rear bar with it's two small LED projector style lights, and it has a clear cover on it.. no diffuser at all. The rear tailgate area light at least has a diffuser to spread the light around.
I've triple checked all the software options. Unless there is a way to change the brightness of the overhead light im not aware of, im out of ideas.
Yep. Now I have switched power in the center of my vehicle to continue running more lighting in the rear, which is in the works now. Also much easier to do it my way.Is there a reason why you didn't just run the power wire a foot under the dash instead of to the back seat area. Place the govee receiver under the dash too? Or just outside from under the dash?
The wires are all connected, and branch off the govee receiver(on/off switch)
Place everything under the dash at the start. And then would it be possible to just run the govee wires to the 2Nd lights under the door sill plate to get it under the back seats?