

Sponsored

Trailrax Real World Reviews?

TrailRax

Badlands
Well-Known Member
Lux Sponsor (Level 2)
First Name
TrailRax
Joined
Nov 3, 2021
Threads
35
Messages
899
Reaction score
1,754
Location
Woods Cross, Utah
Website
www.trailrax.com
Vehicle(s)
2023 Bronco Badlands
Your Bronco Model
Badlands

Delli555

Black Diamond
Well-Known Member
First Name
Michael
Joined
Apr 2, 2021
Threads
14
Messages
426
Reaction score
514
Location
Massachusetts
Vehicle(s)
GMC Acadia
Your Bronco Model
Black Diamond
Clubs
 
1674061503084.png

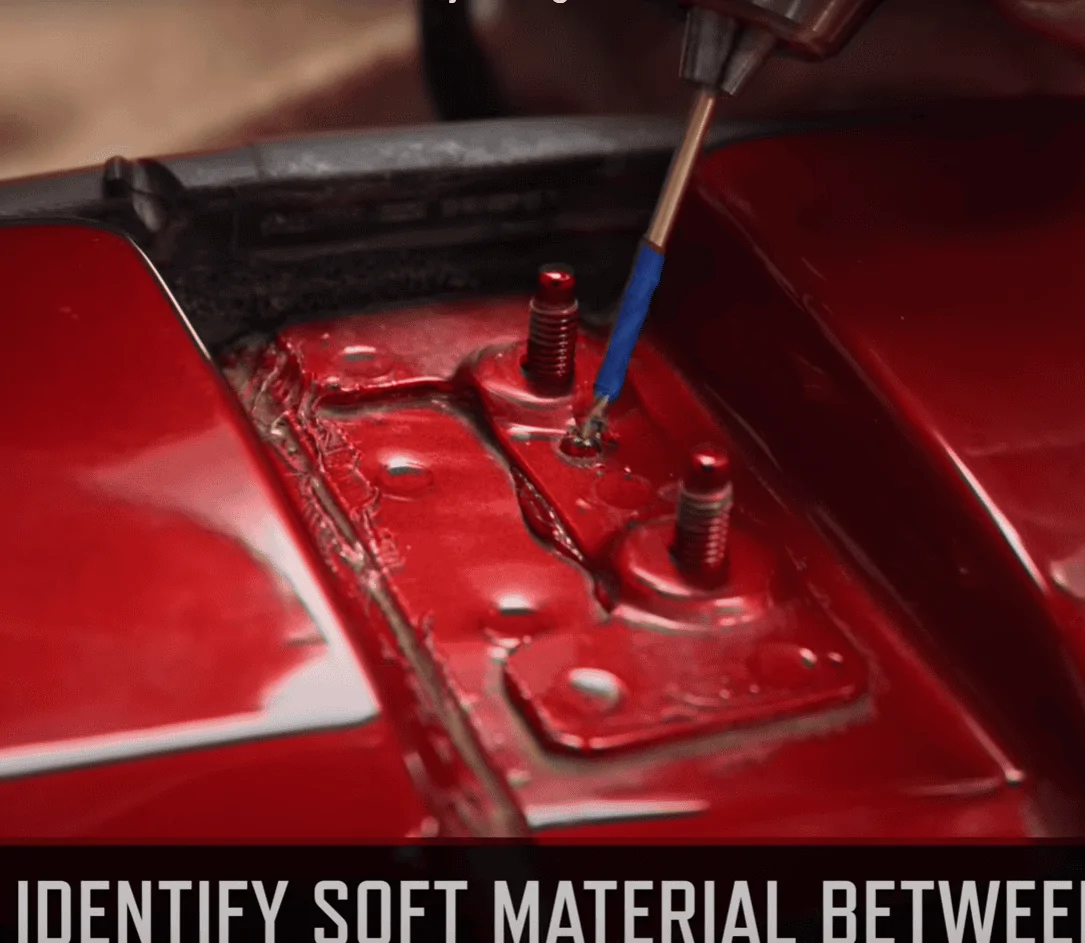
Not the greatest picture ever but the top part of the stud is unthreaded and allows a nut to align and drop onto it without having to start threading it. This small part makes it super easy to install compared to not having it. Also, We have attached out new install instructions as well that we have worked on for the past 4 months.
Perfect! Thanks for the picture and clarification
 
OP
OP
FellowM3

FellowM3

Raptor
Well-Known Member
First Name
Mark
Joined
Jul 14, 2020
Threads
22
Messages
630
Reaction score
596
Location
Northern NJ
Vehicle(s)
Current: 22' Braptor, 2020 BMW M340
Your Bronco Model
Raptor
Clubs
 
1674061503084.png

Not the greatest picture ever but the top part of the stud is unthreaded and allows a nut to align and drop onto it without having to start threading it. This small part makes it super easy to install compared to not having it. Also, We have attached out new install instructions as well that we have worked on for the past 4 months.
Just clarifying here. We are simply placing the 10mm nuts over these studs that are already there correct?

If so, this should be just placing the nuts there (with needle nose plier if needed), and then fitting the 10mm ratcheting wrench over these and tightening, right?
 

TrailRax

Badlands
Well-Known Member
Lux Sponsor (Level 2)
First Name
TrailRax
Joined
Nov 3, 2021
Threads
35
Messages
899
Reaction score
1,754
Location
Woods Cross, Utah
Website
www.trailrax.com
Vehicle(s)
2023 Bronco Badlands
Your Bronco Model
Badlands
Just clarifying here. We are simply placing the 10mm nuts over these studs that are already there correct?

If so, this should be just placing the nuts there (with needle nose plier if needed), and then fitting the 10mm ratcheting wrench over these and tightening, right?
That is correct. We should have an install here in the next 30-45 mins that has been scheduled. we will show how it is done shortly.
 
OP
OP
FellowM3

FellowM3

Raptor
Well-Known Member
First Name
Mark
Joined
Jul 14, 2020
Threads
22
Messages
630
Reaction score
596
Location
Northern NJ
Vehicle(s)
Current: 22' Braptor, 2020 BMW M340
Your Bronco Model
Raptor
Clubs
 
That is correct. We should have an install here in the next 30-45 mins that has been scheduled. we will show how it is done shortly.
Nice. I am sure some pics will help.

I just read through all of the instructions. Seems pretty straight forward and simple.

I dont have a garage and found a place to rent one to do this install next saturday (1/28)


@TrailRax, for light bar installs, do we just mount the light mount to the forward most extrusion? (i have the baja designs, but should be about the same as the heretic)
 

Sponsored

TrailRax

Badlands
Well-Known Member
Lux Sponsor (Level 2)
First Name
TrailRax
Joined
Nov 3, 2021
Threads
35
Messages
899
Reaction score
1,754
Location
Woods Cross, Utah
Website
www.trailrax.com
Vehicle(s)
2023 Bronco Badlands
Your Bronco Model
Badlands
Nice. I am sure some pics will help.

I just read through all of the instructions. Seems pretty straight forward and simple.

I dont have a garage and found a place to rent one to do this install next saturday (1/28)


@TrailRax, for light bar installs, do we just mount the light mount to the forward most extrusion? (i have the baja designs, but should be about the same as the heretic)
Yes for the install, you will use the standard mounts the light came with, should be L shaped brackets, to mount to the deflector extrusion/TSLOT. Then wire will run down the passenger A pillar and connect to the purple wire. That is if you have the AUX switches. If not, the wiring is a bit different but along the same lines.
 
OP
OP
FellowM3

FellowM3

Raptor
Well-Known Member
First Name
Mark
Joined
Jul 14, 2020
Threads
22
Messages
630
Reaction score
596
Location
Northern NJ
Vehicle(s)
Current: 22' Braptor, 2020 BMW M340
Your Bronco Model
Raptor
Clubs
 
Yes for the install, you will use the standard mounts the light came with, should be L shaped brackets, to mount to the deflector extrusion/TSLOT. Then wire will run down the passenger A pillar and connect to the purple wire. That is if you have the AUX switches. If not, the wiring is a bit different but along the same lines.
Got it.

Is the wire brought down into the cabin by drilling a hole in the bracket area, or is part of it ran on the exterior?

Ford Bronco Trailrax Real World Reviews? 1674070985141
 

TrailRax

Badlands
Well-Known Member
Lux Sponsor (Level 2)
First Name
TrailRax
Joined
Nov 3, 2021
Threads
35
Messages
899
Reaction score
1,754
Location
Woods Cross, Utah
Website
www.trailrax.com
Vehicle(s)
2023 Bronco Badlands
Your Bronco Model
Badlands
Got it.

Is the wire brought down into the cabin by drilling a hole in the bracket area, or is part of it ran on the exterior?

1674070985141.png
That is actually not required. A lot of people had come out with this, it is in fact the incorrect way. You will sneak it through between the hardtop panel and the windshield frame, no there will not be leaking or wind noise from it. Heretic installs it this way, we wish we had our bronco to show you guys but Ford likely can't make ours till 2024 now.

@fronc by chance, do you have a picture of the wiring of your lightbar with the TRMR Rack & Heretic bar?
 
OP
OP
FellowM3

FellowM3

Raptor
Well-Known Member
First Name
Mark
Joined
Jul 14, 2020
Threads
22
Messages
630
Reaction score
596
Location
Northern NJ
Vehicle(s)
Current: 22' Braptor, 2020 BMW M340
Your Bronco Model
Raptor
Clubs
 
That is actually not required. A lot of people had come out with this, it is in fact the incorrect way. You will sneak it through between the hardtop panel and the windshield frame, no there will not be leaking or wind noise from it. Heretic installs it this way, we wish we had our bronco to show you guys but Ford likely can't make ours till 2024 now.

@fronc by chance, do you have a picture of the wiring of your lightbar with the TRMR Rack & Heretic bar?
Hmm pics would be greatly appreciated.

Glad I asked before drilling thru..
 
OP
OP
FellowM3

FellowM3

Raptor
Well-Known Member
First Name
Mark
Joined
Jul 14, 2020
Threads
22
Messages
630
Reaction score
596
Location
Northern NJ
Vehicle(s)
Current: 22' Braptor, 2020 BMW M340
Your Bronco Model
Raptor
Clubs
 
That is actually not required. A lot of people had come out with this, it is in fact the incorrect way. You will sneak it through between the hardtop panel and the windshield frame, no there will not be leaking or wind noise from it. Heretic installs it this way, we wish we had our bronco to show you guys but Ford likely can't make ours till 2024 now.

@fronc by chance, do you have a picture of the wiring of your lightbar with the TRMR Rack & Heretic bar?
I think this video shows it well (3:20 min mark)


@TrailRax , is this the method to do and does this work with the rack installed?

That wire should be nicely hidden behind the wind deflector I think
 

Sponsored

TrailRax

Badlands
Well-Known Member
Lux Sponsor (Level 2)
First Name
TrailRax
Joined
Nov 3, 2021
Threads
35
Messages
899
Reaction score
1,754
Location
Woods Cross, Utah
Website
www.trailrax.com
Vehicle(s)
2023 Bronco Badlands
Your Bronco Model
Badlands
I think this video shows it well (3:20 min mark)

@TrailRax , is this the method to do and does this work with the rack installed?

That wire should be nicely hidden behind the wind deflector I think
Yep! No need to remove the rack. What video are you referring to? you will just need to remove the 2 front panels to make it easy for install.
 
OP
OP
FellowM3

FellowM3

Raptor
Well-Known Member
First Name
Mark
Joined
Jul 14, 2020
Threads
22
Messages
630
Reaction score
596
Location
Northern NJ
Vehicle(s)
Current: 22' Braptor, 2020 BMW M340
Your Bronco Model
Raptor
Clubs
 
Yep! No need to remove the rack. What video are you referring to? you will just need to remove the 2 front panels to make it easy for install.
Doh...

Forgot to paste the link haha. Just edited post above.
 

TrailRax

Badlands
Well-Known Member
Lux Sponsor (Level 2)
First Name
TrailRax
Joined
Nov 3, 2021
Threads
35
Messages
899
Reaction score
1,754
Location
Woods Cross, Utah
Website
www.trailrax.com
Vehicle(s)
2023 Bronco Badlands
Your Bronco Model
Badlands
Doh...

Forgot to paste the link haha. Just edited post above.
Yes that is it! Heretic is the specialists when it come to clean wiring and nicely done lights. That is how you will want to install it.
 

fronc

First Edition
Well-Known Member
First Name
Frank
Joined
Jan 16, 2020
Threads
16
Messages
249
Reaction score
664
Location
San Mateo, California
Website
www.instagram.com
Vehicle(s)
2021 First Edition | 4 Door | Cactus Grey
Your Bronco Model
First Edition
Clubs
 
Hmm pics would be greatly appreciated.

Glad I asked before drilling thru..
Yeah - Definitely no need for drilling. I just ran my wire straight back to the roof panel, dropped it through the weatherstripping, and then ran it down the rain gutter to the passenger side of the vehicle. Then it passes under the roll bar, and back behind the A pillar trim and behind the glove box. One additional note, I believe we needed to take the passenger visor fully off in order to remove the panels.

I don't have a photo handy, but DM me on IG if you still have issues and I'll try and help more.
 
OP
OP
FellowM3

FellowM3

Raptor
Well-Known Member
First Name
Mark
Joined
Jul 14, 2020
Threads
22
Messages
630
Reaction score
596
Location
Northern NJ
Vehicle(s)
Current: 22' Braptor, 2020 BMW M340
Your Bronco Model
Raptor
Clubs
 
Yeah - Definitely no need for drilling. I just ran my wire straight back to the roof panel, dropped it through the weatherstripping, and then ran it down the rain gutter to the passenger side of the vehicle. Then it passes under the roll bar, and back behind the A pillar trim and behind the glove box. One additional note, I believe we needed to take the passenger visor fully off in order to remove the panels.

I don't have a photo handy, but DM me on IG if you still have issues and I'll try and help more.
Went to follow you and realized I already am haha

Did you push the wire back through the weather stripping same as in the video (in post #70; 3:20 min marker)?
Sponsored


Top