Sponsored

Blucifer

Badlands
Well-Known Member
Joined
Jul 14, 2021
Threads
0
Messages
100
Reaction score
133
Location
Saint Augustine, Florida
Vehicle(s)
Cadillac SRX
Your Bronco Model
Badlands
Clubs
 
1673922463530.jpeg


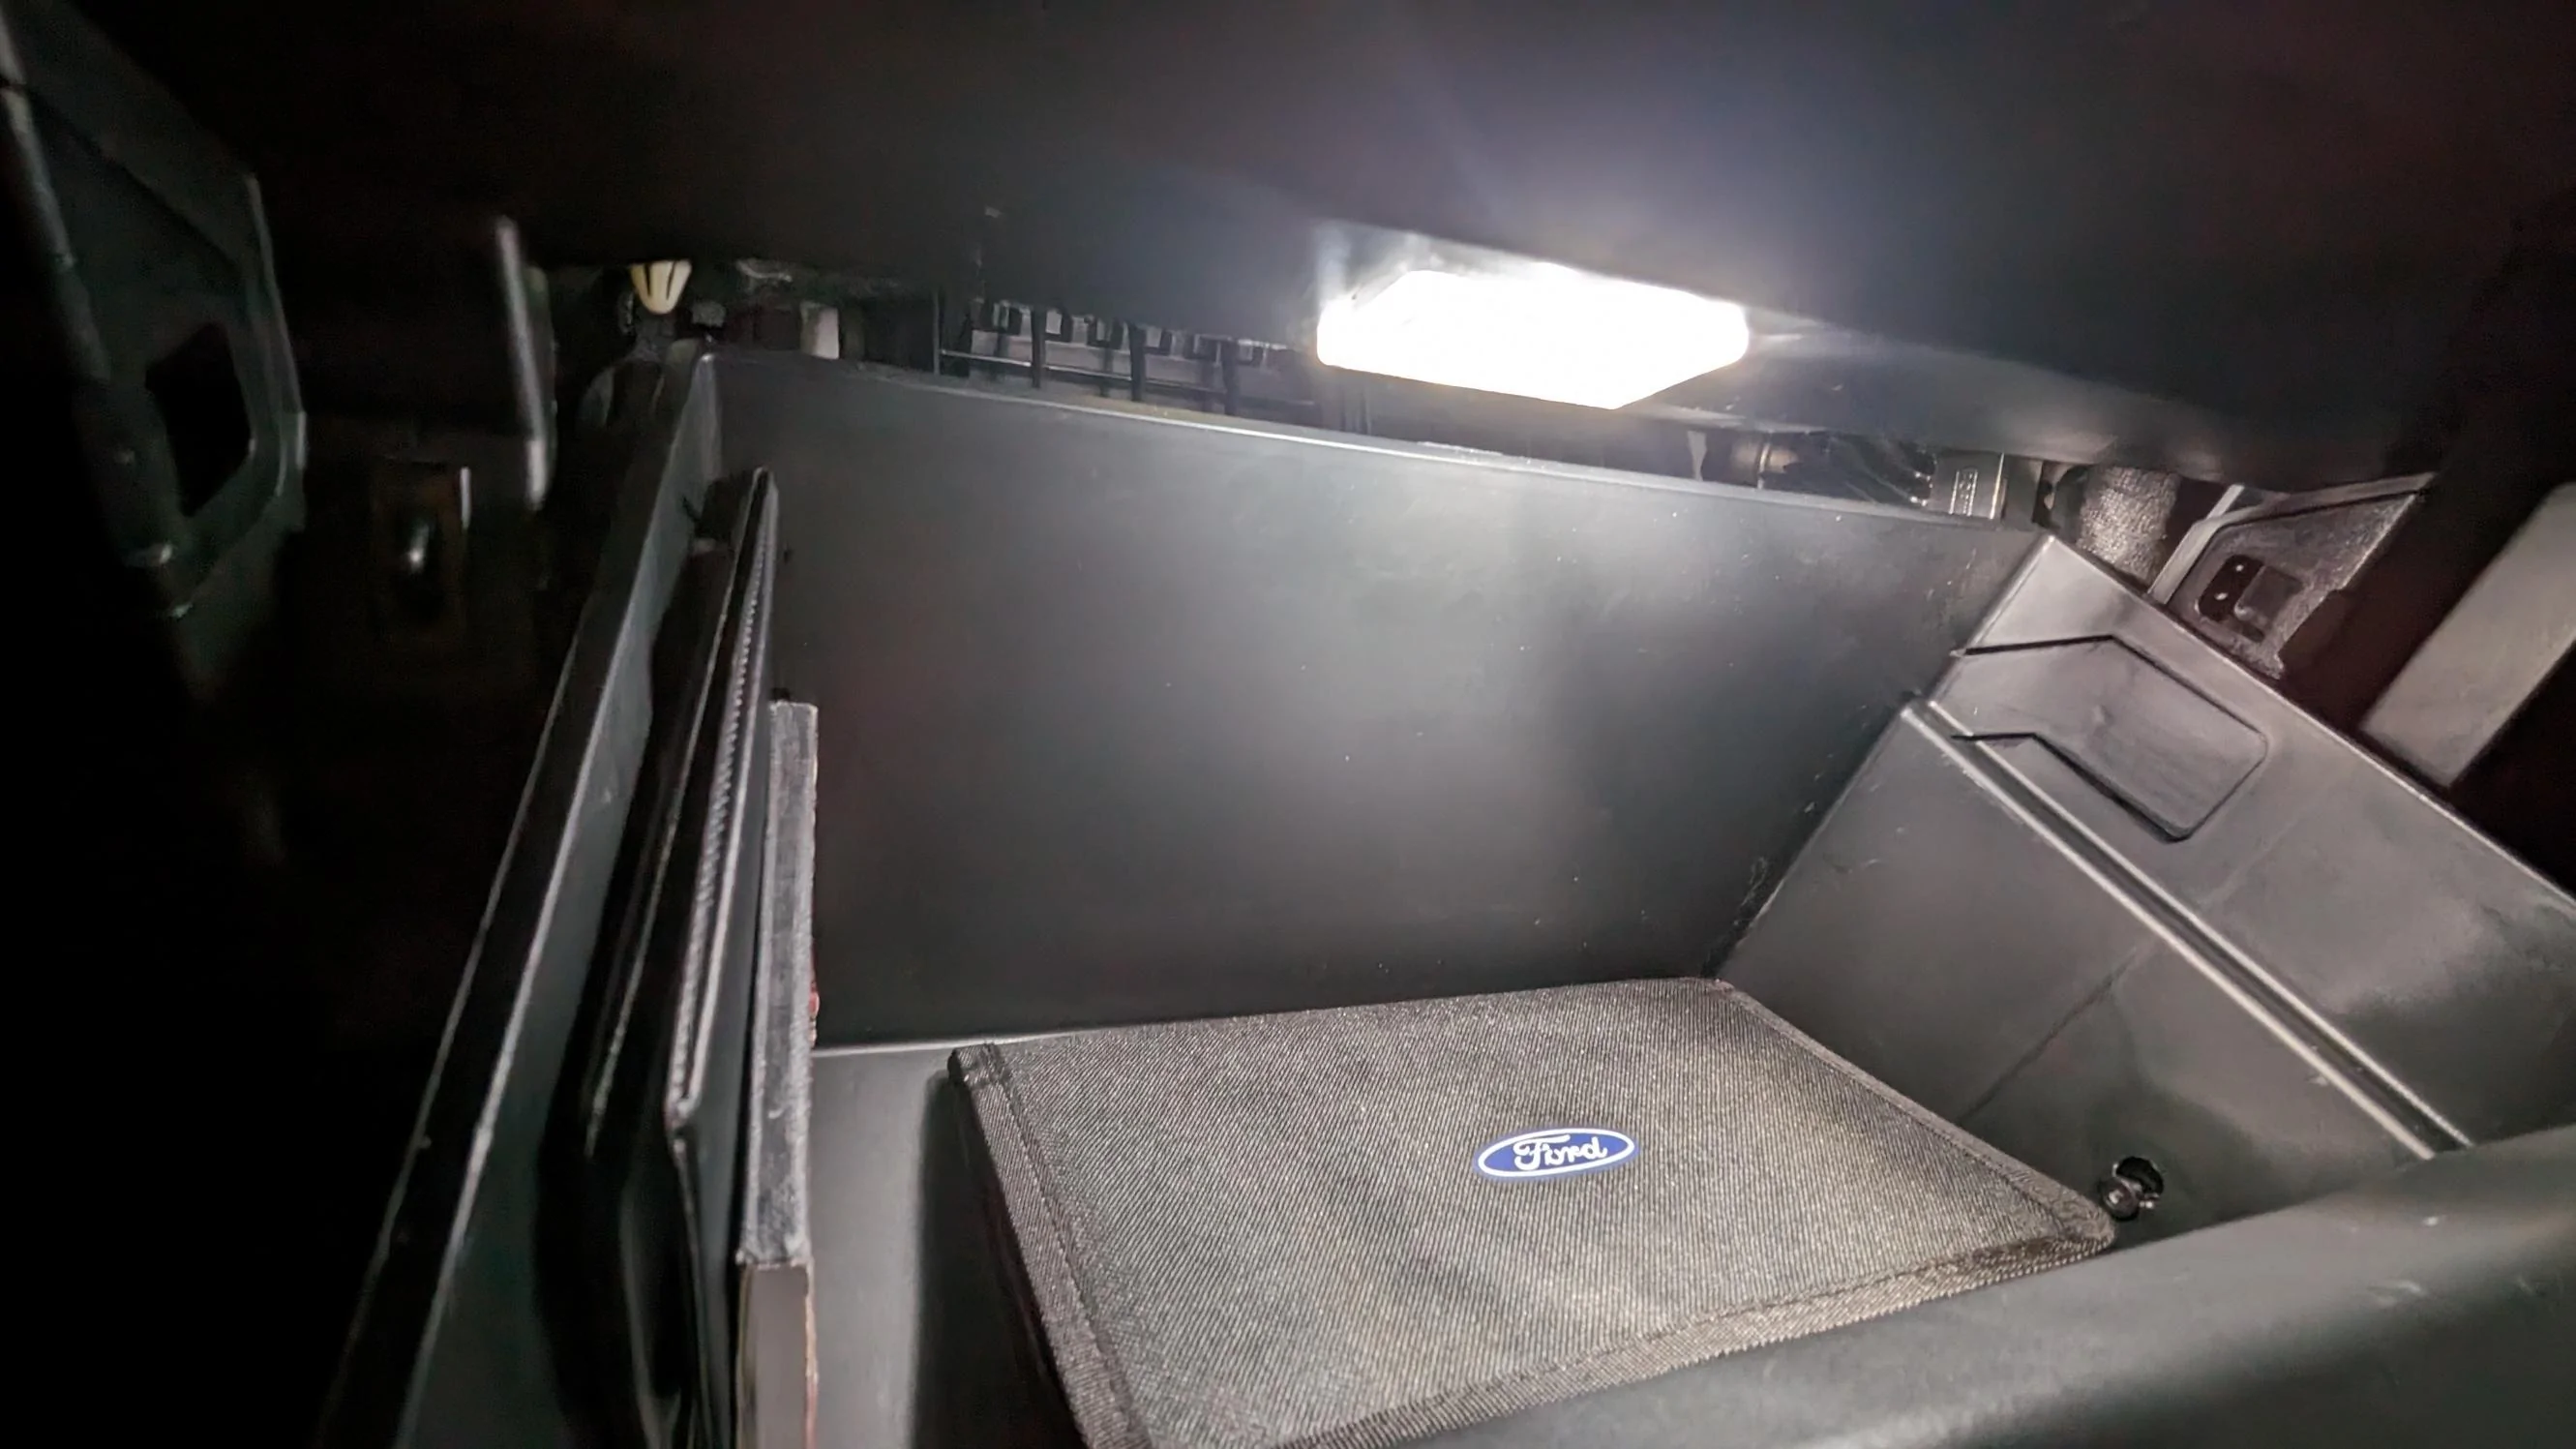
I've wanted to install a lamp in the glove box of my Bronco since the day I drove it off a dealer's lot. I don't know why such a simple convenience is not part of the Lux package.

I started to browse the web looking for a lamp that would perfectly fit in the area surrounding the glove box, wouldn't require too much trimming, and something that would look as if Ford hadn't cheap out and had installed it at the factory.

1673922499994.jpeg


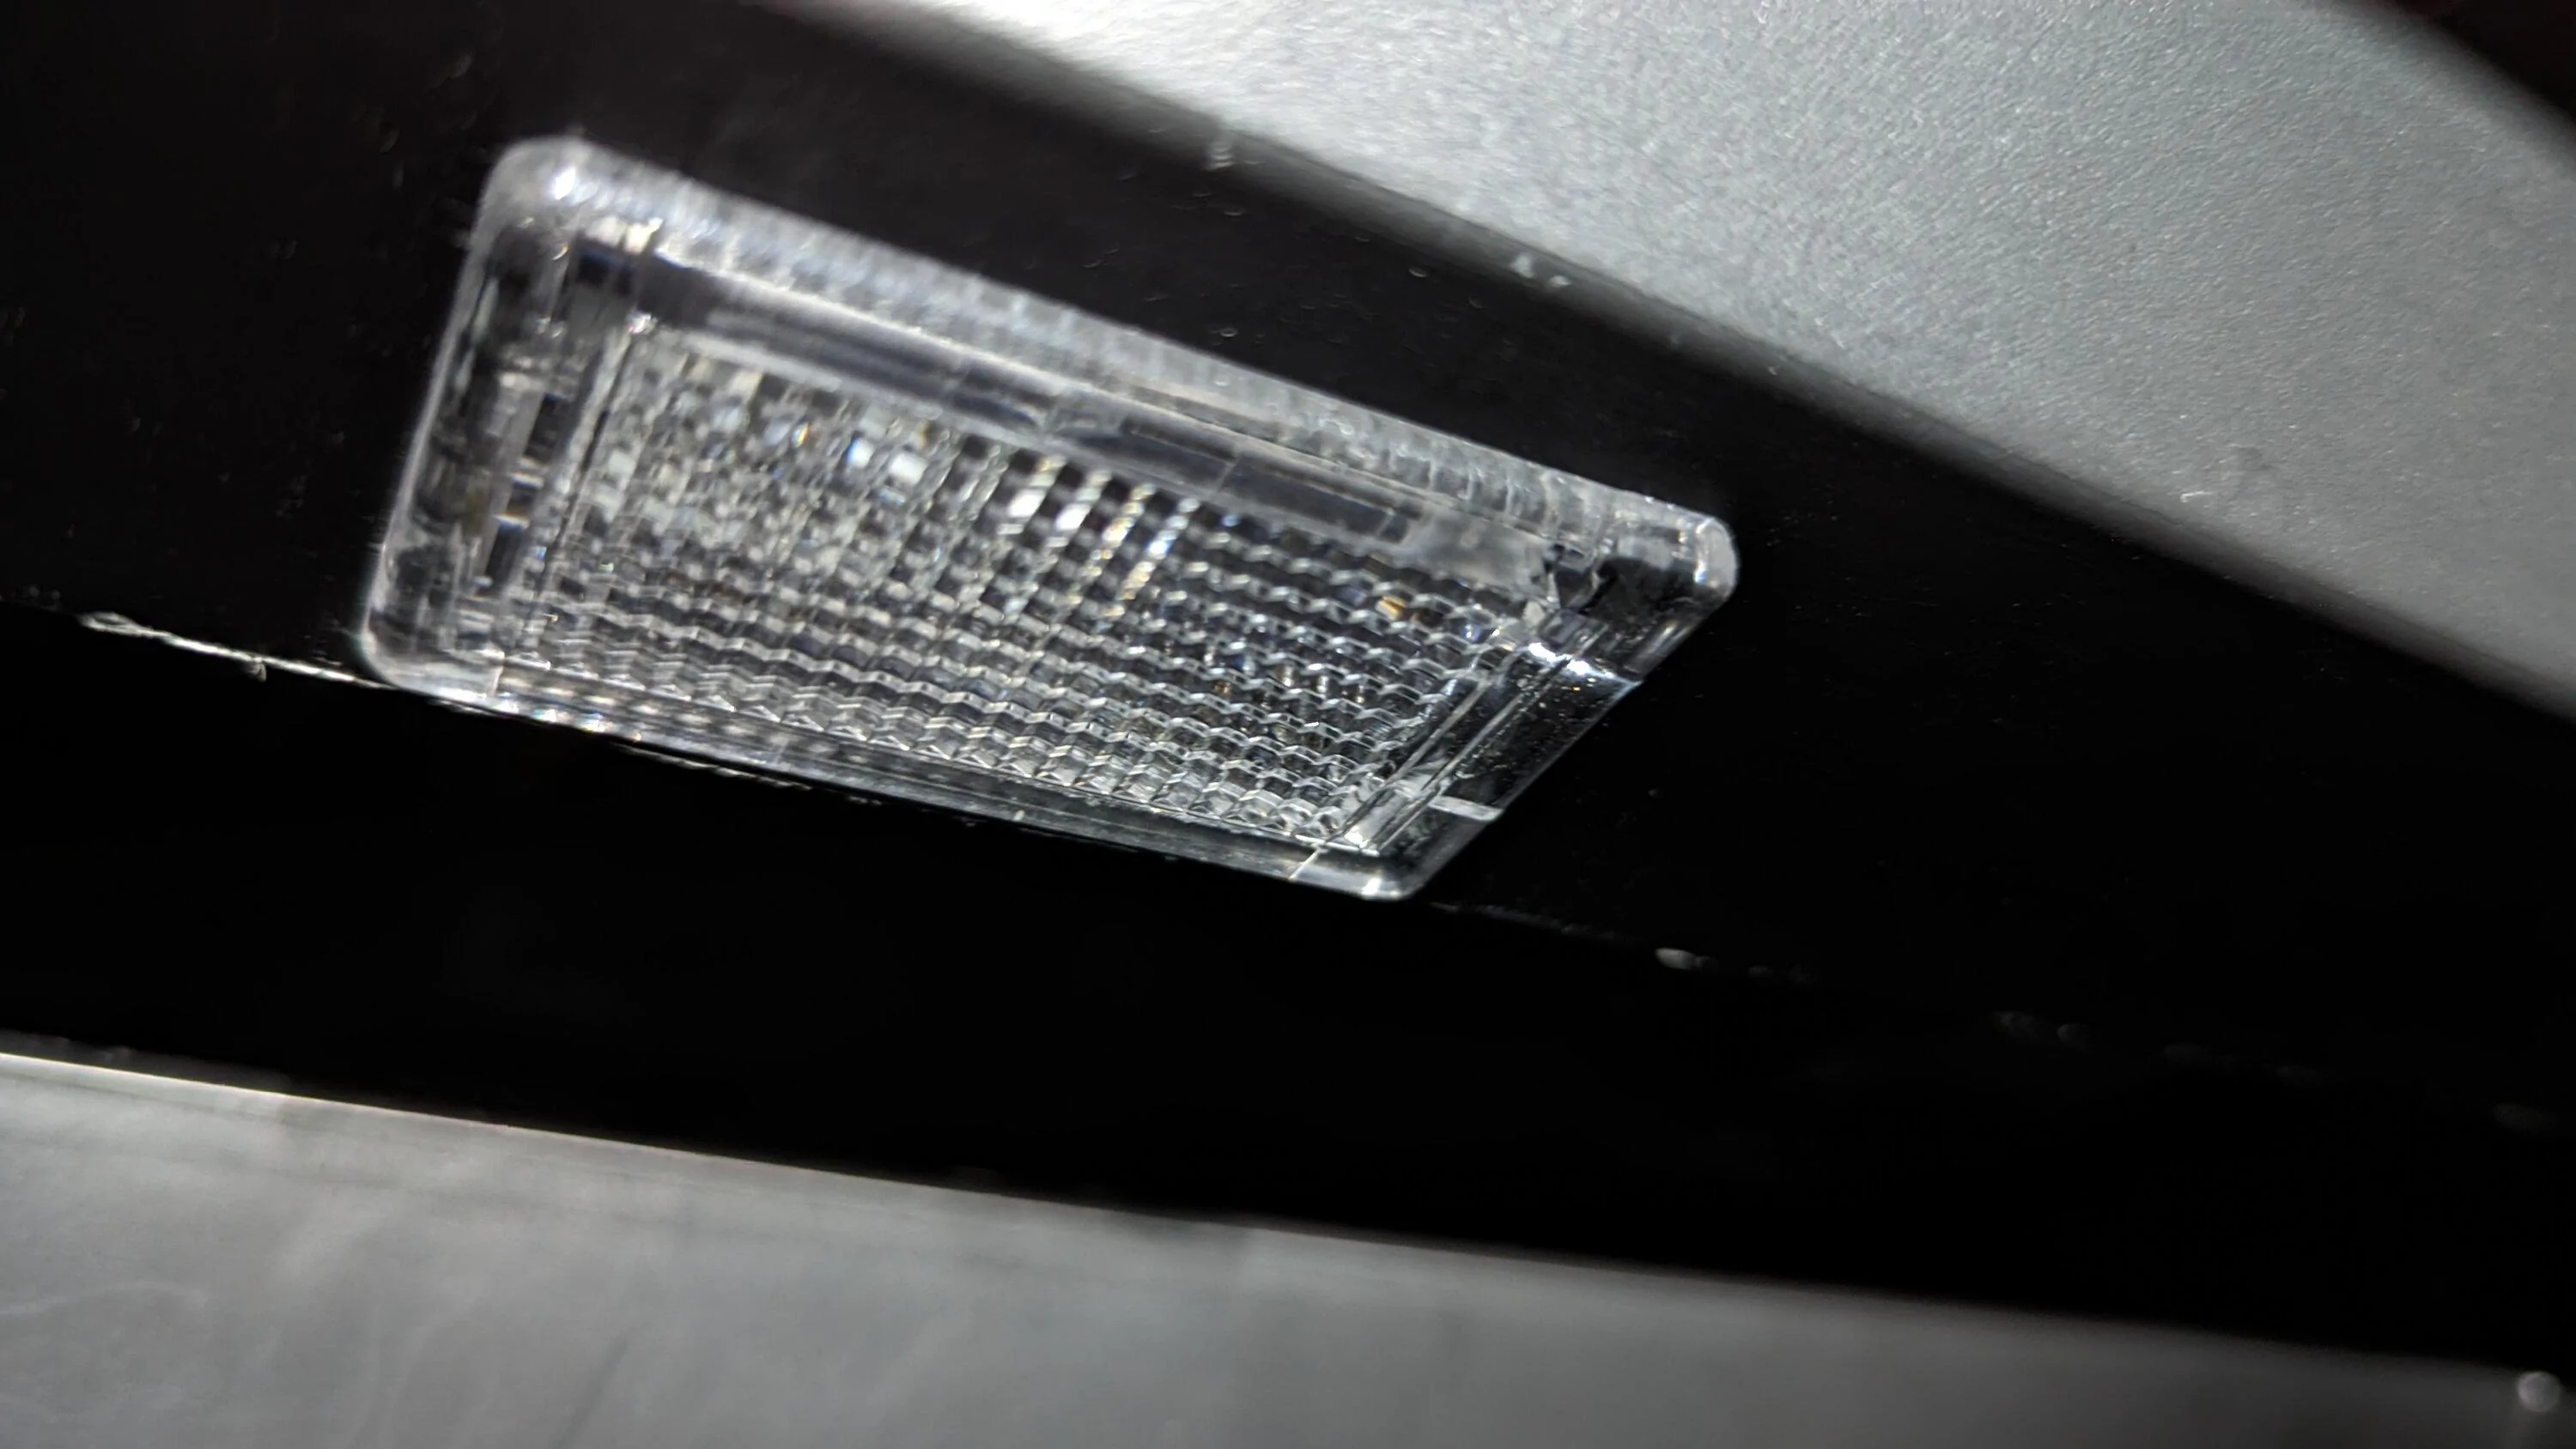
Unfortunately, I couldn't find any glove box light made for Ford, Lincoln, or Mecury models that would work for the Bronco. In my case, the perfect solution came from Hyundai. If any Blue Oval purists are reading this thread, I beg your pardon.

I looked for a lamp that had an external swich because it would be easier to find a good spot for two smaller parts that for a larger all-in-one unit. The Hyundai lamp I used is often sold as a kit: a lamp, switch, and wire harness. Here are the numbers of all these parts: 92620-33000, 93510-21000, 91180-2D900. The kit cost me $19+tax.

1673922525400.jpeg


The lamp fits perfectly in the upper lip of the housing that surrounds the glove box.

1673922557817.jpeg


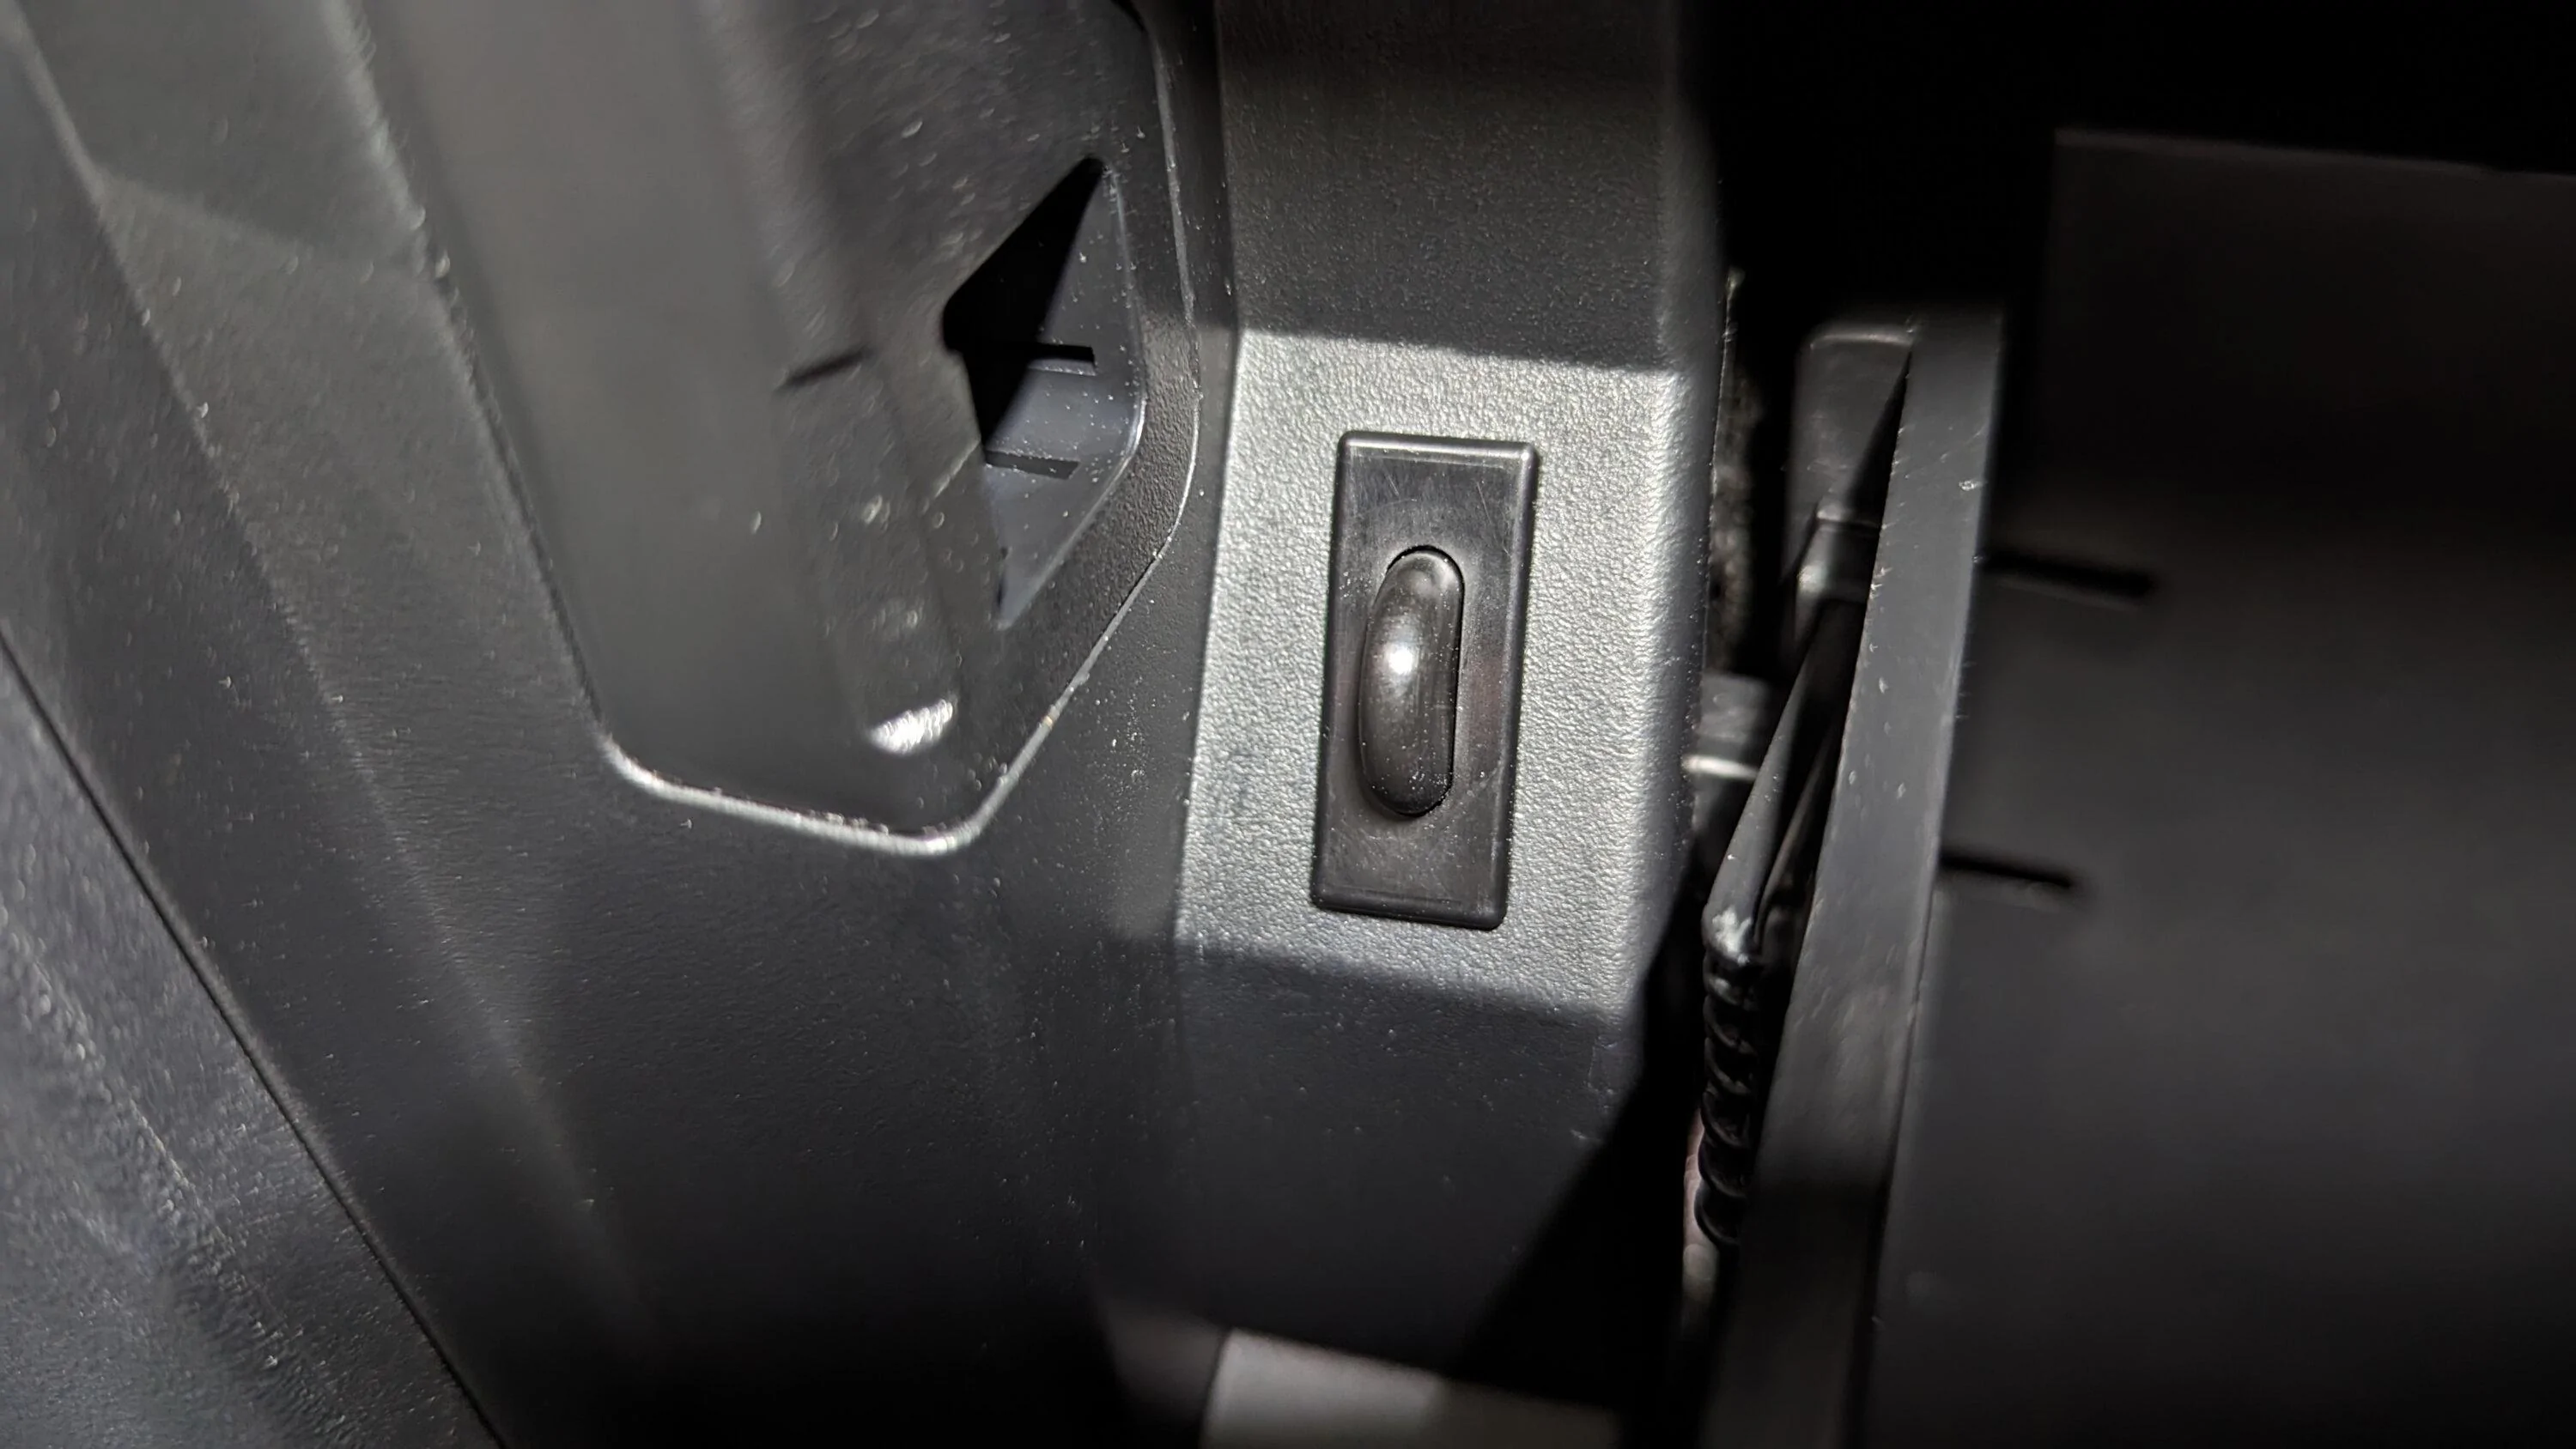
The best spot for the switch is right next to the left latch hole. I cut out the rectangular holes using a small hand drill and Tamiya hand saw.

1673922685376.jpeg

1673922699490.jpeg


Before cutting this holes in the Bronco, I test fitted the lamp and switch in a piece of plastic of the same thickness to make sure they wouldn't wiggle or fall out. After I was happy with the size of the cut outs, I used this plastic piece as a stencil and marked the cut line with a white thin tip marker.

1673922582718.jpeg


I had to squeeze myself in between the passenger seat and the dashboard to be able to cut the hole for the lamp. I'm glad the plastic is pretty soft, so it didn't take me much time to complete this task. If I were a bigger guy, I would have needed to unbolt the passenger seat.

1673922599089.jpeg


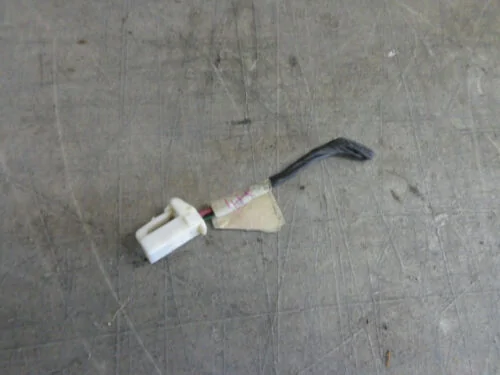
OCD didn't allow me to cut the brand new Hyundai wire harness, so I also purchased a used female electrical connector of the same Korean brand. There aren't any junk yards around the area I live in, so eBay helped me out once again. I don't know the part number, but I'm sure it was used by Hyundai and Kia over many years for iterior lighting.

1673922654372.jpeg


I soldered 20 AWG wires to this connector and routed them to the Ford connector hiding behind the passenger's A-pillar plastic trim. The two wires I spliced feed power to the lamps in the sun visors.

I installed the lamp in the glove box while retroffiting the upfitter switches and adding a roof light bar. This video provides excellent instructions on how to disassamble the interior and get to the electrical connector on the A-pillar.


I'm super happy with the result. Now I can see the stuff lying in the glove box any time of the day. I hope this write up helps you bring more light into your Bronco.

1673922736615.jpeg


Apologies for any grammar or spelling mistakes – English is not my first language.
Skill 👏 👏 👏
Sponsored


WildTrak23

Wildtrak
Well-Known Member
First Name
James
Joined
Oct 24, 2022
Threads
24
Messages
246
Reaction score
359
Location
SW Missouri
Vehicle(s)
2016 Ford F150 FX4 Crew Cab Flame Blue
Your Bronco Model
Wildtrak
Clubs
 

CalvinT

Badlands
Well-Known Member
First Name
Calvin
Joined
Mar 15, 2022
Threads
16
Messages
2,455
Reaction score
3,083
Location
Phoenix, AZ
Vehicle(s)
2002 Subaru WRX Wagon, 2023 Badlands (nonSAS)
Your Bronco Model
Badlands
Clubs
 
The Hyundai lamp I used is often sold as a kit: a lamp, switch, and wire harness. Here are the numbers of all these parts: 92620-33000, 93510-21000, 91180-2D900. The kit cost me $19+tax.
Do you have either a part number or a source for the kit? I can't find the parts separately for less than $40.
 
OP
OP
2door

2door

Outer Banks
Well-Known Member
First Name
AA
Joined
Nov 16, 2022
Threads
46
Messages
791
Reaction score
3,128
Location
California
Vehicle(s)
2022 Bronco® The Sasquatch™ 2-door
Your Bronco Model
Outer Banks

CalvinT

Badlands
Well-Known Member
First Name
Calvin
Joined
Mar 15, 2022
Threads
16
Messages
2,455
Reaction score
3,083
Location
Phoenix, AZ
Vehicle(s)
2002 Subaru WRX Wagon, 2023 Badlands (nonSAS)
Your Bronco Model
Badlands
Clubs
 
Thanks. I found that but I have a problem with it. The seller says their for the 2012-2016 Velostar.. All my research indicates those parts weren't used on a Velostar. Not in the US anyway. Given that and a 80% approval rating I didn't want to trust the seller. I decided to pass and bought from a Hyundai parts distributor in the US. I'll consider the extra cost as insurance I'll get the right parts and a quicker delivery.
 

Sponsored

swamp2

Raptor
Well-Known Member
Joined
Dec 19, 2022
Threads
156
Messages
4,051
Reaction score
4,195
Location
San Diego
Vehicle(s)
911 Carrera S / 4Runner TRD Pro
Your Bronco Model
Raptor
Hi @2door . Pretty sure I already posted here but great thread and mod. I'm done with the switches but need to do the wiring. Do you recall if all of the panels and trim pieces in the video you posted must be removed if one is only doing the gb wiring and nothing with upfitter switches? Perhaps the removal of the roof panel and/or handle can be omitted still opening things up for the splice. TIA.
 
OP
OP
2door

2door

Outer Banks
Well-Known Member
First Name
AA
Joined
Nov 16, 2022
Threads
46
Messages
791
Reaction score
3,128
Location
California
Vehicle(s)
2022 Bronco® The Sasquatch™ 2-door
Your Bronco Model
Outer Banks
Hi @2door . Pretty sure I already posted here but great thread and mod. I'm done with the switches but need to do the wiring. Do you recall if all of the panels and trim pieces in the video you posted must be removed if one is only doing the gb wiring and nothing with upfitter switches? Perhaps the removal of the roof panel and/or handle can be omitted still opening things up for the splice. TIA.
Those trim panels overlap each other which makes it impossible to skip any steps. You're going to need to follow the instructions shown in the video between 4:45 and 9:45. Don't forget to disconnect the battery ;)
 

Steve_In_29

Wildtrak
Well-Known Member
First Name
Steve
Joined
Jul 6, 2025
Threads
8
Messages
457
Reaction score
609
Location
St Johns, Arizona
Vehicle(s)
2023 Bronco 2D, 1973 Bronco, 1999 Ranger, 2007 F350
Your Bronco Model
Wildtrak
Thanks. I'm glad people like my idea.

I used to own a 2012 Dodge Challenger R/T Classic. Those cars didn't come with a glovebox light from the factory, but there was a designated spot for the standard Chrysler unit. It seemed as if Dodge planned to install it at an early stage of development but rejected this idea later on for some reason.

If you ever come across a black 2012 Challenger with a lamp in the glovebox – that car used to be mine;)


IMG_20200229_162352.jpg


def2862b-7988-4f91-9644-a284eeb0df68.jpg
My 2007 F350 was similarly set up.

Had the spots for light and switch along with a connector in wiring harness but nothing was there. Ford parts had everything listed though so I ordered and added it
Sponsored


Top