Sponsored

TideTurner

Badlands
Active Member
Joined
Jan 19, 2024
Threads
2
Messages
26
Reaction score
14
Location
Massachusetts
Vehicle(s)
N/A
Your Bronco Model
Badlands
You simply need to let the front of the pan drop down and then rotate it to get it out.

You do not have to lift the transmission.
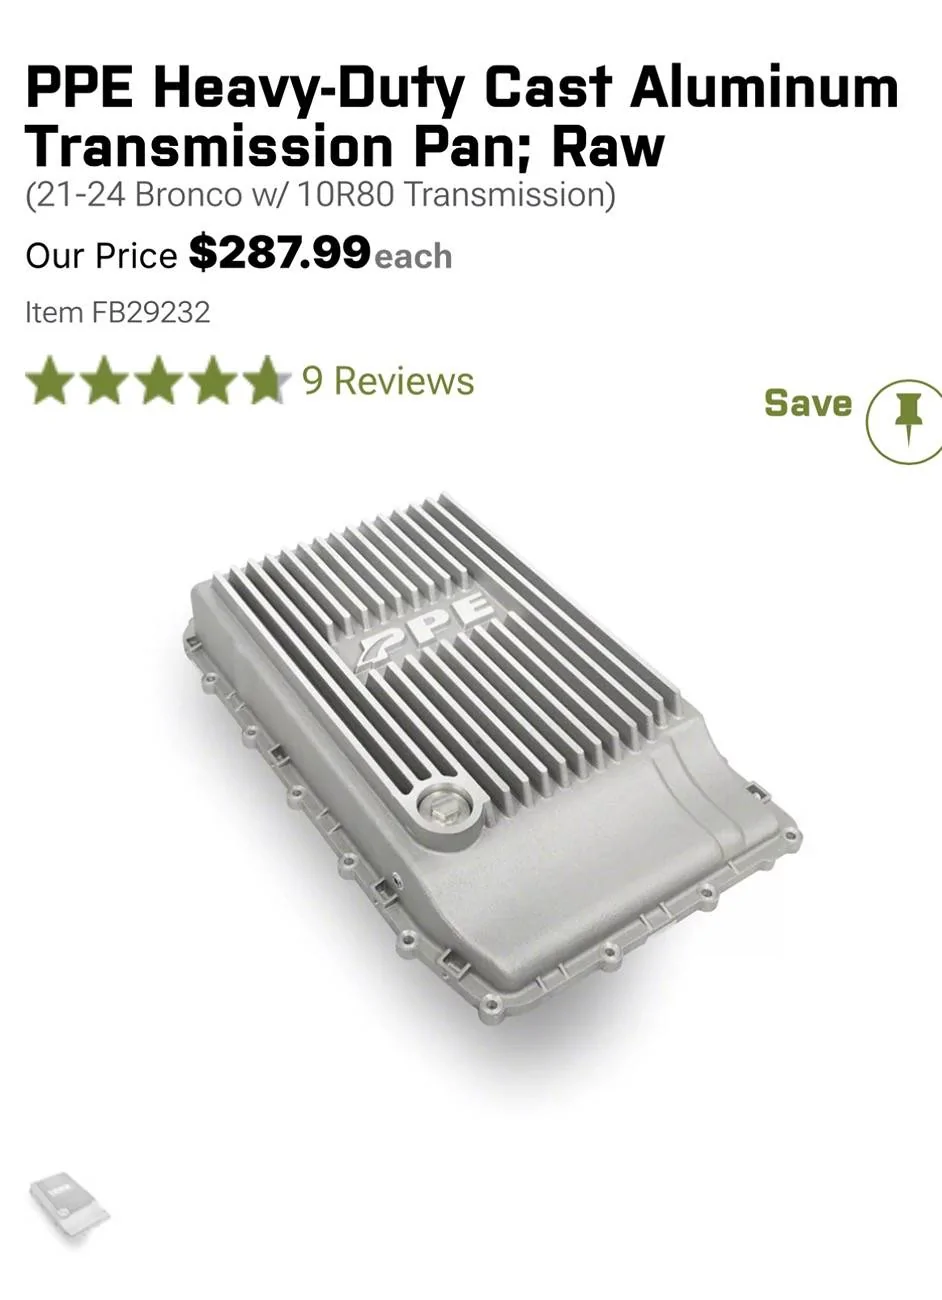
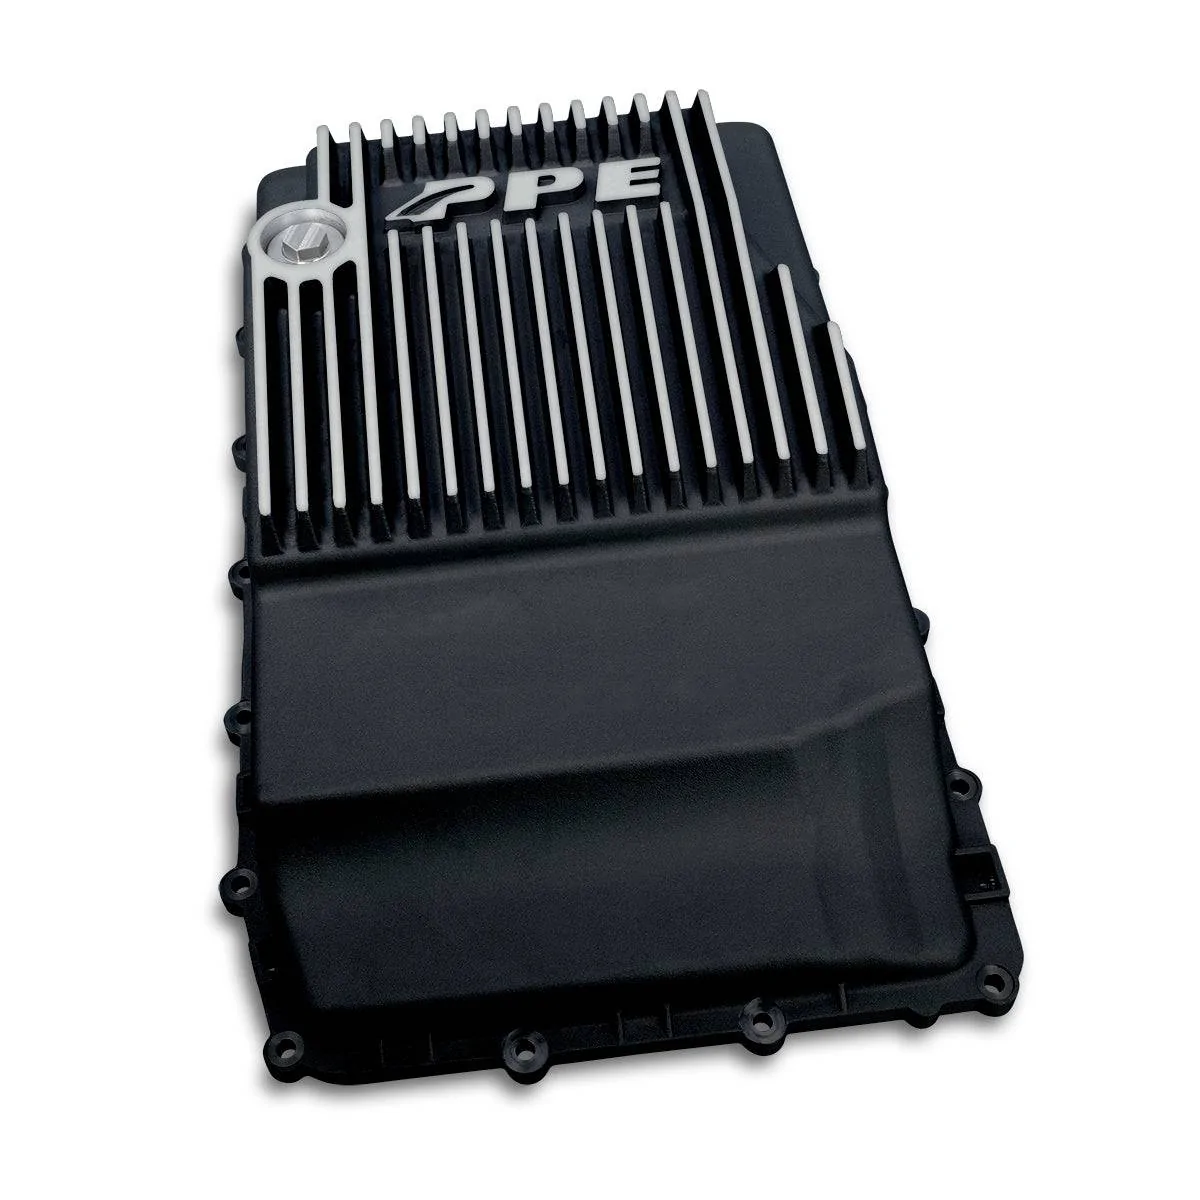
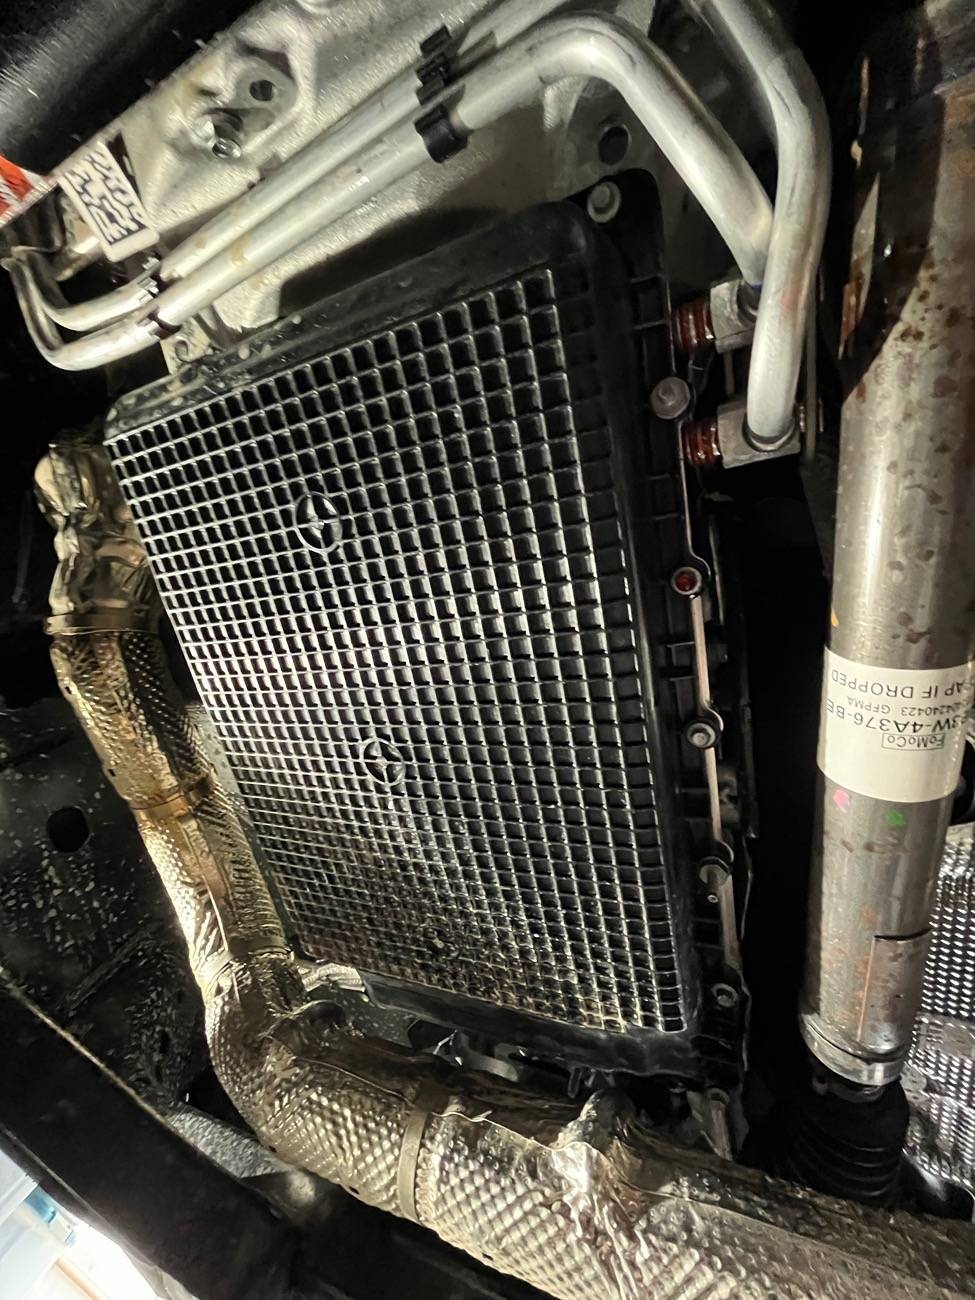
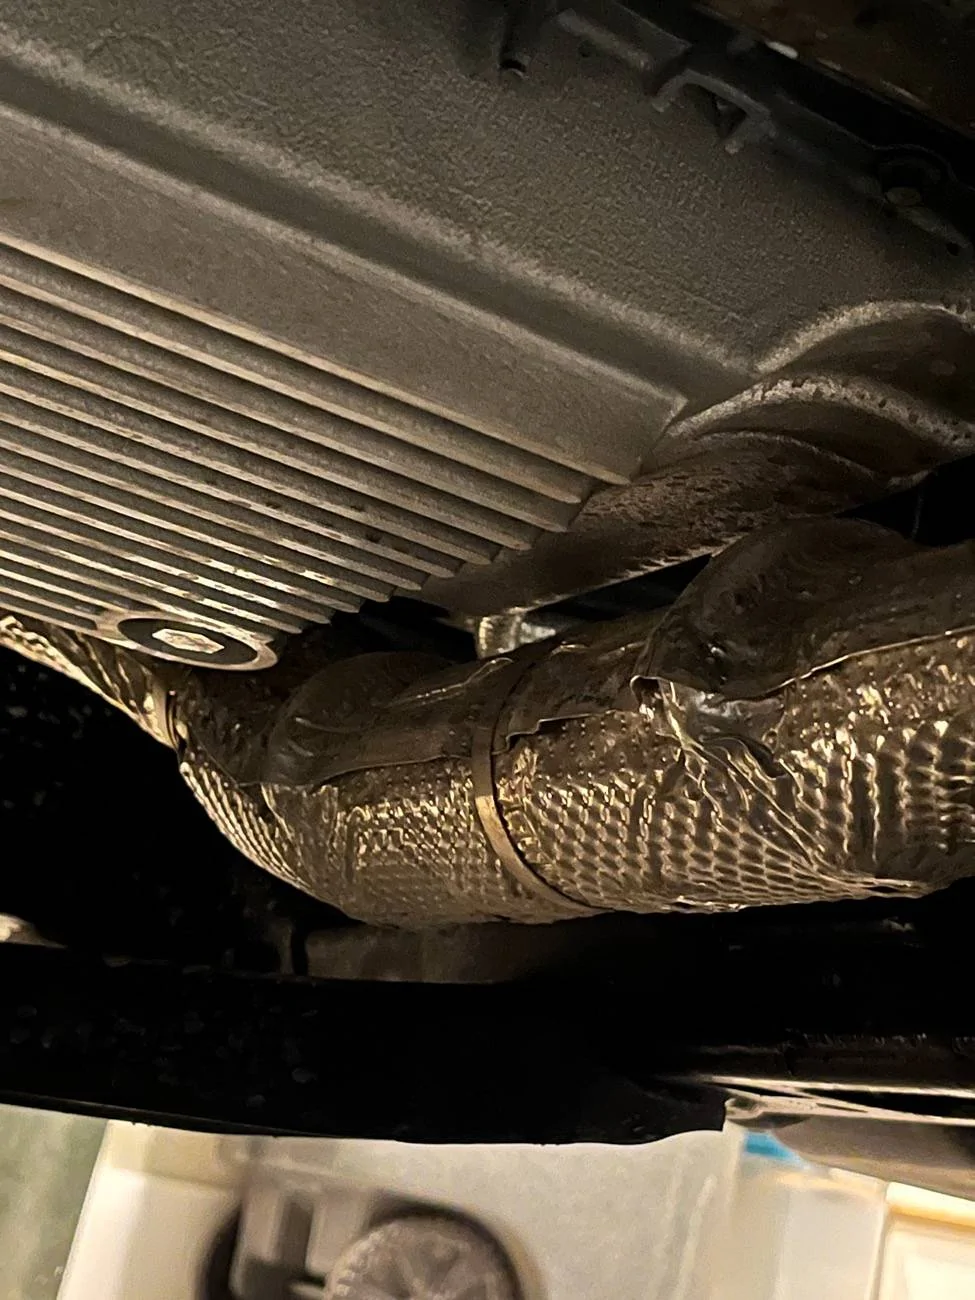
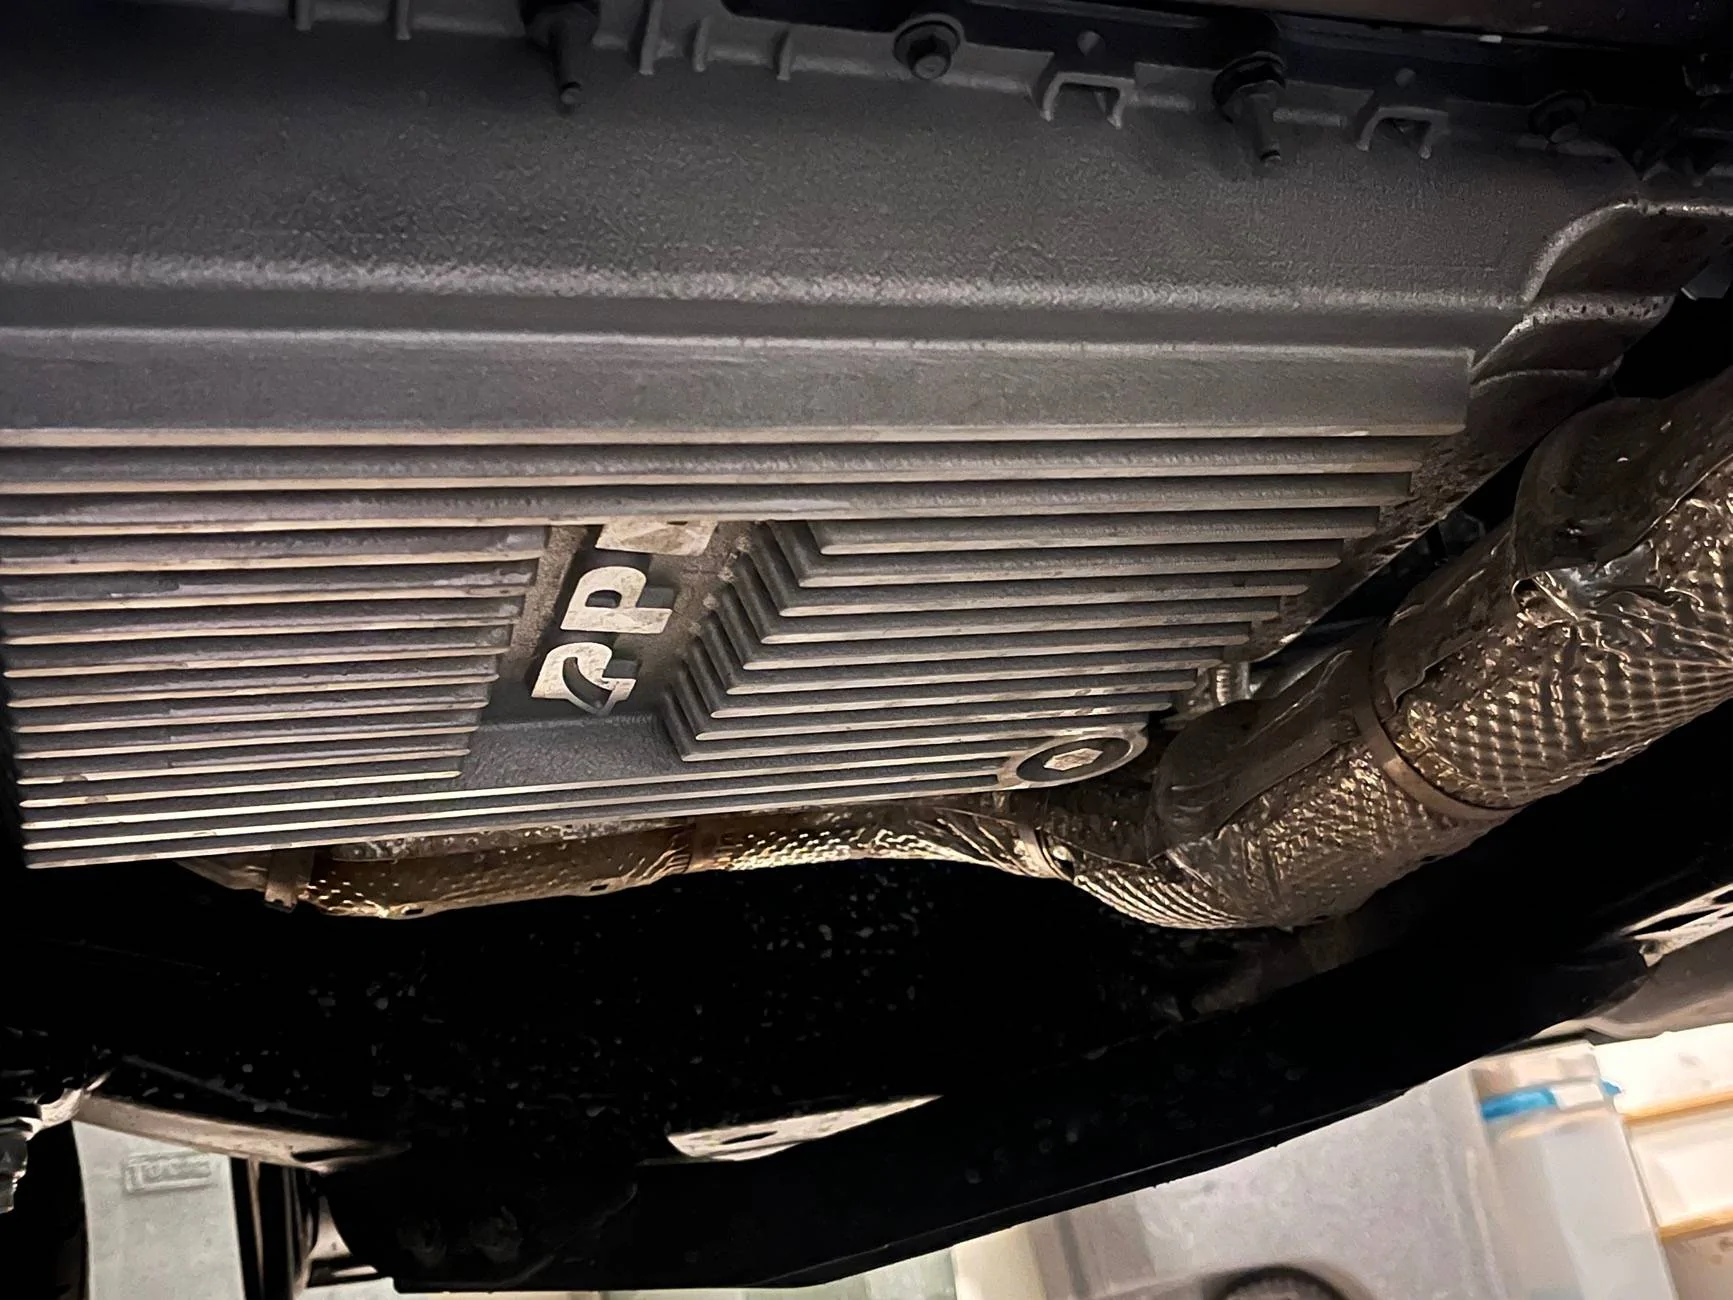
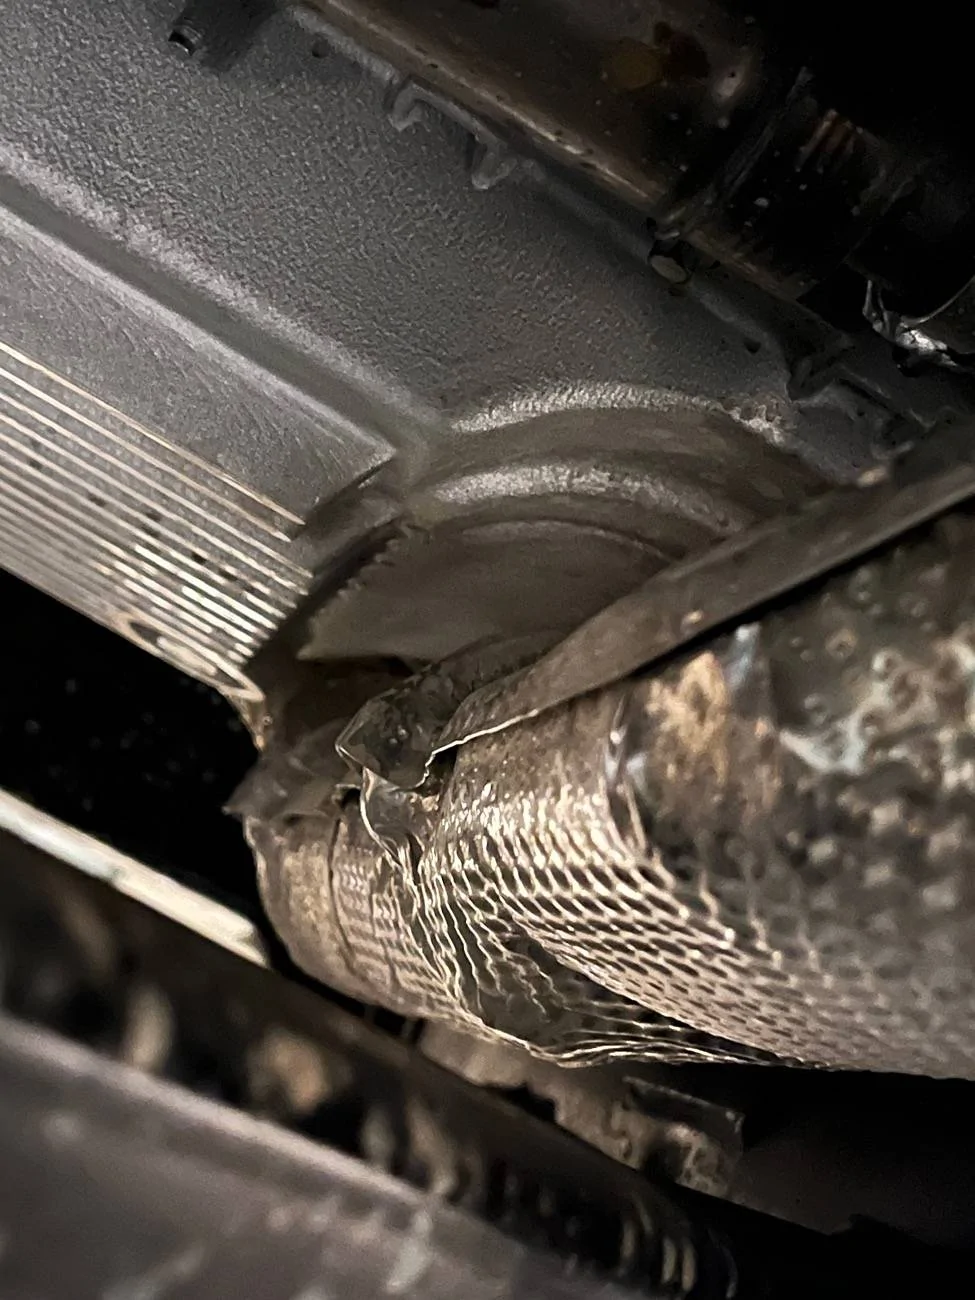
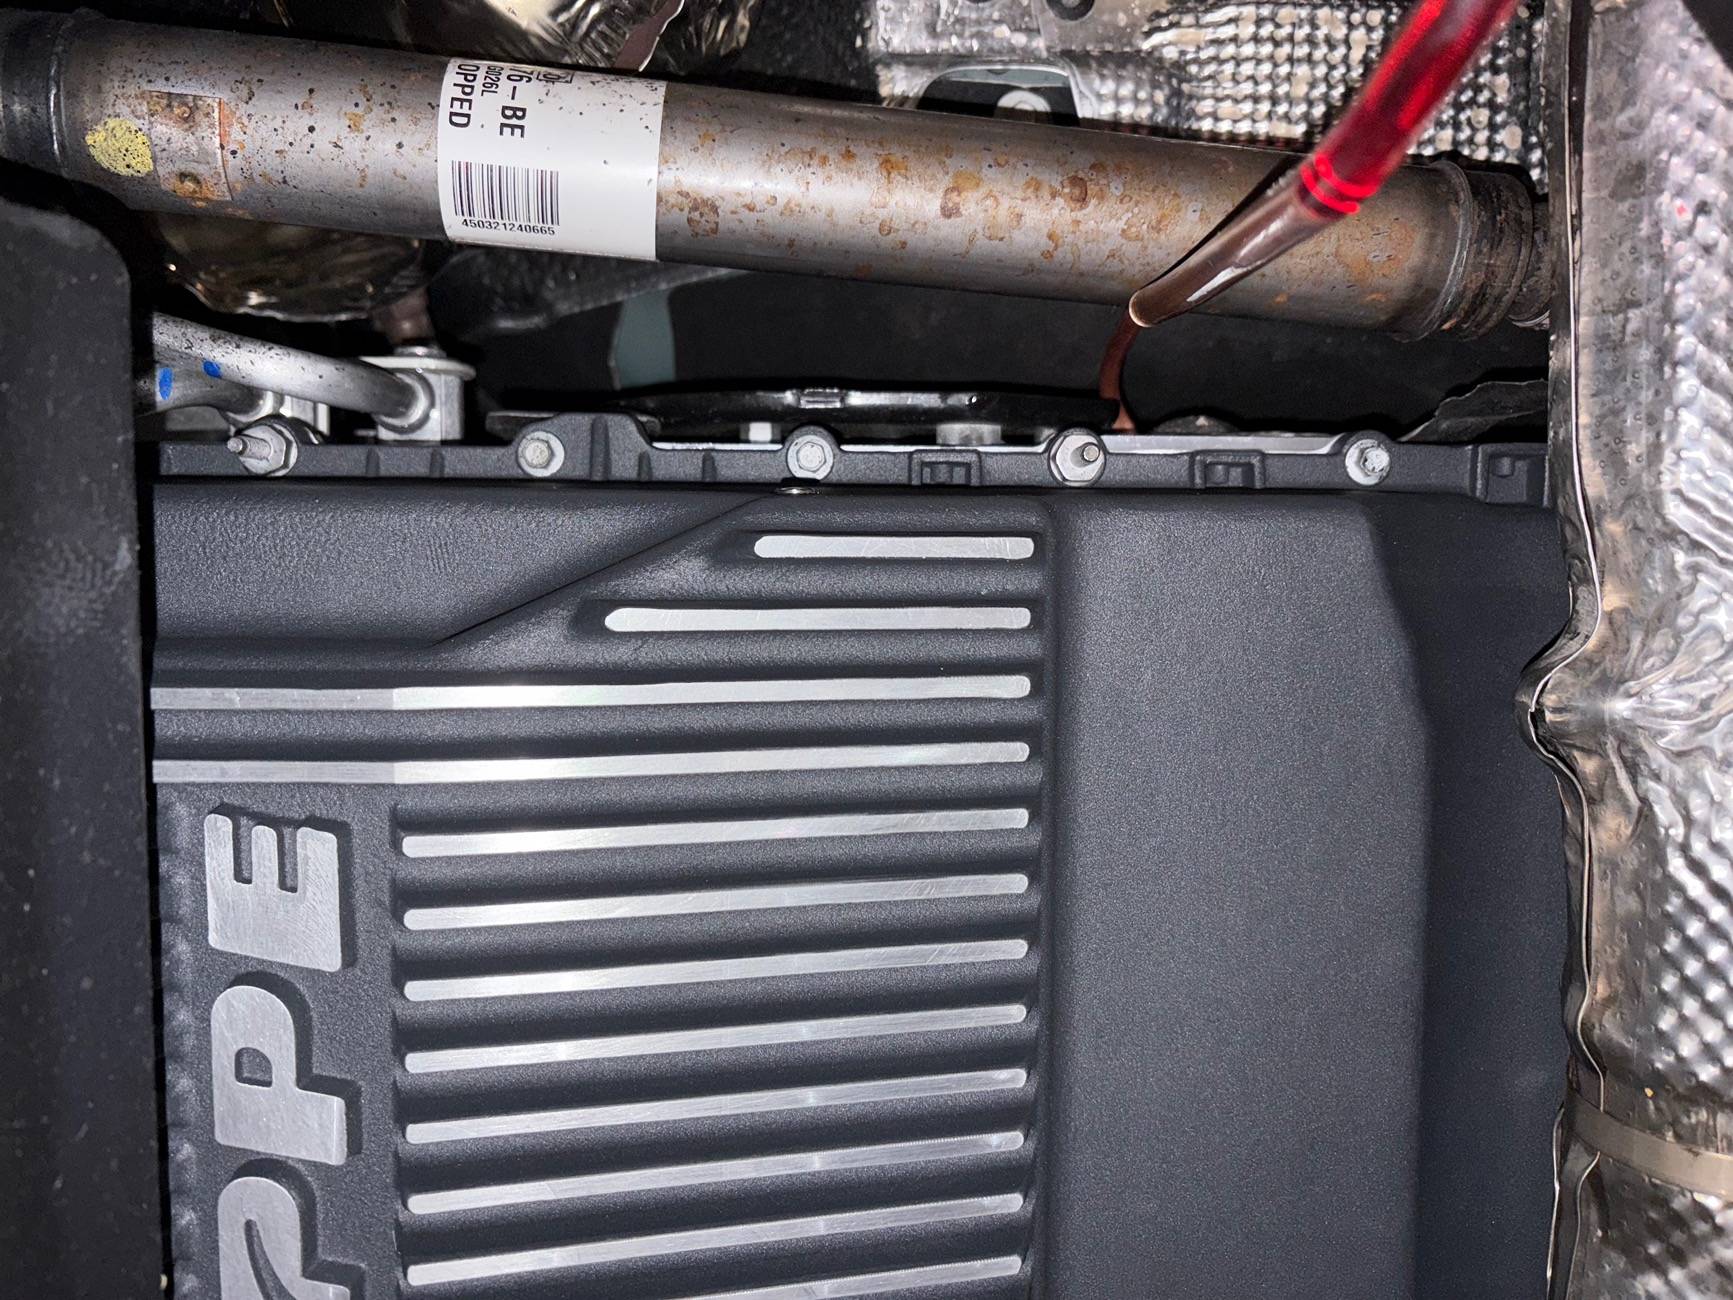
That’s what I thought, seems straightforward (maybe tight though). Was surprised @Nc211 said he needed to lift the trans to install and wondered if there was something I was missing, or maybe something with the deep PPE pan I was missing.
Sponsored


Nc211

Outer Banks
Well-Known Member
Joined
Dec 16, 2023
Threads
47
Messages
743
Reaction score
1,438
Location
Washington DC
Vehicle(s)
24 OBX, 20 GLS 450, 14 VW Tiquan
Your Bronco Model
Outer Banks
This is mine, not the deep pan. The exhaust basically sits right underneath the front curvature party of the pan. I don’t know if the deep pan is slightly different, but I had a difficult time getting mine to seat without the lifting. I was nervous about possibly bumping any of the internals of the transmission with turning it into place, as it was my first time doing it. Additionally will say that once I lifted it, this two corner bolts became a lot easier to manage and bolt back in. That front row of bolts were slightly tricky to navigate around the exhaust, with the two corners being the trickiest, just not a lot of room on mine because of the exhaust. The added couple of the inches made a nice difference.

On the bolts - BE CAREFUL on the torque. The pan does not call for a lot, and if like mine, you’ll likely feel how potentially easy it is to strip out the threads of the aluminum transmission housing. The PPE pan likely has the instructions on the cross pattern to follow to mount it as well.

Good luck and keep us posted!

Ford Bronco CarbonSteel's 2023 Wildtrak Build + Maintenance Journal (Filters, Fluids, Oil Changes Etc) IMG_4890
 
OP
OP
CarbonSteel

CarbonSteel

Wildtrak
Well-Known Member
Joined
Dec 11, 2020
Threads
38
Messages
1,050
Reaction score
1,823
Location
Colorado Springs
Vehicle(s)
2023 Carbonized Gray
Your Bronco Model
Wildtrak
This is the deep pan and it has the same front design:

Ford Bronco CarbonSteel's 2023 Wildtrak Build + Maintenance Journal (Filters, Fluids, Oil Changes Etc) 328053610-2small_1200x
 

Nc211

Outer Banks
Well-Known Member
Joined
Dec 16, 2023
Threads
47
Messages
743
Reaction score
1,438
Location
Washington DC
Vehicle(s)
24 OBX, 20 GLS 450, 14 VW Tiquan
Your Bronco Model
Outer Banks
Definitely looks the same! This is my oem pan as I was starting. Mine was getting snagged by that lump on the exhaust pipe that is wrapped up when trying to get it in there.

But think moral of the story between the two approaches - if you do need some extra room or just want some, it’s an easy thing to achieve. Just back out the two sunken mount bolts, grabs floor jack and a couple of pieces of a 2x4, and lift it up at the transfer case about two inches. Mount the new pan, lower back down and keep on keepin’ on!

I remember seeing some YouTube videos on this project and they mentioned having to lift it up, but I think they were F150’s instead. That’s where I got the idea.

Tide, when you start, one tip that helped me - take a picture of the original pan so you can see the bolt pattern. It may come in handy when putting the new one on to recall where what bolt goes where again. Saved me on my short term memory issues!

Ford Bronco CarbonSteel's 2023 Wildtrak Build + Maintenance Journal (Filters, Fluids, Oil Changes Etc) IMG_4551
 

TideTurner

Badlands
Active Member
Joined
Jan 19, 2024
Threads
2
Messages
26
Reaction score
14
Location
Massachusetts
Vehicle(s)
N/A
Your Bronco Model
Badlands
This is mine, not the deep pan. The exhaust basically sits right underneath the front curvature party of the pan. I don’t know if the deep pan is slightly different, but I had a difficult time getting mine to seat without the lifting. I was nervous about possibly bumping any of the internals of the transmission with turning it into place, as it was my first time doing it. Additionally will say that once I lifted it, this two corner bolts became a lot easier to manage and bolt back in. That front row of bolts were slightly tricky to navigate around the exhaust, with the two corners being the trickiest, just not a lot of room on mine because of the exhaust. The added couple of the inches made a nice difference.

On the bolts - BE CAREFUL on the torque. The pan does not call for a lot, and if like mine, you’ll likely feel how potentially easy it is to strip out the threads of the aluminum transmission housing. The PPE pan likely has the instructions on the cross pattern to follow to mount it as well.

Good luck and keep us posted!

IMG_4890.jpeg
Thanks for the clarification! I’ll probably install in the next week or two, just waiting on a few bolts to replace the studs per @CarbonSteel’s suggestion.

I’m paranoid about the bolt torque after breaking one installing my diff cover. I didn’t over tighten and despite following carbon’s suggestion on replacing bolts with the ford performance cover, I cut a corner and didn’t replace the studs and paid for that with a broken one…luckily was able to drill and back out then just used the original. That being said I plan to do the cross pattern and step up torque slowly, stripping the threads would be a bigger pain than a broken bolt.
 

Sponsored
OP
OP
CarbonSteel

CarbonSteel

Wildtrak
Well-Known Member
Joined
Dec 11, 2020
Threads
38
Messages
1,050
Reaction score
1,823
Location
Colorado Springs
Vehicle(s)
2023 Carbonized Gray
Your Bronco Model
Wildtrak
Definitely looks the same! This is my oem pan as I was starting. Mine was getting snagged by that lump on the exhaust pipe that is wrapped up when trying to get it in there.

But think moral of the story between the two approaches - if you do need some extra room or just want some, it’s an easy thing to achieve. Just back out the two sunken mount bolts, grabs floor jack and a couple of pieces of a 2x4, and lift it up at the transfer case about two inches. Mount the new pan, lower back down and keep on keepin’ on!

I remember seeing some YouTube videos on this project and they mentioned having to lift it up, but I think they were F150’s instead. That’s where I got the idea.

Tide, when you start, one tip that helped me - take a picture of the original pan so you can see the bolt pattern. It may come in handy when putting the new one on to recall where what bolt goes where again. Saved me on my short term memory issues!

IMG_4551.jpeg
On the deep pan, it's better to change all studs to bolts. You have to on the rear of the pan anyway.
 

Nc211

Outer Banks
Well-Known Member
Joined
Dec 16, 2023
Threads
47
Messages
743
Reaction score
1,438
Location
Washington DC
Vehicle(s)
24 OBX, 20 GLS 450, 14 VW Tiquan
Your Bronco Model
Outer Banks
Here’s a few more of the PPE pan installed (just took them). Has a few thousand miles on it now since then, all been fine.

Ford Bronco CarbonSteel's 2023 Wildtrak Build + Maintenance Journal (Filters, Fluids, Oil Changes Etc) IMG_4896


Ford Bronco CarbonSteel's 2023 Wildtrak Build + Maintenance Journal (Filters, Fluids, Oil Changes Etc) IMG_4892


Ford Bronco CarbonSteel's 2023 Wildtrak Build + Maintenance Journal (Filters, Fluids, Oil Changes Etc) IMG_4895
 

Nc211

Outer Banks
Well-Known Member
Joined
Dec 16, 2023
Threads
47
Messages
743
Reaction score
1,438
Location
Washington DC
Vehicle(s)
24 OBX, 20 GLS 450, 14 VW Tiquan
Your Bronco Model
Outer Banks
Thanks for the clarification! I’ll probably install in the next week or two, just waiting on a few bolts to replace the studs per @CarbonSteel’s suggestion.

I’m paranoid about the bolt torque after breaking one installing my diff cover. I didn’t over tighten and despite following carbon’s suggestion on replacing bolts with the ford performance cover, I cut a corner and didn’t replace the studs and paid for that with a broken one…luckily was able to drill and back out then just used the original. That being said I plan to do the cross pattern and step up torque slowly, stripping the threads would be a bigger pain than a broken bolt.
On my last car before the bronco, a 2014 Mercedes e350, the dealership stripped out a bolt as well. I bought it as a CPO in 2017. When it came time to do the transmission fluid, my Indi mechanic called to ask if I had done anything to the car, of which was a big fat no! I couldn't figure out heads/tails on that over-engineered maintenance nightmare. Told me one of the bolts was missing on the pan, and one was held on by some type of glue. Pulled the records, and sure enough, a shifting complaint filed by the previous owner and the dealership changed the fluid at 15k miles. I bought it with 20k miles. So, it definitely happens! Mine on the Bronco is "snug" and that's it. I think it's like 8nm? Or something along those lines? Not a lot.
 
OP
OP
CarbonSteel

CarbonSteel

Wildtrak
Well-Known Member
Joined
Dec 11, 2020
Threads
38
Messages
1,050
Reaction score
1,823
Location
Colorado Springs
Vehicle(s)
2023 Carbonized Gray
Your Bronco Model
Wildtrak
@TideTurner + @Nc211:

Here is a sheet I created of the torque values for most everything in a 2.7L Bronco:


I would use a inch pound torque wrench in a 1/4" drive size.
 

TideTurner

Badlands
Active Member
Joined
Jan 19, 2024
Threads
2
Messages
26
Reaction score
14
Location
Massachusetts
Vehicle(s)
N/A
Your Bronco Model
Badlands
So finally got the deep PPE pan installed. Took me all day today (with some breaks to get a Christmas tree) but all in all there weren’t many surprises on the install and went smoothly, just time consuming to do it right. The hardest parts are the parts you would need to do on any trans fluid fill on the Bronco - taking the fill cap off and then getting the fluid to the right level at the end.

This was the first time I took the fill / check cap off and it was a bear. On there tight with little room to work and probably took an hour finally get it off (I was really trying not to damage the plug but it’s still pretty chewed up). Once that was off, dropped the skids, unplugged and dropped the sway bar disconnect, and loosened the heat exchanger tubes (didn’t remove). Also, just unclipped the heat shield and didn’t remove (no idea why they tell you to…I did however break a clip so have to replace). Sucked the old fluid out with a Mityvac then got to dropping the pan. Some of the bolts are hard to reach but totally doable with patience. I was able to get the pan out without removing the heat exchanger by just loosening it and unclipping the plastic connectors that hold the two tubes together. It was tight but didn’t have to force it. Since I suctioned it, it was fairly clean. Replaced filter, filter seal, and gasket (because I got one in case but didn’t need to).

Fit of the new pan was great and no problems getting it up. Getting the bolts in is time consuming but I was working slow to ensure I did it right (torque and pattern). Again tight and I dropped one bolt in my frame but was luckily able to fish it out with some effort. I ended up keeping the studs because they do fit as long as you have a narrow socket but getting new standard bolts would keep you from needing to switch sockets (I was going to get all the same but misordered).

The hardest part for me was getting the fill right. My initial fill was 6.75 quarts which is the 5 ford calls for plus 1.75 extra in the deep pan. At idle this put me just on the dipstick under the 6 which the workshop manual says is safe to drive and warm up. It’s 40 degrees here so was tough to get the trans up to 206. After a 20 minute drive and some brake torquing I was only at 185 and decided to check where the fluid was…I was STILL below the 6 with barely any fluid on the dipstick. I did a bit more brake torquing to get the temp up and when I checked again there was NO fluid on the dipstick. Freaked me out and I immediately added another quart or two to get back between 5-6. Brake torqued some more and finally got the trans to 210, then it was back and forth probably 5 times filling and checking level. End of it all I used a little over 2 gallons to get between 3-4 (maybe 8.5 quarts? I’ll check tomorrow). I don’t know exactly what happened and why my fluid went down so much but I think maybe ford specking the 206 temp to check fluid ensures the fluid is expanded but it also ensures the heat exchanger kicks in (?). They say something about clearing air in the tubes and for me there must have been some air in there (was draining all day) so when I got near temp, that’s where the fluid went. Any better suggestions welcome (and no it wasn’t a leak). Either way, I’d be careful driving it to warm up and think I got lucky that I checked!

Went for a drive when it was done and she is shifting like butter so far. Happy I did it and will try to get some pics. But here are a few just to show clearance with stock skids. Thanks both @Nc211 and @CarbonSteel for the help!

Ford Bronco CarbonSteel's 2023 Wildtrak Build + Maintenance Journal (Filters, Fluids, Oil Changes Etc) IMG_0119


Ford Bronco CarbonSteel's 2023 Wildtrak Build + Maintenance Journal (Filters, Fluids, Oil Changes Etc) IMG_0118


Ford Bronco CarbonSteel's 2023 Wildtrak Build + Maintenance Journal (Filters, Fluids, Oil Changes Etc) IMG_0114
 
Last edited:

Sponsored
OP
OP
CarbonSteel

CarbonSteel

Wildtrak
Well-Known Member
Joined
Dec 11, 2020
Threads
38
Messages
1,050
Reaction score
1,823
Location
Colorado Springs
Vehicle(s)
2023 Carbonized Gray
Your Bronco Model
Wildtrak
UOA #6 added to the sheet on the first page. Fuel dilution is at its highest level, but is likely caused from the remote warm-up starts that I have done during this OCI and the 30-mile round trip commute that happens 3-4 times per week.

I will attempt to validate that by not using remote start during this new run (despite entering winter here in CO) and see if that is what is contributing to the dilution. If not, then I likely have a leaking injector, though mixed driving MPG remains at 19.0MPG
 

Big Pony

Wildtrak
Well-Known Member
Joined
Jan 10, 2023
Threads
1
Messages
146
Reaction score
100
Location
San Diego
Vehicle(s)
Subaru Ascent LTD '20
Your Bronco Model
Wildtrak
UOA #6 added to the sheet on the first page. Fuel dilution is at its highest level, but is likely caused from the remote warm-up starts that I have done during this OCI and the 30-mile round trip commute that happens 3-4 times per week.

I will attempt to validate that by not using remote start during this new run (despite entering winter here in CO) and see if that is what is contributing to the dilution. If not, then I likely have a leaking injector, though mixed driving MPG remains at 19.0MPG
Interesting. Do you think the idle time from remote start really is a contributing factor? I am about 2K miles until my next oil change and have also been using remote start daily for the last month or so. My commute is super short. It takes me 4 minutes to get to work and I have noticed my mpg go down from 18+ to 15.1 over the past 2 months. I am also filling up about once a month now. I wonder if my issue’s culprit is what you describe. Keep us posted!
 
OP
OP
CarbonSteel

CarbonSteel

Wildtrak
Well-Known Member
Joined
Dec 11, 2020
Threads
38
Messages
1,050
Reaction score
1,823
Location
Colorado Springs
Vehicle(s)
2023 Carbonized Gray
Your Bronco Model
Wildtrak
Interesting. Do you think the idle time from remote start really is a contributing factor? I am about 2K miles until my next oil change and have also been using remote start daily for the last month or so. My commute is super short. It takes me 4 minutes to get to work and I have noticed my mpg go down from 18+ to 15.1 over the past 2 months. I am also filling up about once a month now. I wonder if my issue’s culprit is what you describe. Keep us posted!
I think that it will contribute and when combined with the short(er) trips that I am doing these days (and yours are even shorter), dilution is somewhat inevitable. I have a very mild concern that I have a leaking injector, but that is not probable given the low mileage (I am at 20K).

I have not been on a longer trip in it in a while and that would help some because the oil will be at higher temperatures for a longer period of time and that will cause some, but not all, of the fuel to burn off.

With the colder temperatures happening in CO since late September, I am not seeing the 195F+ oil temperatures I did earlier in the summer. I will stop doing remote starts for this OCI (not a good time of the year to stop though!) and see how that helps.

The oil had a definitive gasoline smell to it and I suspected the dilution was going to be high. The iOLM showed that I had 57% oil life remaining--never trust the iOLM.
 

2021FordBronco2

Big Bend
Well-Known Member
First Name
Jo
Joined
Nov 17, 2020
Threads
40
Messages
482
Reaction score
428
Location
Nampa, ID
Vehicle(s)
2024 Ford Bronco Big Bend
Your Bronco Model
Big Bend
Clubs
 
While I have no plans to go to the depth I did on the JL Wrangler I had, I will post upgrades/improvements I add over time.

Sharing the sheet that I use to track UOA data. I do this on all vehicles that I invest in. Overkill for most, but it is a hobby for me and for the Wrangler provided data that I had a coolant leak long before any traditional method would have detected it.

The sheet has UOAs (used oil analysis) and VOAs (virgin oil analysis) in it as well. When trending, it is important to start with a baseline for the oil that you use so that you can see how it is changing as miles are stacked on.

Link To 2023 Wildtrak UOAs

If I were to replace the trans pan with a standard depth PPE pan, how many quarters should I put in?
 

Nc211

Outer Banks
Well-Known Member
Joined
Dec 16, 2023
Threads
47
Messages
743
Reaction score
1,438
Location
Washington DC
Vehicle(s)
24 OBX, 20 GLS 450, 14 VW Tiquan
Your Bronco Model
Outer Banks
If I were to replace the trans pan with a standard depth PPE pan, how many quarters should I put in?
When I did mine, fluid cold, I put in 6 of the motocraft quarts (and 5-10 ounces of Lubeguard Red). I had it checked recently at the dealer to make sure I had it right, and it checked out fine, read on the stick between 3-4 on their official warmed up test. Mine is very smooth, other than the usual ultra low speed clunks that we all suffer from. Accelerating and decelerating, I feel no shifts. Feels almost like a CVT thanks to 10 gears when accelerating.

That said though, I also replaced the filter, which certainly absorbed some of it. If you're going to do the pan, I do highly recommend getting a new filter as well.
Sponsored


Top