
Sponsored

ARB single compressor and American Adventure Lab Tailgate mount.

OP
OP
Ninjak

Ninjak

Raptor
Well-Known Member
First Name
David
Joined
Feb 19, 2022
Threads
28
Messages
2,769
Reaction score
4,755
Location
Miami
Vehicle(s)
2024 Bronco Raptor 68 Mustang GTA 2024 Mustang Dark Horse
Your Bronco Model
Raptor
Hang in there! A good sleep and a fresh start tomorrow will get you over the finish line!

It was some time ago so I am struggling to remember exactly what I did. Hopefully the following will help:

- the assembly was a tight fit but not impossible. A few of us here have done it with no cutting.

- make make sure your wiring in the cavity is well tucked away.

- practice putting the unit (AAL plate and compressor) in the cavity without the wiring or brackets attached. This was an important step for me because it assured me that the unit would go in as designed.

- "pre-screw" all the screws into both brackets on the bench (I recall the bracket holes being too tight and a tiny bit misaligned - putting the screws in and out helped make the the final assembly easier. One screw ended up going in on an angle because of the misalignment.

One statement in the instructions helped:
  • With the nut plate loosely installed on the right side, lift the assembly up and lead it into place starting with the left side. Once flat against the tailgate start but do not tighten the first two screws on the left and then the right, making sure to align the nut plate and verify that it is behind the lip on the gate. Once this is verified, remove the tape and tighten the screws.
However, I recall the key was to also keep the LHS bracket loose. I only had one screw (loose) holding it onto the tailgate. I pressed the unit in and got one "long" screw started on the LHS. Then I started to align and start all the screws. I believe I worked the LHS into place before finishing with the RHS. But this is where I forget the detail!

What I do remember is that pre-fitting the unit and leaving the LHS bracket loose were the tricks for me.

Hope this helps in some way.
I'll try fitting it in without the wires attached and see what happens. It still seems though that the part of the compressor is hitting that middle parts of the Bronco. Though too, the RHS does not seem to sit flat, and when it does, it is to high.

I'll give it another try today, and see what happens.
Sponsored

 
OP
OP
Ninjak

Ninjak

Raptor
Well-Known Member
First Name
David
Joined
Feb 19, 2022
Threads
28
Messages
2,769
Reaction score
4,755
Location
Miami
Vehicle(s)
2024 Bronco Raptor 68 Mustang GTA 2024 Mustang Dark Horse
Your Bronco Model
Raptor
Well, I was met with failure again :( I gave a call over to AAL and sent pictures, called in again, and they are telling me they will get back to me. From some talk in the background it seems my compressor is sticking out too far?
So some of the things I attempted was to grind down/cut where it was hitting. Well its still hitting there. No way I can take any more off. I have considered cutting out the lower-angle shelf so I have more room to come down, as it seems I am sitting too high. Ugh.

This indeed has not been fun. Never mind the scratches on my tailgate, but meh I can fix it with touch-up paint. I just want the bloody thing to go in at this point.
 

paperboy

Badlands
Well-Known Member
First Name
Nelson
Joined
Nov 20, 2021
Threads
0
Messages
149
Reaction score
229
Location
Vancouver, BC
Vehicle(s)
2019 Passport
Your Bronco Model
Badlands
Well, I was met with failure again :( I gave a call over to AAL and sent pictures, called in again, and they are telling me they will get back to me. From some talk in the background it seems my compressor is sticking out too far?

So some of the things I attempted was to grind down/cut where it was hitting. Well its still hitting there. No way I can take any more off. I have considered cutting out the lower-angle shelf so I have more room to come down, as it seems I am sitting too high. Ugh.

This indeed has not been fun. Never mind the scratches on my tailgate, but meh I can fix it with touch-up paint. I just want the bloody thing to go in at this point.
Sorry to hear - maybe you received something different? One can hopefully assume the tailgate and cavity are identical to all Broncos.

I found the photos in the thread of sadiki2527 very helpful (second link in post #2). Those photos helped me discover the incorrect parts that AAL originally sent me.

Maybe you can identify any differences with your set-up?

I wish you good luck.
 
OP
OP
Ninjak

Ninjak

Raptor
Well-Known Member
First Name
David
Joined
Feb 19, 2022
Threads
28
Messages
2,769
Reaction score
4,755
Location
Miami
Vehicle(s)
2024 Bronco Raptor 68 Mustang GTA 2024 Mustang Dark Horse
Your Bronco Model
Raptor
Well, better news today. ITS IN!!!! So since I STILL HAVE NOT RECEIVED ANY SUPPORT from AAL, I decided, well "I'm an Engineer, I can figure this out." So I did what all Engineers do, start over and reverse it.

I took everything apart and just went with the mount lid and the inside mounts. I wanted to see if something was off. Measured, and I took down the distance to the edges. I put the mount on and was able to secure it. I then marked it all with painter's tape to make a outline of where it goes. I then took the ARB alone and put it in the space. I could see where it could hit, and what little room I had. Doing this though, I now understood where and how it had to be adjusted. The tailgate locking system was the issue here.

I put everything back together and slowly adjusted the cylinder and the tbar air pressure coupler until finally! it went in, not perfect, but I was lined up with the tape. Put the screws in and mounted it all. Needed some adjustments, but FINALLY, it mounted up. Now I took the wires and connected everything. Slowly put it back in and now with the tape, and adjustments, it was easier to line it up. Got it in and tightened it down loosely so it could hold. YES!!! But of course.........

Started the vehicle, went to the app, and the first thing I noticed was the compressor turning on and off. Hmmm........hooked up and hose and no air.........looked at the voltage on the app, it read 8.5. Pulled it out double double-checked triple-checked the wires, and still the same thing. Took it out and redid the ground to the Pressure control unit, same thing. Well not really, not it will not turn on!!!! Lights are on, nobody is home.

So it's dark again. At least I can take away the fact that it is now in. Also, I know exactly how to mount it on the plate to get it in. I'll get back at it tomorrow, hopefully, ARB support will be better than AAL's.......

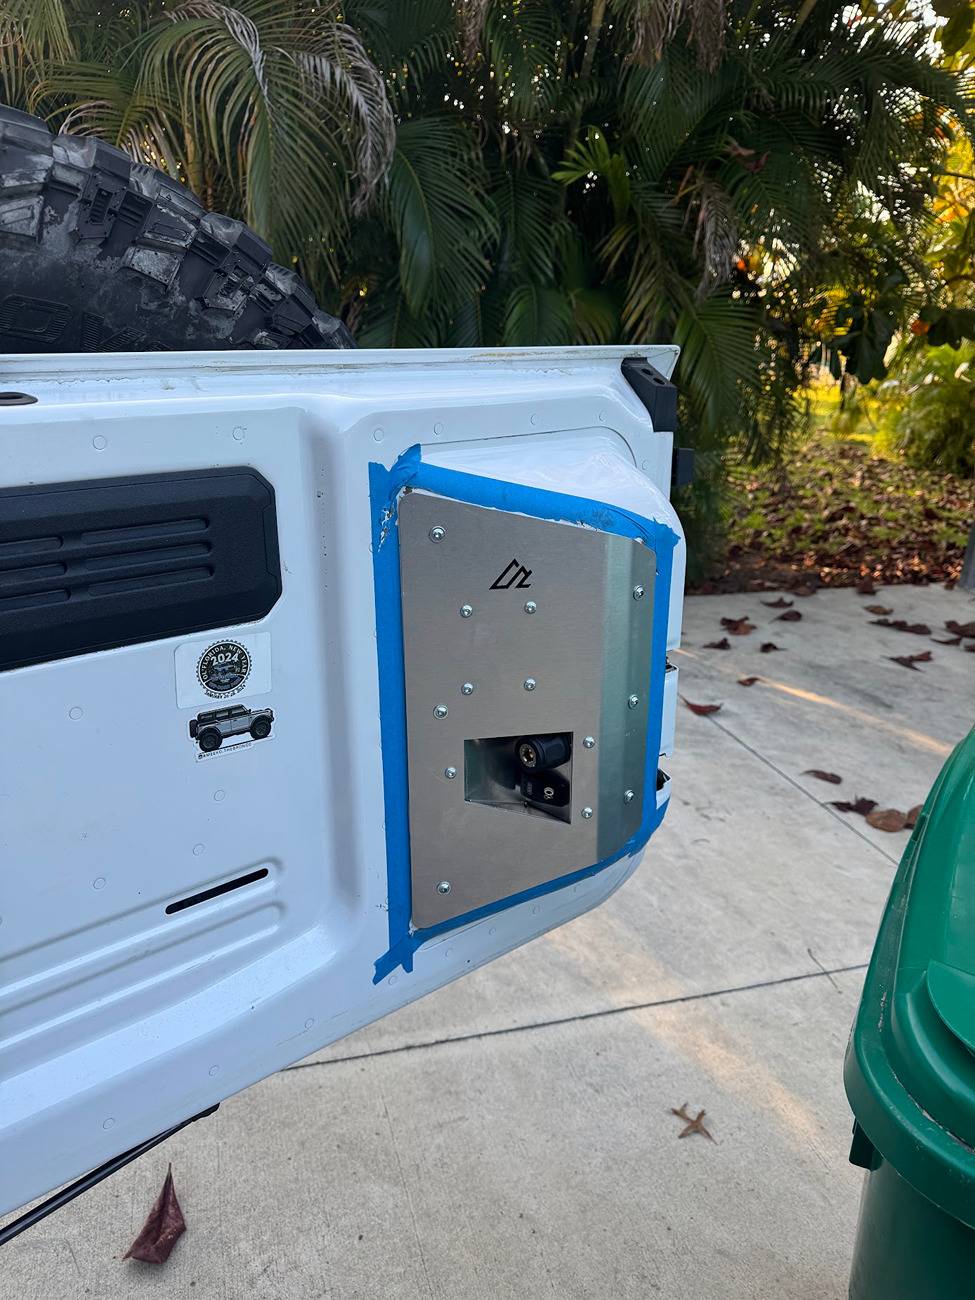
Ford Bronco ARB single compressor and American Adventure Lab Tailgate mount. 1738716305750-8q
 

paperboy

Badlands
Well-Known Member
First Name
Nelson
Joined
Nov 20, 2021
Threads
0
Messages
149
Reaction score
229
Location
Vancouver, BC
Vehicle(s)
2019 Passport
Your Bronco Model
Badlands
Well, better news today. ITS IN!!!! So since I STILL HAVE NOT RECEIVED ANY SUPPORT from AAL, I decided, well "I'm an Engineer, I can figure this out." So I did what all Engineers do, start over and reverse it.

I took everything apart and just went with the mount lid and the inside mounts. I wanted to see if something was off. Measured, and I took down the distance to the edges. I put the mount on and was able to secure it. I then marked it all with painter's tape to make a outline of where it goes. I then took the ARB alone and put it in the space. I could see where it could hit, and what little room I had. Doing this though, I now understood where and how it had to be adjusted. The tailgate locking system was the issue here.

I put everything back together and slowly adjusted the cylinder and the tbar air pressure coupler until finally! it went in, not perfect, but I was lined up with the tape. Put the screws in and mounted it all. Needed some adjustments, but FINALLY, it mounted up. Now I took the wires and connected everything. Slowly put it back in and now with the tape, and adjustments, it was easier to line it up. Got it in and tightened it down loosely so it could hold. YES!!! But of course.........

Started the vehicle, went to the app, and the first thing I noticed was the compressor turning on and off. Hmmm........hooked up and hose and no air.........looked at the voltage on the app, it read 8.5. Pulled it out double double-checked triple-checked the wires, and still the same thing. Took it out and redid the ground to the Pressure control unit, same thing. Well not really, not it will not turn on!!!! Lights are on, nobody is home.

So it's dark again. At least I can take away the fact that it is now in. Also, I know exactly how to mount it on the plate to get it in. I'll get back at it tomorrow, hopefully, ARB support will be better than AAL's.......

1738716305750-8q.jpg
Great perseverance getting that to fit!

You said the compressor was running in post #13 so another sleep and fresh eyes will figure it out tomorrow.
 

Sponsored
OP
OP
Ninjak

Ninjak

Raptor
Well-Known Member
First Name
David
Joined
Feb 19, 2022
Threads
28
Messages
2,769
Reaction score
4,755
Location
Miami
Vehicle(s)
2024 Bronco Raptor 68 Mustang GTA 2024 Mustang Dark Horse
Your Bronco Model
Raptor
Update!

So, I have it in, and the compressor works. It seems my pressure control module was faulty. After talking with some people who know these items well, and ARB, the module for the pressure control was shorting. So ARB is going to send me a new one.

I spoke with AAL, I am now known as the compressor guy there...(lol), and told them to calm down, I have it in. I requested some new screws and bolts as taking it on and off, the bolts supplied with the star front, well yeah they are not going to hold up and they will strip. So they agreed to send me some nice new pretty bolts/screws. I also purchased some touch up paint to fix the scratches on my tailgate from when I was trying to mount.

All in all, yes it was a pain, but I am happy with the end result. I have the EZ-Flate hose system, and I hooked up just one side and tested it. Air down, easy, air up, easy. With the app, it will be a simple set and go do something else. It may not be as fast as a dual compressor, but it will get the job done and I'm not taking up any space.

My last part of this will be to get the ol laptop out and set the forscan setting for the 12v plug to 5~10 mins after the power is off. Not really worried about hitting the power button on for the compressor, it is reset pretty deep. Just a bit of maintenance.

With the pain out of the way, I will say the AAL system is a bit of thinking out of the box. With MUCH BETTER INSTRUCTIONS, it would not be a bad install. The cubby in the tailgate is unused space, also it gets air, so running the compressor in that space is not bad. You are usually working on things at the back of your RIG anyway, so it works out.

The newest mount has the latest ARB air chuck, so that's nice. Also, the new harness AAL made is truly wonderful. Even if you suck at electrical things, the cable is not hard to figure out. That part of the instructions they got right, as the ARB switch is numbered, so all you need to do is follow it. The thin red separate cable (It's not taped bundled with the rest)is the one that is spliced to the RED/WHITE 12V harness behind the passenger panel. You plug the red and black power into a clip included, and you are good to go.

Now the parts that are not in the instructions: Or at least I did not get it:
1. There were NO INSTRUCTIONS on how to mount the pressure control system. I relied on pictures and posts to figure it out.

2. It is VERY IMPORTANT how to ORIENTATE the compressor to get it in that tight spot. If you do not have the cylinder and the T-bar clinoid at the correct angles, it will never fit in. AAL has ZERO mention of this, they do talk about using a spacer that they include to set the height, but it is the air piece that is the problem. You can have the height, but if that piece is not rotated at the correct angle.......yeah you will end up like I did, frustrated, very frustrated thinking why or why did I buy this. The best thing to do is leave it loose slightly so that when you push in the bottom, then move it right, that part will turn to fit. Pull it out, and NOW tighten the cylinder.

3. Going back to step two, if you purchase the Pressure Control Module, STEP 2 is even tougher. Because the extra parts are now on the bottom, you will hit the slant of the cubby. So it is even more important to get it lined up. Also because of the way the hoses run, you need to get those lined up in a way they can move, because of the rotation of the tank, and the air pressure switch.
You can still employ part two, you just do not have as much adjustment.

I suggest that anyone now looking at this and deciding to perhaps purchase, follow these tips to prevent massive amounts of pain and frustration.

1. Align the plate and the bracket to your rig before mounting the compressor. My plate and left mounting were slightly off. By doing this, I was able to line it up and get the screws in and out of it. Also, drop a little bit of grease to help the screws go in easier.
2. Fit your compressor to that spot WITHOUT the plate mount. This way you can see/feel how the cylinder needs to be rotated to clear. It will give you a better perspective on just where you start, then you can make small adjustments if needed. Step 2 above though works well once you have an idea of where it needs to be.
3. TAPE UP THE AREA. It will help avoid scratches, but more importantly, it will give you a template of exactly where the plate will line up with your screw-in mount. It is very hard to eyeball it, so the tape you know if you are inside of that outline, then you are lined up. I used some blue painter's tape.
4. To get the compressor in, you need to angle it FORWARD, then up, to the right, and down in place. Yes, it's crazy, but that is how it happens. Also know that at the bottom, there will be some resistance. Make sure you get it ALL THE WAY RIGHT at the bottom. With or without the pressure system, you will need to really get it over there, and get the bottom screw in. If you have a helper it will be easier. Also, make sure that the right plate is on and loose. Once you get it there, it will be the part that sandwiches the tailgate frame and will help hold it. You can slightly tighten the middle left screw to help hold things together. Once you have in the bottom, then put in the top, then middles. When you tighten them down, tighten the middle, then the top, then the bottom. Do this to the left and right. Do not do one side than the other. Do them in tandem.

Well, that is all I can think of. As I said, once it's in, it works great. Save space, and is practical. with my Armadillo top, the gullwing storage is the perfect place to keep my air-up hoses. So now I will wait for my new pressure control, and screws/bolts and it will be all good. Have to say ARB support was great. Finally, the saga of the compressor has finished. LOL
 

masshole

Badlands
Well-Known Member
Joined
Nov 21, 2023
Threads
11
Messages
71
Reaction score
106
Location
Boston, MA
Vehicle(s)
24 Bronco
Your Bronco Model
Badlands
Clubs
 
Has anyone tried this with the new ARB brushless? TIA!
 

4x4TruckLEDs.com

Outer Banks
Well-Known Member
Squatch Sponsor (Level 3)
First Name
Adam
Joined
Aug 30, 2021
Threads
553
Messages
6,152
Reaction score
7,045
Location
Lindenhurst, NY
Website
www.4x4TruckLEDs.com
Vehicle(s)
2018 Raptor & 2021 Bronco Outer Banks
Your Bronco Model
Outer Banks
Clubs
 
Has anyone tried this with the new ARB brushless? TIA!
Most likely won't fit because of the different in brackets + wiring. I'd also not recommend this place for an air compressor. It's such a pain in the neck installation. I'll never do another one. We only installed it for a customer because he was an existing customer of ours. But what a pain in the neck install it was.

No fault of Adventure Lab, it's just so much to fit in such a small space.
 

murphtron

Badlands
Well-Known Member
First Name
T
Joined
Mar 11, 2021
Threads
19
Messages
594
Reaction score
752
Location
Berkeley, CA
Vehicle(s)
2023 Badlands, 2013 Toyota Highlander, 2000 Miata
Your Bronco Model
Badlands
Clubs
 
Most likely won't fit because of the different in brackets + wiring. I'd also not recommend this place for an air compressor. It's such a pain in the neck installation. I'll never do another one. We only installed it for a customer because he was an existing customer of ours. But what a pain in the neck install it was.

No fault of Adventure Lab, it's just so much to fit in such a small space.
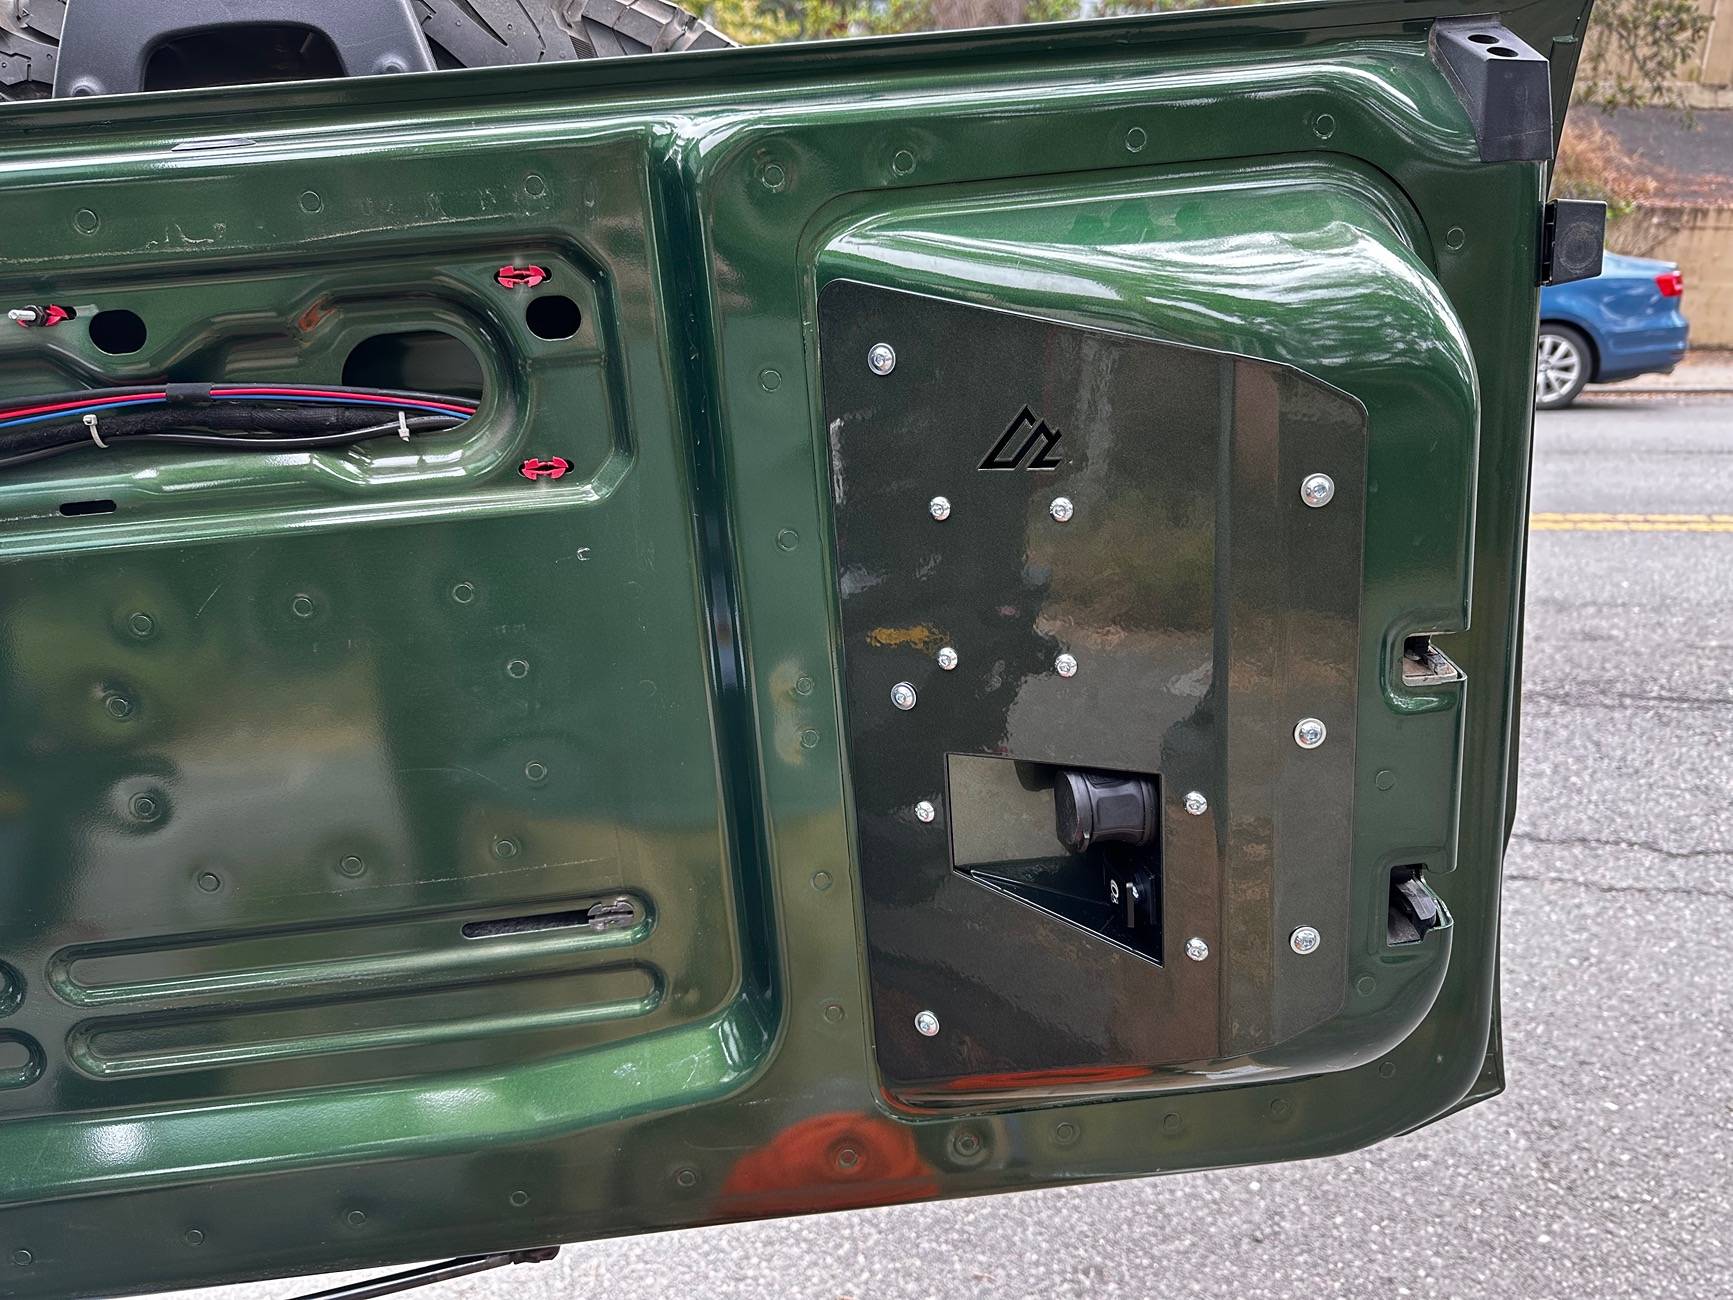
I don’t think it’s fair to trash the install process. I did it and I’m just a guy with a small garage and a few tools. The only challenging part was the final step: fitting the bracket onto the the tailgate. But that still only took a few minutes.

without question my favorite mod and I still get a feeling of joy each time I use it. And even just showing it to people. It’s a badass place to hide a single ARB.

Ford Bronco ARB single compressor and American Adventure Lab Tailgate mount. IMG_5300
 
OP
OP
Ninjak

Ninjak

Raptor
Well-Known Member
First Name
David
Joined
Feb 19, 2022
Threads
28
Messages
2,769
Reaction score
4,755
Location
Miami
Vehicle(s)
2024 Bronco Raptor 68 Mustang GTA 2024 Mustang Dark Horse
Your Bronco Model
Raptor
Will agree with @murphtron. When I first did the process, it was indeed a pain, also their instructions are not up to speed. With their harness, it does take some of the harder parts out if you are not electrician savvy...lol, but I did find the secret sauce and could easily install this again, as a matter of fact, I am going to do it for a friend.

What makes this a pain is the space behind the locking mechanism for the rear door. You have to have the ARB at the precise correct angle for it to fit. What I found is to leave it a little loose, so that when you fit it into that space, it will adjust on it own. It's also good to do this WITHOUT attaching it to the mounting plate. Once you have the correct angle, tighten it down, put it on the plate, apply the plate to the tape-off section, and everything will line up.

I did this even using the AIR component attached to the compressor, and honestly, it was even easier without it. The space is small, but once you learn that little piece, it is not bad at all. AAL should take the time to write up instructions that would help the installers out. That in itself would be a great help.

Lol I forgot to answer the question! @masshole : I do not think it would work? The mounting brackets on the brushless are a little different now, so they probably would be misaligned with the AAL bracket. The new harness, I think, would not be that big of a deal; it would still plug in and connect to the same place as the OG harness on the Bronco from that location. So in the end, it would be on ALL to line up their mount to fit the new setup. AAL may answer whether or not they could drill some extra holes in their plate.
 
Last edited:

masshole

Badlands
Well-Known Member
Joined
Nov 21, 2023
Threads
11
Messages
71
Reaction score
106
Location
Boston, MA
Vehicle(s)
24 Bronco
Your Bronco Model
Badlands
Clubs
 
Lol I forgot to answer the question! @masshole : I do not think it would work? The mounting brackets on the brushless are a little different now, so they probably would be misaligned with the AAL bracket. The new harness, I think, would not be that big of a deal; it would still plug in and connect to the same place as the OG harness on the Bronco from that location. So in the end, it would be on ALL to line up their mount to fit the new setup. AAL may answer whether or not they could drill some extra holes in their plate.
Thanks!
Sponsored


Top