
Sponsored

Icetek

Big Bend
Well-Known Member
First Name
Mike
Joined
Apr 2, 2025
Threads
6
Messages
84
Reaction score
64
Location
Oeiras Portugal
Vehicle(s)
2012 BMW F21, 2024 Harley Road Glide, 2009 Harley Street Glide
Your Bronco Model
Big Bend
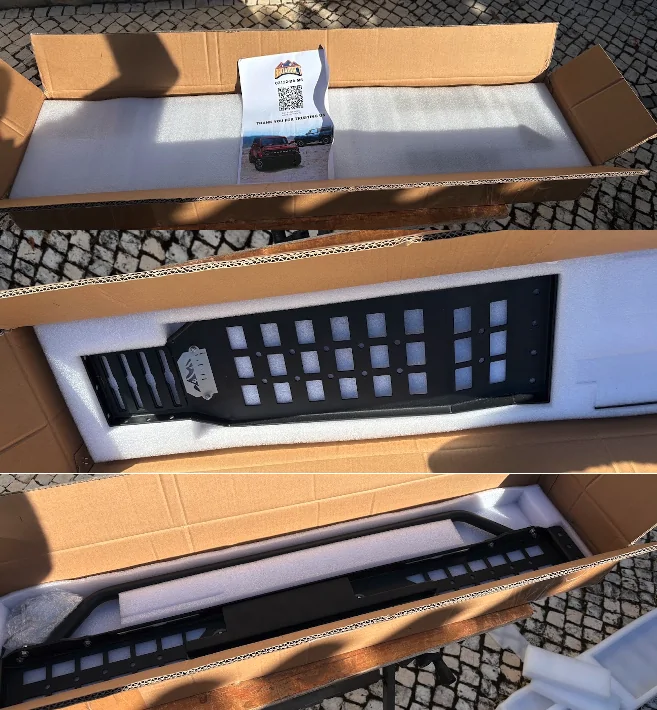
I purchased the BroAddict Overhead Molle Rack from Amazon with the $50 off coupon: $190. I installed it yesterday. I've not driven the Bronco with it yet, but it seems to be a decent product.

It came well packaged and protected:

1788106777648-cn.webp

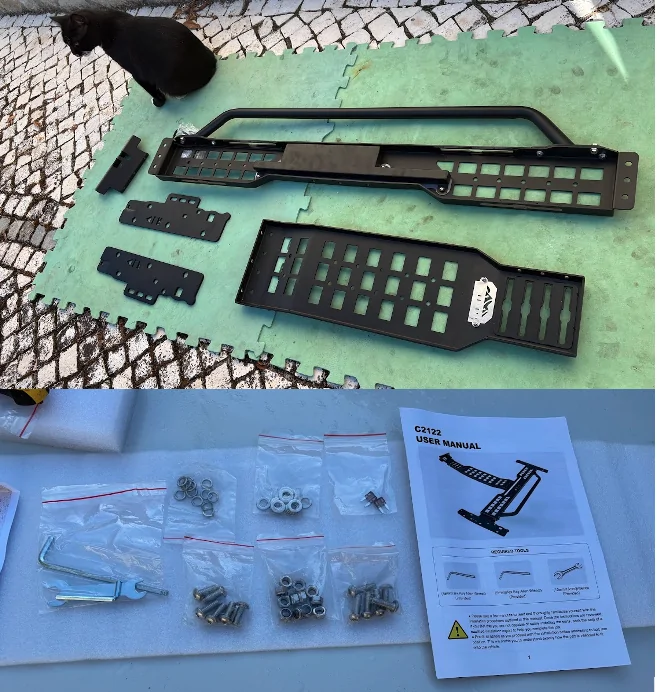
All pieces and parts. (cat is not included)
1788106945616-ri.webp

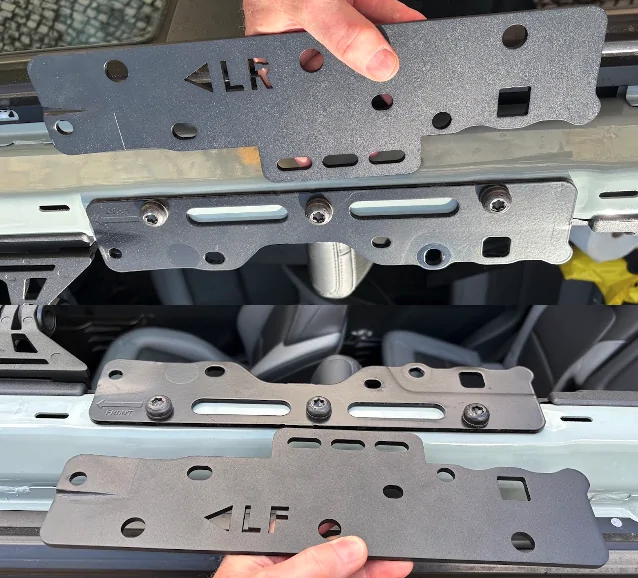
OEM and New Crossbeam brackets. T50 Torx for the bolts.
- Keep bolts loose for now
1788107021205-je.webp

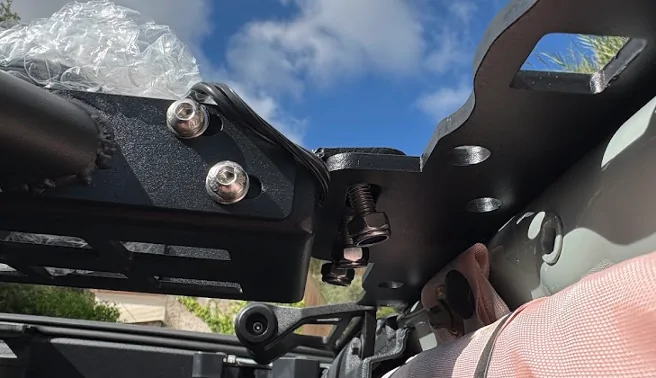
5mm Allen Key and 13mm socket with short extension or a deep socket for these.
- Keep bolts loose for now
1788107087119-e9.webp

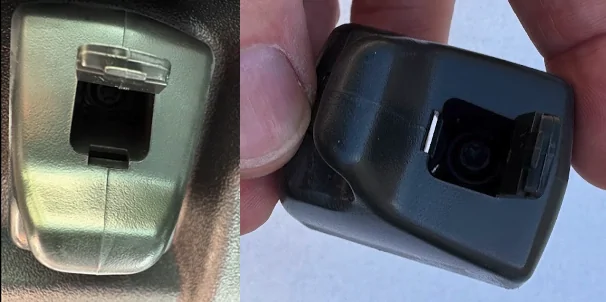
For the Sun Visor clips there are small 'doors' on them that you need to use a small screwdriver or pick to open. Inside is a T15 Torx bolt. I did not remove the whole visor, just this part and swung the visors out of the way.
1788107162334-fr.webp

Two clips hold the center trim in and a firm pull down will release them giving you access to the two T50 Torx bolts here. I left the bolts loose until I put everything together.
- I did not trim the plastic as the 2 clips seemed to clip in and the visor screws help hold it all together but will see if it comes loose or not. Doesn't seem like a big job to trim a little off here if needed.
1788107484195-mb.webp

Found an Easter Egg I did not know about in the process. Just behind the front grab handle
1788107551870-6h.webp


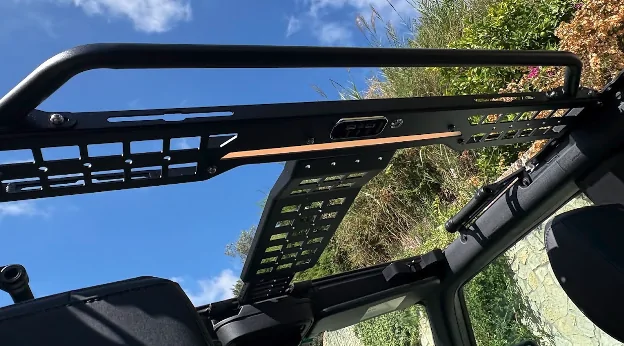
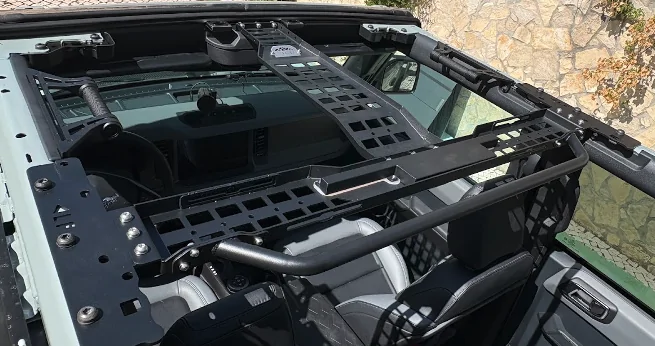
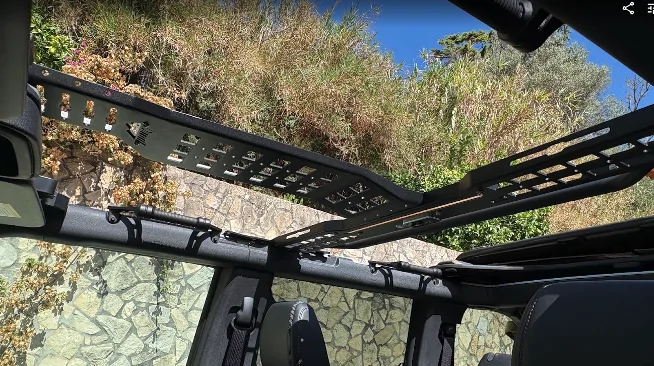
Installed
1788107591419-rk.webp

1788107617125-to.webp

1788107644867-du.webp


Some notes:

Instructions on page 4 state to ‘reinstall interior light’ with an image of it being put back in but never mention taking it out. The video on the Amazon page also shows it out. I tried to use a trim tool to pop it out and ended up damaging the 2 small metal clips that hold the light into the plastic trim. Not sure how it is supposed to come out other than removing the whole trim piece which means removing the rear roof to get access to the screws.
  • I ended up pulling the plastic trim piece down as much as possible to access the connector (and try to fix the metal clips – no joy on the clips)
  • The cable with the fuse socket on it is now loose in the trim piece. Not sure if it will rattle or not
Before tightening everything up try to put the middle roof panel on to see if the 2 side clamps mate with the square holes in the new crossbeam brackets. I tightened everything up but then found that mine was off by a just enough (too wide) to cause binding on one side that made the clamp super tight and started to damage the rubber coating on the hook (I did not force it fully closed)
  • I loosened up the 6 T50 bolts and one side of the crossmember to push the crossbeam brackets towards the middle to make it work.

Tools required:
T50 Torx
T15 Torx
Small flathead screwdriver to pop open the ‘door’ in the sun visor mount
5mm Allen Key
13mm socket with extension or 13mm deep socket
8mm socket for the trim piece removal to route the light wire
Sponsored

 
OP
OP
BA OffRoad

BA OffRoad

Badlands
Well-Known Member
Squatch Sponsor (Level 3)
Joined
Jul 18, 2023
Threads
260
Messages
630
Reaction score
590
Location
New York
Website
www.broaddict.com
Vehicle(s)
Bronco Badlands
Your Bronco Model
Badlands
3 of us. I just installed mine yesterday. Black hardware (and also black power button and USB trim??) would be great!!! I'll write up a short installation post next.
Added.
Really looking forward to your installation write-up.
 
OP
OP
BA OffRoad

BA OffRoad

Badlands
Well-Known Member
Squatch Sponsor (Level 3)
Joined
Jul 18, 2023
Threads
260
Messages
630
Reaction score
590
Location
New York
Website
www.broaddict.com
Vehicle(s)
Bronco Badlands
Your Bronco Model
Badlands
If I may be so bold, how about rewarding the two us with a retro kit
Haha, fair request 😄 We can’t promise a free retrofit kit just yet, but I’ve definitely noted your name and passed the idea along to the team. Early adopters deserve some consideration when we plan future upgrade options.
 
OP
OP
BA OffRoad

BA OffRoad

Badlands
Well-Known Member
Squatch Sponsor (Level 3)
Joined
Jul 18, 2023
Threads
260
Messages
630
Reaction score
590
Location
New York
Website
www.broaddict.com
Vehicle(s)
Bronco Badlands
Your Bronco Model
Badlands
I purchased the BroAddict Overhead Molle Rack from Amazon with the $50 off coupon: $190. I installed it yesterday. I've not driven the Bronco with it yet, but it seems to be a decent product.

It came well packaged and protected:

1788106777648-cn.webp

All pieces and parts. (cat is not included)
1788106945616-ri.webp

OEM and New Crossbeam brackets. T50 Torx for the bolts.
- Keep bolts loose for now
1788107021205-je.webp

5mm Allen Key and 13mm socket with short extension or a deep socket for these.
- Keep bolts loose for now
1788107087119-e9.webp

For the Sun Visor clips there are small 'doors' on them that you need to use a small screwdriver or pick to open. Inside is a T15 Torx bolt. I did not remove the whole visor, just this part and swung the visors out of the way.
1788107162334-fr.webp

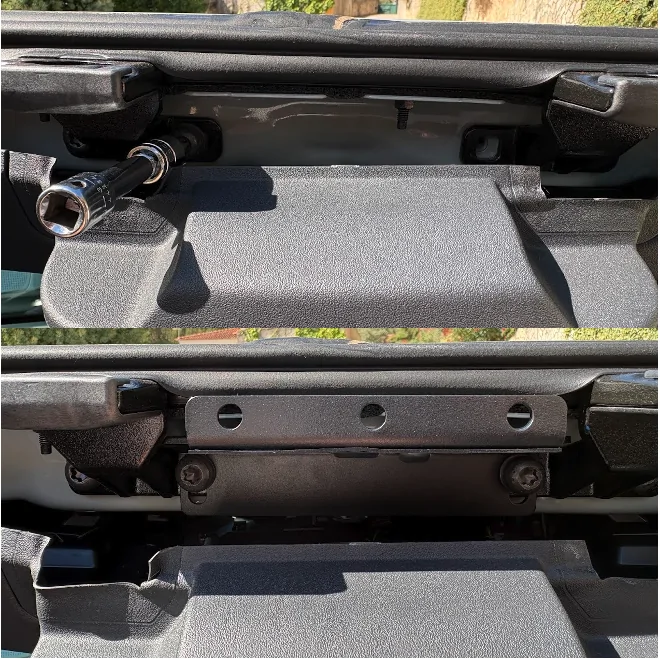
Two clips hold the center trim in and a firm pull down will release them giving you access to the two T50 Torx bolts here. I left the bolts loose until I put everything together.
- I did not trim the plastic as the 2 clips seemed to clip in and the visor screws help hold it all together but will see if it comes loose or not. Doesn't seem like a big job to trim a little off here if needed.
1788107484195-mb.webp

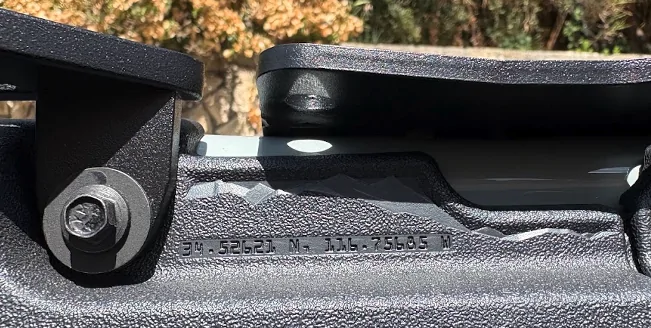
Found an Easter Egg I did not know about in the process. Just behind the front grab handle
1788107551870-6h.webp


Installed
1788107591419-rk.webp

1788107617125-to.webp

1788107644867-du.webp


Some notes:

Instructions on page 4 state to ‘reinstall interior light’ with an image of it being put back in but never mention taking it out. The video on the Amazon page also shows it out. I tried to use a trim tool to pop it out and ended up damaging the 2 small metal clips that hold the light into the plastic trim. Not sure how it is supposed to come out other than removing the whole trim piece which means removing the rear roof to get access to the screws.
  • I ended up pulling the plastic trim piece down as much as possible to access the connector (and try to fix the metal clips – no joy on the clips)
  • The cable with the fuse socket on it is now loose in the trim piece. Not sure if it will rattle or not
Before tightening everything up try to put the middle roof panel on to see if the 2 side clamps mate with the square holes in the new crossbeam brackets. I tightened everything up but then found that mine was off by a just enough (too wide) to cause binding on one side that made the clamp super tight and started to damage the rubber coating on the hook (I did not force it fully closed)
  • I loosened up the 6 T50 bolts and one side of the crossmember to push the crossbeam brackets towards the middle to make it work.

Tools required:
T50 Torx
T15 Torx
Small flathead screwdriver to pop open the ‘door’ in the sun visor mount
5mm Allen Key
13mm socket with extension or 13mm deep socket
8mm socket for the trim piece removal to route the light wire
This is incredibly helpful — thank you for taking the time to document the install in this much detail, especially the steps that weren’t clear in our current instructions.

We’ve already passed your notes to our product and documentation teams. In particular, we’ll be reviewing:

  • The missing step for removing/reinstalling the interior light
  • A better way to secure the fuse/wiring inside the trim to avoid possible rattles
  • Adding a clear reminder to test-fit the middle roof panel and clamps before final tightening
  • Updating the complete required-tool list
  • Clarifying the bracket-alignment sequence so owners don’t discover binding after everything is torqued down
Your note about keeping the bolts loose until everything is aligned is exactly the kind of real-world detail that makes an installation guide actually useful.

Sorry about the damaged light clips during the process — that’s precisely the kind of issue we want better instructions to prevent.

Once you’ve had some road and trail time with it, we’d really appreciate an update on rattles, roof-panel operation, and overall stability. Thanks again for giving us something specific to improve rather than just saying “the instructions could be better.”
 
OP
OP
BA OffRoad

BA OffRoad

Badlands
Well-Known Member
Squatch Sponsor (Level 3)
Joined
Jul 18, 2023
Threads
260
Messages
630
Reaction score
590
Location
New York
Website
www.broaddict.com
Vehicle(s)
Bronco Badlands
Your Bronco Model
Badlands
I purchased the BroAddict Overhead Molle Rack from Amazon with the $50 off coupon: $190. I installed it yesterday. I've not driven the Bronco with it yet, but it seems to be a decent product.

It came well packaged and protected:

1788106777648-cn.webp

All pieces and parts. (cat is not included)
1788106945616-ri.webp

OEM and New Crossbeam brackets. T50 Torx for the bolts.
- Keep bolts loose for now
1788107021205-je.webp

5mm Allen Key and 13mm socket with short extension or a deep socket for these.
- Keep bolts loose for now
1788107087119-e9.webp

For the Sun Visor clips there are small 'doors' on them that you need to use a small screwdriver or pick to open. Inside is a T15 Torx bolt. I did not remove the whole visor, just this part and swung the visors out of the way.
1788107162334-fr.webp

Two clips hold the center trim in and a firm pull down will release them giving you access to the two T50 Torx bolts here. I left the bolts loose until I put everything together.
- I did not trim the plastic as the 2 clips seemed to clip in and the visor screws help hold it all together but will see if it comes loose or not. Doesn't seem like a big job to trim a little off here if needed.
1788107484195-mb.webp

Found an Easter Egg I did not know about in the process. Just behind the front grab handle
1788107551870-6h.webp


Installed
1788107591419-rk.webp

1788107617125-to.webp

1788107644867-du.webp


Some notes:

Instructions on page 4 state to ‘reinstall interior light’ with an image of it being put back in but never mention taking it out. The video on the Amazon page also shows it out. I tried to use a trim tool to pop it out and ended up damaging the 2 small metal clips that hold the light into the plastic trim. Not sure how it is supposed to come out other than removing the whole trim piece which means removing the rear roof to get access to the screws.
  • I ended up pulling the plastic trim piece down as much as possible to access the connector (and try to fix the metal clips – no joy on the clips)
  • The cable with the fuse socket on it is now loose in the trim piece. Not sure if it will rattle or not
Before tightening everything up try to put the middle roof panel on to see if the 2 side clamps mate with the square holes in the new crossbeam brackets. I tightened everything up but then found that mine was off by a just enough (too wide) to cause binding on one side that made the clamp super tight and started to damage the rubber coating on the hook (I did not force it fully closed)
  • I loosened up the 6 T50 bolts and one side of the crossmember to push the crossbeam brackets towards the middle to make it work.

Tools required:
T50 Torx
T15 Torx
Small flathead screwdriver to pop open the ‘door’ in the sun visor mount
5mm Allen Key
13mm socket with extension or 13mm deep socket
8mm socket for the trim piece removal to route the light wire
Also, if you have a moment, we’d really appreciate it if you could leave an honest review on the platform where you purchased the product. Detailed owner feedback like yours helps other Bronco owners know what to expect and helps us improve the product at the same time.

And as a thank-you for taking the time to share such useful installation feedback, I’ve specially requested a gift card for you. Please keep an eye on your private messages — I’ll send you the details there.

Thanks again for supporting Broaddict and for helping us make the installation experience better for the next owner.
Sponsored


Top